Pull Print Coach
Last Updated: October 08, 2026
Set Up Pull Print
Complete each section in order. The next section unlocks once you finish the one before it.
Before You Begin
Review the following requirements:
- Admin Console administrator access.
- A configured identity provider. For more details refer to Identity Providers (IdPs).
-
The number of printers with Pull Print turned on must be equal to or less than the number of Pull Print licenses purchased. Keep this requirement in mind when turning on Pull Print by default for all printers.
An error appears during the next Admin Console sign-on if you have more printers than Pull Print licenses.
- You can view license details by selecting your username in the upper-right corner of the Admin Console and selecting My Account.
- You can manage Pull Print for individual printers on the printer object's Printing tab in the Pull Printing section.
- Note that due to caching, adjusting the following Pull Print settings might prevent new held jobs from appearing on the Control Panel Application (CPA) for up to 8 hours:
- Allow Pull Print jobs to be released to all printers by default.
- Allow Pull Print jobs to be released to this printer.
For more details refer to Secure Release Print.
Purge settings define the time that active and held print jobs remain in the queue before the system automatically removes them. Set purge times in the Admin Console by going to Tools  Settings Printing and scrolling down to the Purging section. Purge times support a minimum of 1 hour. Review the following settings:
- Purge active print jobs after (x) hours
- Print jobs remaining in the queue after the specified time period without successfully printing are automatically removed.
- Purge held jobs after (x) hours
- Held jobs remaining in the release system after the specified time period are automatically removed.
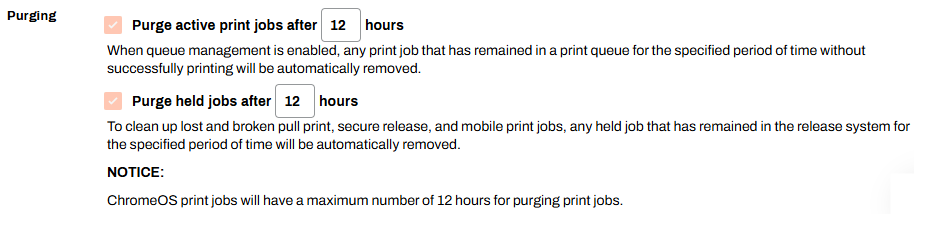
Note that ChromeOS print jobs support a maximum 12-hour purge time.
After you configure Pull Print or Direct Secure Release, users' held jobs display in the Release Portal. You can use the printer object's Release Tab, which provides a central location to view, release, and delete held jobs for that printer.
Refer to the following topics for more information about other secure release options for users:
This coach includes optional steps for configuring and installing the CPA as a release method.
Configure Identities
If you already have a configured identity provider, this section is mostly review.
PrinterLogic authenticates users at the printer control panel through IdPs like Entra ID (Azure AD), Okta, Active Directory, and more.
Review the Supported IdPs and configure your identity provider before moving on to the next section.
- Active Directory (AD)-based IdPs (LDAP with Identity Sync and Active Directory Query eXecutor (ADQX)) support username / password, badge, and PIN authentication at the CPA.
- Cloud-based IdPs (Entra ID (Azure AD), Okta, Google Identity, etc.) support only badge and PIN authentication at the CPA.
For steps to set up attributes in your IdP, refer to Badge & PIN Management and the section's subtopics.
Confirm your users provisioned into PrinterLogic.
- In the Admin Console, go to Tools Identity Management or Tools Identities, depending on which features are turned on.
- Confirm that your provisioned users appear in the list.
- Select a user and verify that the badge or PIN appears.
Users in the Identity Management table can sign in to the Self-service Portal and the Agent.
Turn On Queue Management
This setting makes the Queue tab appear on printer objects. You use the Queue tab to view the printer queues on end user devices, and this setting makes jobs visible to the local spooler for release.
Follow these steps:
- In the Admin Console, go to Tools Settings Printing.
-
In the Print Jobs section, select Enable queue management.

- Select Save.
Turn On Pull Print
Choose one option. Release held Pull Print jobs to all printers by default, or turn on Pull Print for specific printer objects. If you leave the default option deselected, you must turn on Pull Print for each printer object that you want to receive held jobs.
Release to all printers by default
Follow these steps:
- In the Admin Console, go to Tools Settings Printing.
-
In the Pull Printing section, select Enable Workstation Pull Printing / Secure Printing.
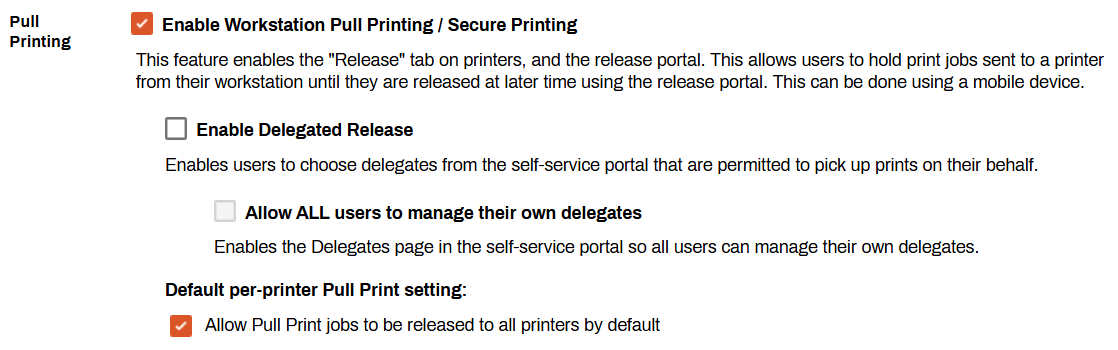
- Select the checkbox for Allow Pull Print jobs to be released to all printers by default.
- Select Save.
All printer objects can release Pull Print jobs by default.
If you turn on Pull Print for all printers and receive license alert messages in the Admin Console, then there are more printers in your environment than licenses. Turn off the global Allow Pull Print jobs to be released to all printers by default setting, then turn on Pull Print on a per-printer basis using the steps in the Release to specific printers section.
Release to specific printers
Follow these steps:
- In the Admin Console, go to Tools Settings Printing.
-
In the Pull Printing section, select Enable Workstation Pull Printing / Secure Printing.
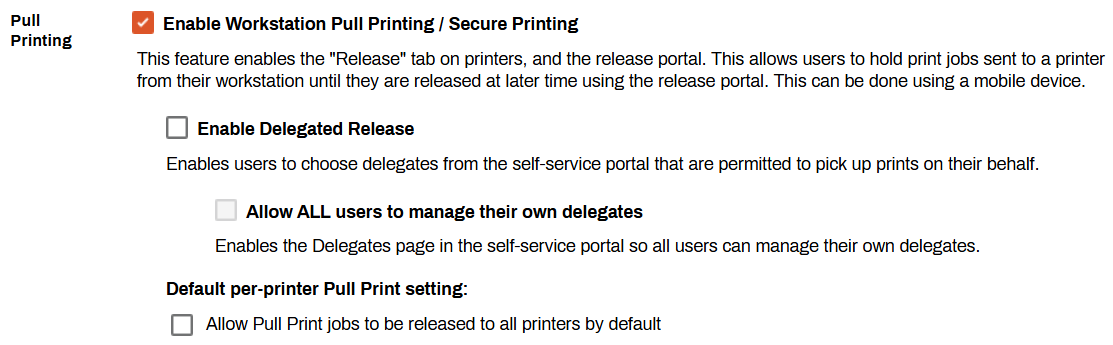
- Select Save.
For the printer-specific configuration, you must complete the following steps on each printer object to turn on Pull Print:
- Select the printer object in the tree structure.
- Select the Printing tab.
-
In the Pull Printing section, select Use printer-specific Pull Print setting.
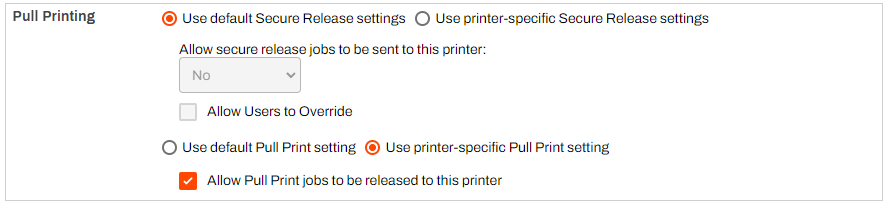
- Select Allow Pull Print jobs to be released to this printer.
- Select Save.
- Repeat these steps for any additional printer objects.
Printers with this setting turned on can release Pull Print jobs.
Create a Pull Printer
Follow these steps:
- Select the folder in the tree structure.
-
Select New
Printer.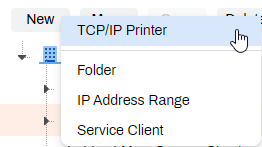
Alternatively, you can right-click on the folder and select New
Printer from the context menu. - In the Add Printer modal, use the Printer Name field to name the printer.
- (Optional) Complete the Location and Comment fields.
-
Select the checkbox for Make Pull Printer.
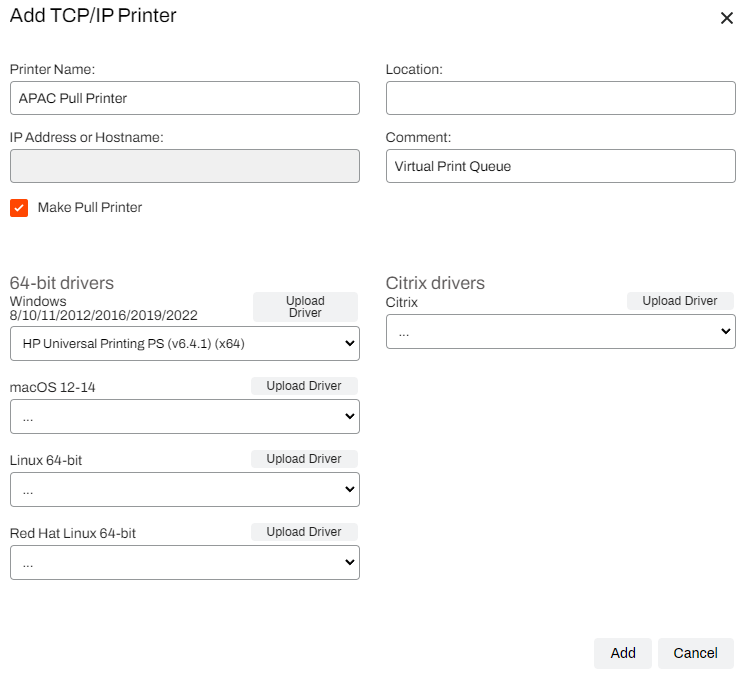
- Upload a new driver or assign an existing driver to the pull printer.
- Select Add.
The pull printer appears in the folder.
Configure the Service Agent
This section covers configuring a Service Agent, which installs Vasion apps and features on a printer, like Direct Secure Release, Copy / Scan Tracking, and more.
If you already have a configured Service Agent, still review the requirements and steps below before continuing to the next sections.
Device Requirements
Review the following requirements:
- Device:
- Windows 10 or 11 and Server 2016, 2019, 2022, or 2025.
- Visual C++ Redistributable for Visual Studio 2015-2022 package or later.
- You must install both the x86 and x64 redistributable packages. You can download these packages from the Windows Download Center.
- The Service Agent cannot be a Windows device using an ARM processor.
- Visual C++ Redistributable for Visual Studio 2015-2022 package or later.
- macOS with an Intel processor.
- Ubuntu Long Term Support (LTS) 22.04, 24.04, or 26.04.
- Windows 10 or 11 and Server 2016, 2019, 2022, or 2025.
- Dual-core processor.
- 20 GB of available hard drive space.
- 8 GB of RAM.
- PrinterLogic Agent installed and authorized.
- The device, such as server, virtual machine, or workstation, must have network access to target printers.
- The device must remain powered on because shutting it down stops all services.
Additional CPA Requirements
The number of printers with the CPA An app installed on a compatible multifunction device (MFD) that aids in the release of held print jobs, supports authentication for secure printing, and provides simple scanning functionality. installed that a single Service Agent or Independent Service Manager (ISM) can support depends on the device's resources and operating system (OS). Windows and Linux devices that follow the CPA requirements below support around 1,000 printers. If you have a large environment with 1,000 or more printers using the CPA, consider adding an additional Service Agent or ISM.
Requirements for the CPA Printer Apps service include the following:
- The device running the Printer Apps service must be on the same network as the printers it manages.
- For every 100 printers, add an additional 2 GB of RAM to the minimum listed above.
- If your environment uses Single Sign-On (SSO), monitor RAM usage and increase the RAM as needed to handle increased memory usage during check-ins.
- On macOS and Linux, the Service Agent running the PrinterLogicServicePrinterApp.exe service must have OpenSSL 3.5 or later installed. On Windows, the Service Agent installation already includes this requirement, so no separate installation is needed. For more details refer to OpenSSL Documentation.
For more details refer to Service Agents.
You must install and authorize the Agent on the device acting as your Service Agent before you define it in the Admin Console.
If the Agent is already installed and authorized on this device, you can mark this step complete and move on.
For more details refer to Install the Agent & Web Extension.
Follow these steps to create a new Service Agent:
- Sign in to the Admin Console.
- Select the folder in which you want to place the Service Agent.
-
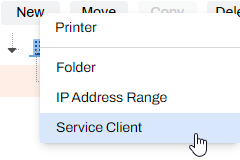
Select the New button at the top of the tree structure.
-
Alternatively, you can right-click the folder and select New
Service Agent.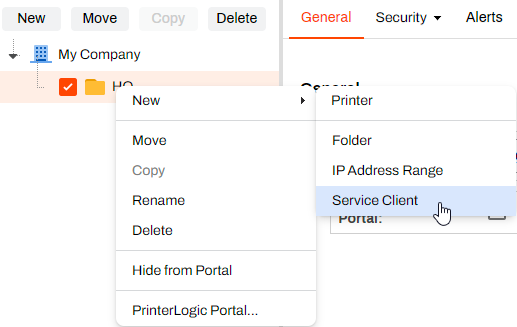
-
- In the Name field, give the Service Agent object an identifiable name.
- In the IP Address or Hostname field, enter the IP address or Fully Qualified Domain Name (FQDN) The complete domain name for a specific device or host on a network, consisting of the hostname, the domain name, and the top-level domain. of the device that hosts the Service Agent.
-
Select Add Service Client.
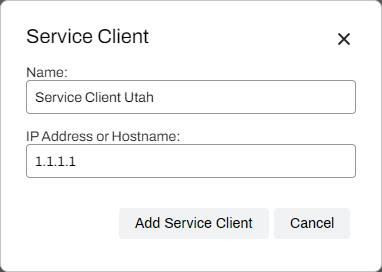
The name can be anything descriptive. For hostnames, use the FQDN, for example printserver01.example.com.
With the Service Agent object created, turn on the Printer Apps service.
Follow these steps:
- Go to the Service Agent's Printer Apps tab.
-
Select Enable Printer Apps.

- Select Save.
- Access the device designated as the Service Agent.
- Use the system tray icon or Start menu to refresh configurations.
- Open the Task Manager, and select the Details tab.
- In the Search field, enter printer to locate the Agent services.
- Confirm that the following services are running:
- Agent services, which include VasionClient.exe, PrinterInstallerClient.exe, PrinterInstallerClientInterface.exe, and PrinterInstallerClientLauncher.exe.
- PrinterLogicServiceManager.exe.
- PrinterLogicServicePrinterApp.exe.
Other active services on the Service Agent also appear.
The folder structure creation for the new service takes a minute. After the Agent creates the folder structure, the service begins running and you can view it in Task Manager or similar management apps.
If the service does not start or does not create the folder structure after 2 minutes, select on the General tab of the Service Agent object, then refresh the Agent on the Service Agent device.
Install the CPA
Review the following requirements:
-
These are universal requirements. Note that each printer manufacturer has additional requirements that you must review before installation.
- Have admin login access to the printer. Installing the app is equivalent to changing printer settings, which requires login verification.
- The printer should have the latest firmware version.
-
Turn on the Printer Apps service on the Service Agent, and confirm that the PrinterLogicServicePrinterApp.exe service is running.
For Windows Service Agents, install the Visual C++ Redistributable for Visual Studio 2015-2022 package or later. You must install both the x86 and x64 redistributable packages. You can download these packages from the Windows Download Center.
- Confirm that the HTTPS certificate matches the Service Agent device hostname or IP address. For more details refer to Service Agent Setup.
- The Service Agent running the PrinterLogicServicePrinterApp.exe service must have OpenSSL 3.5 or later. Windows and macOS should have OpenSSL by default, but you might need to manually update the version for Ubuntu.
- Turn on Simple Network Management Protocol (SNMP) status monitoring. For more details refer to SNMP Status Monitoring.
- All devices must be able to reach the Domain Name System (DNS) server and resolve names.
Identity & Authentication
- Active Directory: LDAP domain with Identity Sync configured.
- IdP: Users must have email addresses assigned. CPA authentication fails without them.
Certificates
-
If you use self-signed certificates, verify that the root Certificate Authority (CA) is installed on the printer. Some manufacturers have additional certificate requirements.
Each printer manufacturer might include additional installation steps for the CPA. Keep the manufacturer topic open during the installation process.
Do not skip this step. Manufacturer-specific requirements might include additional firmware settings, certificate configurations, or printer-side setup that you must complete before the CPA can install successfully.
Review the port requirements closely in your manufacturer's documentation. There are specific ports that must be open between the Service Agent and the printer for installation and operation to succeed.
Manufacturer CPA Topics
Select the topic for your manufacturer:
The CPA has global settings that apply to each printer. These settings include the default credentials that install the CPA, whether you use Single Sign-On (SSO), and which authentication options users have at the printer, for example, badge authentication, username / password, or User ID and PIN.
Select the appropriate section to set up or review your authentication settings before moving on to the next steps.
- Username & Password
- User ID & PIN
- Badge Scan
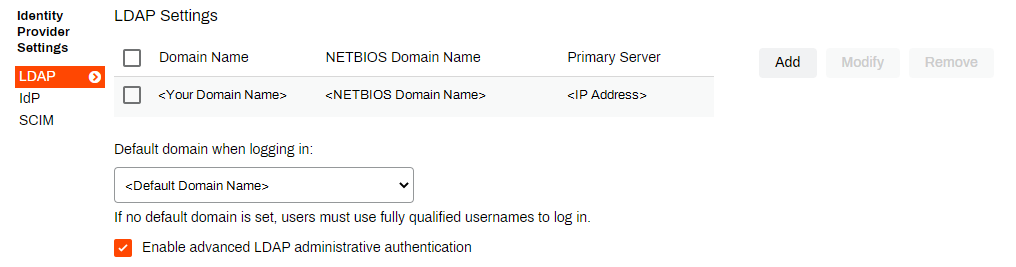
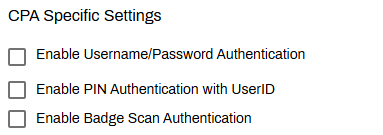
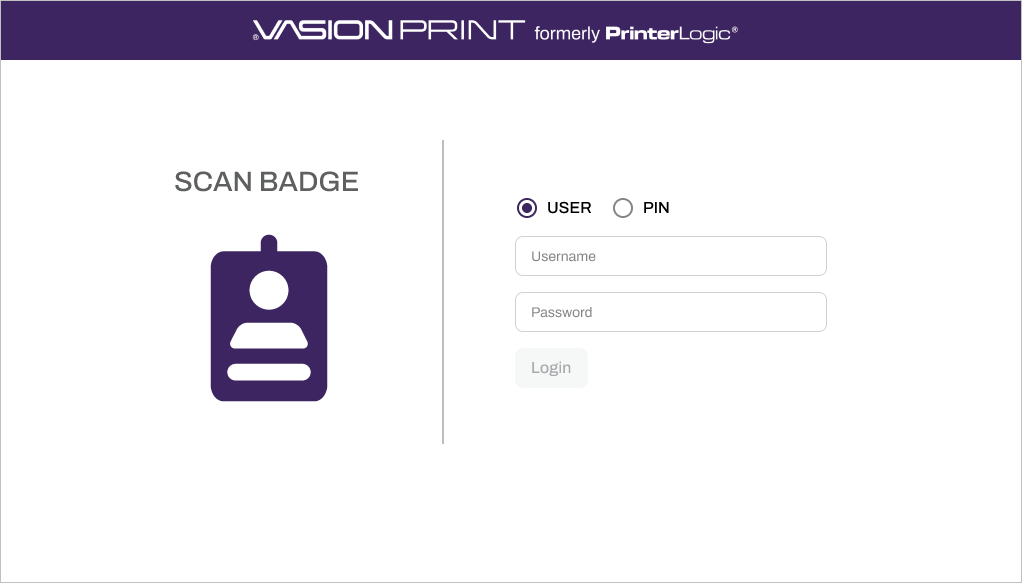
Users sign in with their network credentials or the same credentials they use to sign in to the device. This method requires no additional setup beyond your LDAP Identity Sync configuration since it uses the credentials already defined there.
To verify this LDAP option:
-
In the Identity Provider Settings section, select LDAP.
-
Scroll down to the CPA Specific Settings section and turn on Enable Username/Password Authentication.
- Select Save in the upper-right corner.
PIN authentication requires the end user to enter a User ID and PIN at the CPA.
 LDAP Settings
Follow these steps:
-
In the Identity Provider Settings section, select LDAP.
-
In the CPA Specific Settings section, select Enable PIN Authentication with UserID.
- Select the PIN storage option:
- Database: Enter The field name containing UserID.
- Active Directory: Enter The field name containing UserID and The field name containing PIN.
- Select Save in the upper-right corner.
If you select the Database option, users set their PIN in the Self-service Portal. For more details refer to PIN Self-Registration.
IdP Settings
Follow these steps:
-
In the Identity Provider Settings section, select IdP.

-
In the Control Panel Application (CPA) Authentication section, select Enable PIN Authentication.
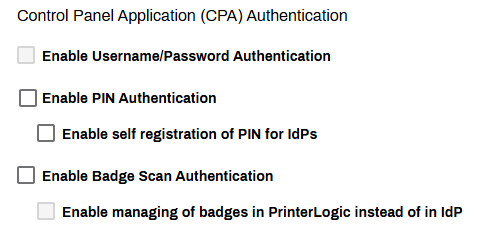
- If you do not use your IdP to map and manage PINs, select Enable self registration of PIN for IdPs.
- Select Save in the upper-right corner.
Do not select Enable self registration of PIN for IdPs if you already have a PIN attribute mapped through your IdP.
If you select the Enable self registration of PIN for IdPs option, users set their PIN in the Self-service Portal. For more details refer to PIN Self-Registration.
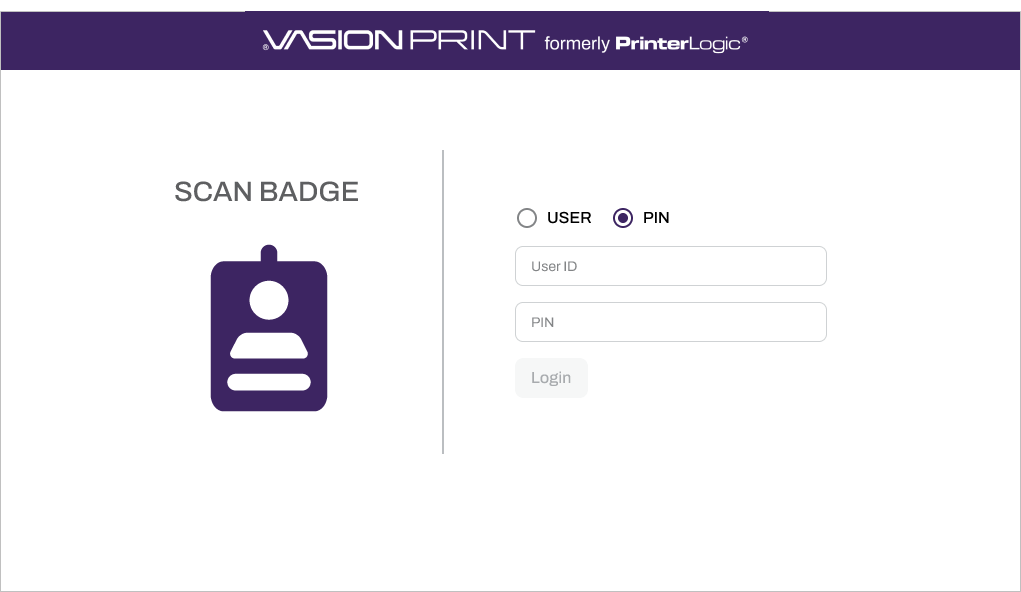
Badge scan authentication requires the end user to scan a badge, card, or dongle at the CPA.
LDAP Settings
Follow these steps:
-
In the Identity Provider Settings section, select LDAP.
-
Scroll down to the CPA Specific Settings section, and select Enable Badge Scan Authentication.
- Select whether to store badges in the Database or pull them from Active Directory. For AD, provide the field name that contains the badge ID attribute.
- Select Save in the upper-right corner.
If you select the Database option, badge registration becomes mandatory.
Register badges in one of the following ways:
- Manage and import badges using the PrinterLogic Badge Management page.
- Have users set up their badge in the Self-service Portal. For more details refer to Badge Self-Registration.
IdP Settings
Follow these steps:
-
In the Identity Provider Settings section, select IdP.
-
In the Control Panel Application (CPA) Authentication section, select Enable Badge Scan Authentication.
- If you do not use your IdP to map and manage badges, select Enable managing of badges in PrinterLogic instead of in IdP.
- Select Save in the upper-right corner.
Do not select Enable managing of badges in PrinterLogic instead of in IdP if you already have a badge attribute mapped through your IdP.
If you select the Enable managing of badges in PrinterLogic instead of in IdP option, users set their badge in the Self-service Portal. For more details refer to Badge Self-Registration.
Global Install Credentials, Security, & SSO
Go to the Control Panel Application section on Tools Settings General to set global installation credentials if the username and password to access the printer's UI are the same. Adjust credentials per printer on the Apps tab or through the CPA Manager.
The Control Panel Application section also includes the global settings for SSO
Review the following information:
- In Provider mode you can lock the printer so that a user must authenticate before they can access the printer's control panel.
- In Listener mode PrinterLogic listens for when another app acting as the SSO provider authenticates a user and passes that user information to the CPA. The user can then select PrinterLogic on the control panel.
- To review and understand the Enable higher security options and impact, refer to Transport Layer Security (TLS) Settings.
To set global installation credentials or turn on SSO
- Go to the Control Panel Application section.
-
Use the Username and Password fields to set the global installation credentials.
The credentials must have admin rights to the printer.
-
Turn SSO on or off using the Enabled and Disabled options.
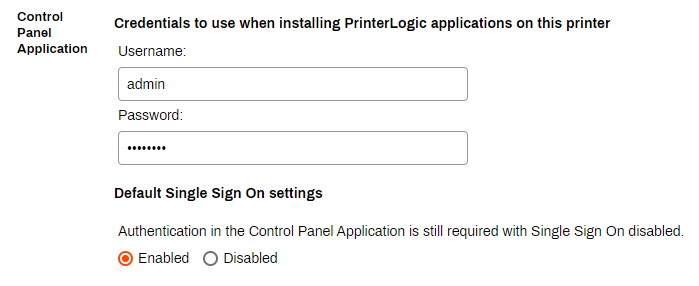
- Turn on higher security using the Enable higher security checkbox.
- Select Save in the upper-right corner.
With requirements and authentication settings complete, install the Secure Release Print CPA. This app lets users release held jobs at the device.
These steps are for installing the CPA on a single printer using the printer's Apps tab. To install the CPA on multiple printers at once, refer to CPA Manager.
Follow these steps:
- From the Admin Console tree structure, select the printer on which you want to install the CPA.
- Select the Apps tab.
-
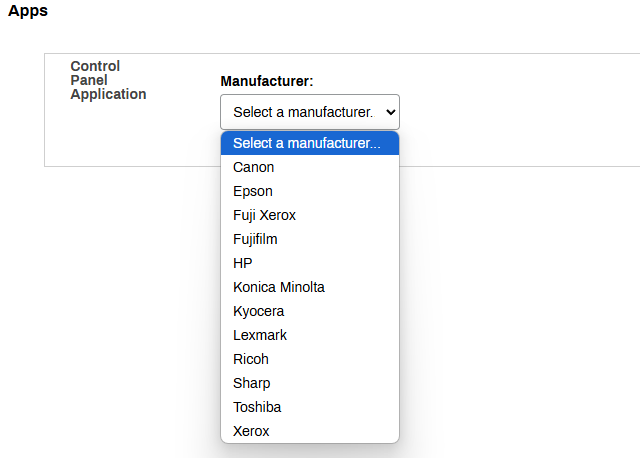
From the Manufacturer menu, select the printer manufacturer.
- Select the Service Agent that you want to use to install the CPA.
- In the Install Embedded Application section, select the Secure Release option.
- Select the checkboxes for any additional apps that you want to install:
Review each feature's requirements before you install it. Some features listed require additional licensing and may not appear as options.
Installation Credentials
If your printers do not share the default username and password, defined on Tools Settings General in the Control Panel Application section, follow these steps to set printer-specific credentials:
- Go to the Apps tab, Credentials to use when installing PrinterLogic applications on this printer section.
- Select Use printer-specific administration credentials.
- Enter the admin username and password for that printer.
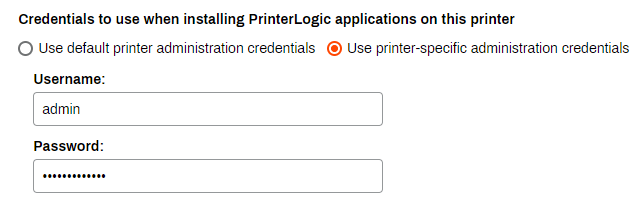
The credentials must have admin rights to the printer.
CPA Authentication Options
The options below appear depending on what you select in the CPA Specific Settings section. Note that authentication features vary depending on the printer manufacturer.
The CPA supports only badge and PIN authentication for cloud IdPs.
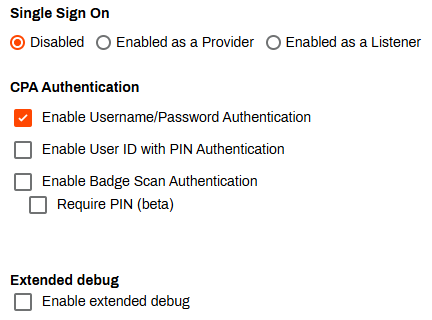
For SSO, select from the following options:
- Disabled: Normal CPA authentication without SSO.
- Enabled as a Provider: Users authenticate through the CPA screen before accessing apps.
- Enabled as a Listener: Users authenticate through another SSO provider and the CPA listens in the background and accepts the authorization.
For CPA Authentication, select from one of the options you turned on in the General Authentication Options.
The Extended debug section is for troubleshooting and contains the following:
- Certificates to download the PrinterLogic CA.
- PrinterLogic Control Panel Application manual install URL.
The installation process might trigger a device restart once complete.
Install the App
With your settings in place, select Save to start the installation.
If the installation fails, do the following:
- Note the error message, and check the Printer Apps logs. For more details refer to PrinterLogic Log File Locations.
- Review and adjust your configuration to verify that it meets all requirements.
- Select the Try Again button to restart the installation.

Install and Test
Follow these steps to test this feature:
- Install the pull printer from the Self-service Portal or through Printer Deployment.
- After installing, print a job and select the pull printer as the destination.
Use the applicable release method to test printing the held job. For more details refer to Release Held Jobs.
Admin Console
- In the Admin Console, select the pull printer's Release tab.
- Select the held print job.
- Select the Release button in the upper-right.
- Search or browse for the printer destination and select it.
- Select the Release button.
The held job prints to the destination location.
Release Portal
- Access your Release Portal.
- Select the held print job.
- Select the Select Printer button.
- Use the side-modal to search or browse for the printer destination and select it.
- Select the Release button.
The held job prints to the destination location.
PrinterLogic mobile app
- Access and authenticate to the PrinterLogic mobile app on your phone.
- Select the Print Release tab.
- Select the held print job.
- Select Print.
The held job prints to the destination location.
CPA
- Go to one of the printers with Pull Print turned on.
- Authenticate to the CPA.
- Select the Print or Release tab, depending on the version.
- Select the held print job.
- Select the Print icon
 .
.
The held job prints to the destination location.