Imprivata
Last Updated: October 08, 2026
PrinterLogic integrates with Imprivata Enterprise Access Management (EAM) to turn on badge-based secure release printing for a multifunction printer (MFP) in healthcare environments. This integration resolves an identity continuity problem specific to shared clinical workstations, where print jobs are otherwise attributed to the machine rather than the authenticated user.
Key Points
The following are important things to know about the Imprivata integration:
- Vasion is an Imprivata-Ready Certified integrator.
- Imprivata handles user authentication only.
- PrinterLogic handles authorization, so your users must already exist in PrinterLogic before Imprivata authenticates them.
- PrinterLogic and Imprivata sync users independently from the same identity source. Imprivata does not add users to PrinterLogic.
- Clinicians badge in at the MFP using an rf IDEAS proximity badge reader to release only their own print jobs.
- PrinterLogic supports both shared kiosk workstations (Imprivata Type 2) and standard workstations (Imprivata Type 1).
- This integration supports Windows operating system (OS) devices in Vasion Now and Scheduled Release SaaS (SRS) environments.
- Supports both Pull Print and Direct Secure Release print. For more details refer to Secure Release Print.
How the Imprivata Integration Works
In healthcare environments, clinical staff often authenticate at shared kiosk workstations using an Imprivata badge. Because the underlying Windows session uses a generic service account, PrinterLogic would ordinarily attribute print jobs to the computer name rather than to the individual user. This means that when a clinician badges in at the MFP to release their jobs, no jobs appear.
The integration separates authentication from authorization. Imprivata verifies who a user is, and PrinterLogic determines what that user can do. PrinterLogic and Imprivata each sync users from the same identity source, such as Active Directory or Entra ID, but they do so independently. Imprivata does not provision users into PrinterLogic.
When a user signs in, Imprivata authenticates the user and returns a user identifier. PrinterLogic trusts that result and matches the identifier to the corresponding user already in PrinterLogic to apply the correct permissions. If a matching user does not exist in PrinterLogic, the user signs in without any permissions.
The integration resolves identity attribution at two points:
- At the workstation: The PrinterLogic Agent detects Imprivata running on the workstation and queries the ProveID SDK to identify the currently authenticated user. The Agent passes that identity to the Service Agent, which tags all print jobs created during the session with the user's username.
- At the MFP: When a clinician taps their badge on the rf IDEAS reader, the CPA sends the badge credential to the customer's Imprivata instance via the ProveID Web API. The appliance returns the corresponding username. The CPA then matches that username to queued print jobs and displays only that user's jobs for release. Tapping the badge a second time signs the user out of the CPA session.
Print jobs released through Imprivata badge authentication are captured in Print Job Records report, including user, timestamp, and job details. For more details refer to Print Job Records.
Requirements
Before you configure the Imprivata integration, confirm that your environment meets the following requirements:
- Imprivata EAM accessible and deployed in your environment.
- Your users provision into PrinterLogic through a supported identity provider connection before you configure the Imprivata integration. Choose from:
- On-premises Active Directory, use Identity Sync or Active Directory Query eXecutor.
- Cloud identities, use Entra ID (SAML) or Okta (SAML).
- Configure badges in the identity provider your users provision from. For more details refer to Print Release Methods.
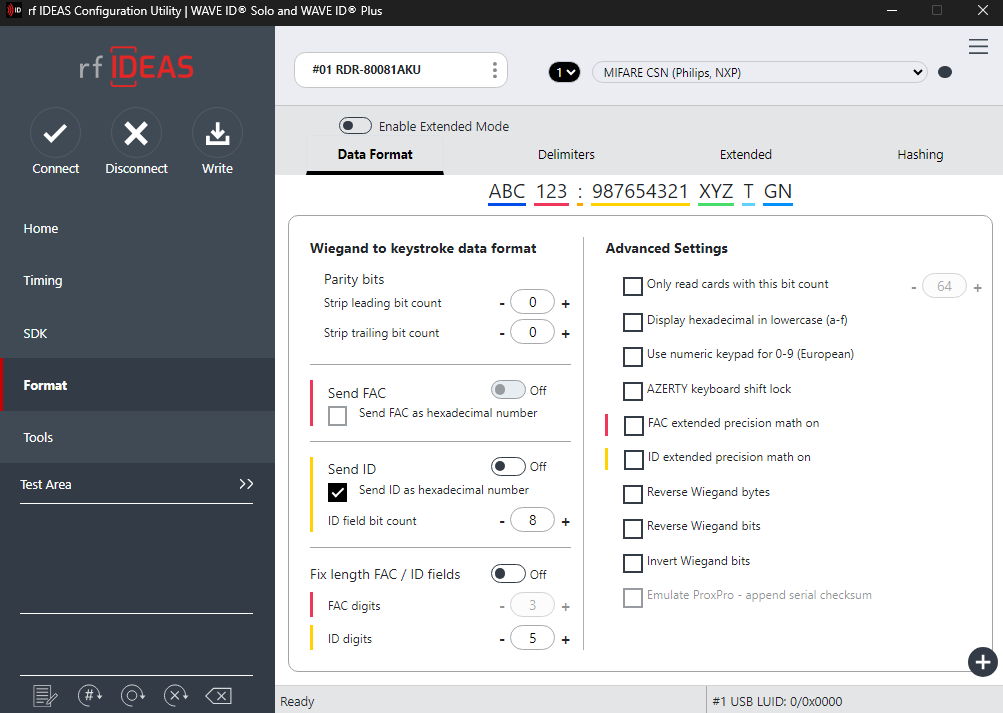
- An rf IDEAS 800 or 805 USB badge reader is connected to each MFP where badge release is required, and operating in HID keyboard emulation mode.
Use the rfIDEAS configuration utility, or similar tool, so the badges send the ID as a hexadecimal number.
- The Imprivata instance (on-premises or cloud-hosted) is reachable from the CPA on port 443.
- Access to PrinterLogic, and:
- A Service Agent running the Printer Apps service. For more details refer to Service Agents.
- Secure Release Print installed from the CPA onto the MFP. For more details refer to CPA 2.0.
Next Steps
After reviewing this topic, see the following:
In this topic: