Okta (SAML)
Last Updated: June 30, 2026
An identity provider (IdP) uses an authentication token to vouch for a person's identity. Vasion Automate uses IdPs for several tasks, including logging in to the Admin Console and portals, deploying printers, releasing print jobs, and more.
If you use an IdP, the Control Panel Application (CPA) supports only badge and PIN authentication.
Key Points
Review the following key points:
- This configuration creates an OIDC connection, for the SAML method, refer to Okta (OIDC).
- The OIDC configuration is required for mobile Microsoft Intune environments. For more details refer to Microsoft Intune Support.
- These steps follow Okta's classic user interface rather than the Developer Console user interface.
- Systems for Cross-domain Identity Management (SCIM) configurations generally require Okta Lifecycle Management licensing.
- Okta might show two PrinterLogic apps. Use the PrinterLogic SaaS (with support for multiple instances) option.
Configure Connection
To add and configure enterprise app properties for the PrinterLogic connection, do the following:
- Create the Okta App.
- Add the IdP Settings Template.
- Configure Single Sign-On (SSO).
- Add the X-509 Certificate.
- Complete IdP Settings.
- Configure Provisioning.
1. Create the Okta App
- Log in to your Okta portal.
-
In the left-side menu, expand Applications and select the Applications option.

- Select the Browse App Catalog button.
- Search for PrinterLogic in the Search field, and select PrinterLogic SaaS (with support for multiple instances).
- Select the Add Integration button.
- In the Application label field, name your app.
- Select your instance region from the Region dropdown menu.
- Enter your subdomain in the Subdomain field.
- Select Done in the lower-right corner.
- Leave the current browser open on the new app screen for the following steps.

2. Add the IdP Settings Template
If the IdP Settings modal does not look like the image below, you may not be using the latest version and should contact Product Support to upgrade your IdP settings.
- Open your PrinterLogic Admin Console in a new browser tab, and sign in.
- Select Tools
 Settings General, and scroll down to the Identity Provider Settings section.
 - Select IdP, and then select Add.
- Select the IdP that you want to configure from the IdP Template dropdown menu.
- Select SAML2 in the Authentication Protocol section.
-
In the Provisioning section, if you are using Systems for Cross-domain Identity Management (SCIM), leave the Just-in-Time (JIT) option deselected.
By default, the Admin Console assumes that you are using SCIM for provisioning. Only select JIT if you are not using SCIM.
- In the Name field, enter the name that you want to appear on the login button for users. For example, My Company, Login, or Acme Corp.
- Scroll down, and select the desired settings:
- Enable for End User Login: Allows end users to log in using this IdP. (Self-service Portal)
- Enable for Admin Login: Allows admins to log in using this IdP. (Admin Console)
- You can select both checkboxes when admins and end users use the same IdP to sign in.

Keep the IdP Settings modal open so that the Service Provider Information section at the bottom is available for the following steps.
3. Configure Single Sign-On (SSO)
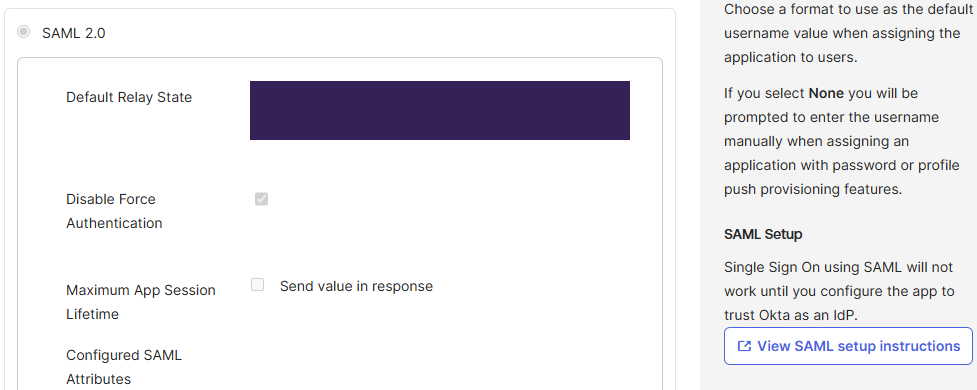
- In the Okta app, select the Sign On tab and then select Edit on the right.
- In the PrinterLogic Admin Console, copy the Relay State in the Service Provider Information section, and paste it in the Okta Default Relay State field.
-
In the Okta Metadata details section, select More details to expand.

- Copy the Sign on URL and paste it into the Admin Console SSO URL field.
- Press Tab in the Admin Console to autopopulate the Issuer URL and Issuer ID fields.
- Scroll down to the Okta Advanced Sign-on Settings section.
- Copy the Admin Console IdP Identifier, and paste it in the Okta IDP ID field.
- Select Save in the Okta app.

4. Add the X-509 Certificate
-
Select View SAML setup instructions on the right. A new screen appears with additional information.
-
Copy the X-509 Certificate to cut and paste in PEM Text Format.

- Paste the X-509 certificate in the Admin Console X-509 Certificate field.
- Select Apply.
-
Select Save.
The Admin Group Name field stays blank unless you are using an attribute statement for additional security. You can set up an attribute statement after the initial IdP configuration by following the steps in Additional Admin Console Security.

5. Complete IdP Settings
- In the General settings of the PrinterLogic Admin Console, navigate to the Identity Provider Settings section.
-
To have PrinterLogic prompt users to authenticate through the IdP when performing any function that requires authorization, such as installing a printer, select the Automatically Open Browser to Login on Desktop Client option.
If you do not select this option, users must manually navigate to the IdP login screen to log in.
-
We recommend enabling the Use Loopback with Saml 2.0 (recommended) option. The IdP needs to provide an authentication token to the desktop Agent whenever authentication happens. This option allows the Agent to handle the token and automatically log in without interaction from end users.

- The option Use Domain User (Windows only) automatically authorizes domain-joined Windows users and does not require log in via the configured IdPs.
- Select Save in the upper-right corner of the General settings.
6. Configure Provisioning
The provisioning steps vary depending on whether you are using Systems for Cross-domain Identity Management (SCIM) or Just-in-Time (JIT) provisioning. Choose the appropriate option below to view the corresponding steps.
SCIM Provisioning
Enable SCIM Provisioning
- In the Okta app, select the Provisioning tab.
- Select Configure API Integration.
- Select Enable API integration.

Generate & Apply a SCIM Token
- In the PrinterLogic General settings, select the SCIM option in the Identity Provider Settings section.
- Select your IdP configuration from the dropdown menu.
-
Select Generate SCIM Token.

Generating a SCIM token invalidates any previous tokens for that IdP.
- Copy the token, close the modal, and select Save in the upper-right corner of the General settings.
- In the Okta app, paste the token in the API Token field in the Provisioning tab.
- Select Test API Credentials. A notification appears if the token verified successfully.
- Select Save in the Okta app.

Enable the To App Settings
- In the Okta app, select To App from the left-side menu.
- Select Edit to the right.
- Select the Enable checkboxes for the following.
- Create Users.
- Update User Attributes.
- Deactivate Users.
- Select Save in the lower-right corner.

Assign Users & Groups
Note that Okta does not support assigning the same groups on the Assignments and Push Groups tabs. For example, if you assign Group A on the Assignments tab, you should not assign Group A on the Push Group tab.
A best practice is to create an Okta group that includes all users who need access to the PrinterLogic app, which should consist of admin users who require access to the Admin Console and end users who only need access to the Self-service Portal. Assign this group on the Assignments tab in Okta, which provisions all the necessary user records into the instance without any group membership data. You can then assign your role-specific groups, such as Admin, Help Desk, etc., on the Push Group tab, which provisions the group membership data needed for Role-Based Access Control (RBAC), portal security, and deployment rules.
For more details refer to the official Okta documentation on the Push Group tab.
Assignments Tab: Assign Users & Groups
Follow these steps:
- In Okta, select the Assignments tab.
-
Select the Assign menu.

- To grant access to individual users, select Assign to People. To grant access to groups, select Assign to Groups.
- Search for the desired users or groups, and select Assign.
- Scroll down to the bottom, and select Save and Go Back.
- Select Done.
- Repeat these steps for any additional users or groups.

Push Groups Tab: Assign Groups
If you need to provision group membership information into PrinterLogic, do the following:
- In Okta, select the Push Groups tab.
- Select the + Push Group menu.
-
Select Find groups by name.

-
Search for and select the desired groups.
Ensure that the groups you select on this tab are not the same groups that you assigned on the Assignments tab. -
In the Match result & push action column, confirm that + Create Group is selected.

- Select Save.
- In the Push Status column, confirm that the status changes from Pushing to Active.

JIT Provisioning
Assign Users
JIT does not support the provisioning of group membership associations, so you cannot apply Role-Based Access Control (RBAC) roles, printer deployments, or portal security roles to groups. You must create assignments individually for each user.
- In the Okta app, select the Assignments tab.
-
Select the Assign dropdown menu.
- Select Assign to People to assign individual users.
- Search for the desired users, and select Assign.
- Select Done.
- Repeat these steps for any additional users.

Create Users
When using JIT provisioning, the app creates users during the first sing-in attempt:
- Access your Vasion instance, and select Sign In With <IdP Name>.
- Attempt to sign in with your IdP credentials.
-
This sign-in attempt fails and returns you to the sign-in screen.
This behavior is expected. With JIT, this action triggers user creation in the Vasion instance.
- The second sign-in attempt with valid credentials initiates a typical sign-in sequence.
For admins who need access to the Admin Console, you still need to add them to the Users page located in Tools ![]() Users.
Users.
Next Steps
- For steps on assigning users and roles to the PrinterLogic and Vasion Automate Admin Console, refer to Admin Console Users.
In this topic: