Agent Updates
Last Updated: September 25, 2026
The PrinterLogic Agent updates regularly. New versions can deploy automatically from the Admin Console, or you can manually update devices or push the new version with a tool, like a Group Policy Object (GPO) A set of settings and rules that control the working environment of user and computer accounts in Microsoft Active Directory. GPOs are used to manage and configure operating systems (OSs), apps, and user settings..
For more details on available versions, refer to the Agent tab in the Vasion Automate Release Notes topic.
Ways to Update
There are a few ways to update the Agent on devices.
Automatic Updates
Using the Automatic Client Update section, you can set Agent updates to happen automatically on devices during the next Agent check-in or refresh. The Enable auto-deploy item level targeting option is where you choose specific users, groups, devices, etc. to receive the automatic update. Without item-level targeting, all devices with the Agent installed update during the next check-in.
The Automatic Client Update section shows the latest Agent version that is available for your instance, the last Agent version update deployed from the Admin Console, the Show Filter button, and the Update Client button for each supported operating system (OS). The Update client if older than: field is blank if you never deployed the Client.
Do the following to turn on automatic updates for the Agent:
- In the Admin Console, go to Tools
 Settings Client.
 - Scroll down to the Automatic Client Update section.
-
Select Enable automatic update during the next client check-in or refresh.
- Optional: Select the Enable auto-deploy item level targeting option.
- Select Show Filter.
- Select the Add button, and choose the target object.
- Enter the information, or locate the object.
- Select Add.
- Select the Update Client button for the OSs you want to update.
- Select Save.
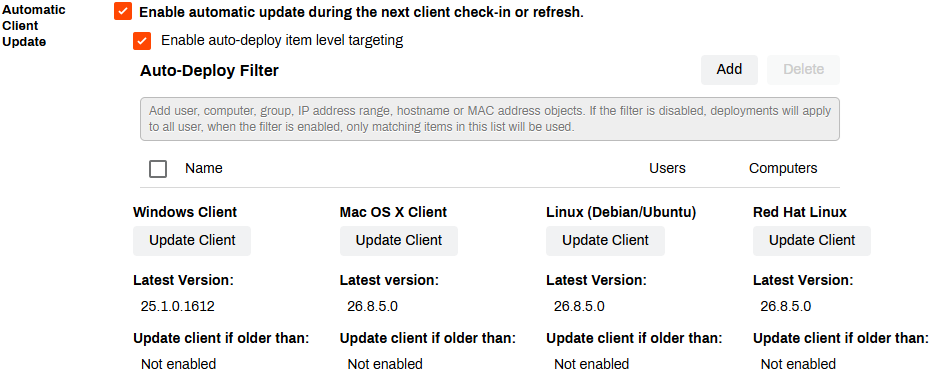
Devices with automatic Agent updates turned on update during the next Agent check-in or refresh. The update happens in the background and does not require end user interaction. The previous Agent version uninstalls, and the new version installs in less than a minute with proper device resources and bandwidth.
Manual Updates
Do the following to manually update the Agent:
- In the Admin Console, go to Tools Settings Client.
- Scroll down to the Deployable Client Packages section.
-
Select the file type for the desired package.
- Place the file on the desired device.
- Access the OS's Add or remove programs or Apps settings.
- Uninstall the previous Agent version.
- Run the new Agent version file, and complete the installation prompts.
Software Deployment
The Agent uses the same Globally Unique Identifier (GUID) for each new version. We suggest using an alternate identifier when deploying the update with a deployment tool, such as Microsoft Configuration Manager, Microsoft Intune, etc.
Follow these steps to deploy or update the Agent with a command prompt, script, batch file, or GPO:
- In the Admin Console, go to Tools Settings Client.
- Scroll down to the Deployable Client Packages section.
-
Select the file type for the desired package.
-
Run the following command in a command prompt, script, batch file, or GPO to deploy or update the Agent on end user devices:
Copy CodePrinterInstallerClient.msi REINSTALLMODE=vomus REBOOT=ReallySupress REINSTALL=ALL /qn /norestart
Restrict Agent Updates
Using item-level targeting, you can restrict automatic Agent updates to specific users, groups, hostnames, IP address ranges, etc. Only objects in the list update when you deploy a new Agent version. Restricting automatic updates lets you test a new Agent version for specific users or sites before you introduce the update to the rest of the environment.
Do the following to configure item-level targeting:
- In the Admin Console, go to Tools Settings Client.
- Scroll down to the Automatic Client Update section, and select Enable automatic update during the next client check-in or refresh.
- Select Enable auto-deploy item level targeting.
-
Select Show Filter.

- Select the Add button, and select an option.
- Options include the following: Active Directory objects, IP Address Range, Hostname, MAC Address, Chromebook Serial Number, Chromebook Asset Id, Advanced Groups.
- After adding the filters, select the Update Client button for the desired OS.
- Select Save in the upper-right corner.
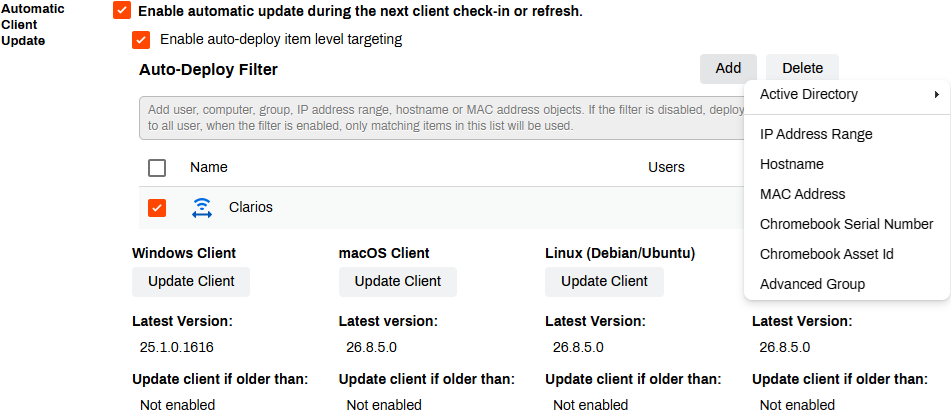
When a device is associated with an object in the Auto-Deploy Filter list, the Agent updates during the next check-in. You can also manually refresh the Agent on a device using the system tray icon.
In this topic: