Off-Network Print Coach
Last Updated: October 08, 2026
Set Up Off-Network Print (ONP)
Complete each section in order. The next section unlocks once you finish the one before it.
Before You Begin
Review the following key points:
- Additional licensing required. Contact your Vasion representative for details.
- Uses RAW printing on the Windows platform.
- Line Printer Remote (LPR) is not currently supported.
- Supports Windows, macOS, Linux, ChromeOS, and mobile devices (iOS and Android).
- ONP uses RAW printing on macOS platforms.
- Supports customer-hosted and hybrid gateway configurations for additional redundancy.
- You can use your own asymmetric key pair for additional print-job encryption. For more details refer to Asymmetric Key Pair Configuration.
For more details refer to Off-Network Printing.
Review the following requirements:
- Printers using ONP cannot have the SNMP Status option selected on the printer's Port tab. This option is different from SNMP Status Monitoring.
- ONP printing occurs over TCP port 443 from the device to the external gateway and from the external gateway to the IRS.
- Ensure that the following allow list URLs are open
ofn.app.printercloud.com.ofn-gw.app.printercloud.com.
- Customer-hosted gateways require a Secure Sockets Layer (SSL) certificate and key from a trusted Certificate Authority (CA).
- The certificate must be a Base64 Privacy Enhanced Mail (PEM) full chain unencrypted file.
- The key must be in unencrypted Public-Key Cryptography Standards (PKCS) #8 format, and it must correspond to the PEM certificate.
- The certificate must match the external Domain Name System (DNS) or IP address of the external gateway.
ONP uses a Service Agent running the Internal Routing Service (IRS) to route print jobs from the external gateway to the printer. The IRS Service Agent requires the following:
- All devices must access the Domain Name System (DNS) server to resolve names.
- For redundancy, you can add multiple Service Agents.
- Routing from the IRS to the printer occurs over Transmission Control Port (TCP) port 9100 or port 631 for Internet Printing Protocol Secure (IPPS).
For Windows Service Agents, install the Visual C++ Redistributable for Visual Studio 2015-2022 package or later. You must install both the x86 and x64 redistributable packages. You can download these packages from the Windows Download Center.
For more details refer to Service Agent Setup.
Vasion-Hosted Gateways
Vasion external gateways are hosted in AWS and include the following:
-
PrinterLogic U.S.-NOW Gateway: printercloudnow.
Note that the PrinterLogic U.S.-NOW Gateway is for Vasion Now instances only. U.S.-based Scheduled Release SaaS (SRS) customers must use the PrinterLogic U.S. Gateway.
- PrinterLogic U.S. Gateway: printercloud.
- PrinterLogic EMEA Gateway: printercloud5.
- PrinterLogic ASIAPAC Gateway: printercloud10.
- PrinterLogic SE-ASIAPAC Gateway (Singapore): printercloud20.
- PrinterLogic CANADA Gateway: printercloud15.
Customer-Hosted Gateways
Customer-hosted gateways show as Service Agent Name in the Admin Console with External Gateway listed as the service.
Off-Network Priority controls where the PrinterLogic Agent tries to send the job first, either directly to the printer or to the ONCP or ONP service.
- Off-Network Only
- The Agent sends the print job using only the ONCP or ONP service and does not try to send the job directly to the printer, which is direct IP printing.
- Direct IP Primary
- The Agent sends the print job directly to the printer, which is direct IP printing. If unsuccessful, the Agent sends the print job using the ONCP or ONP service.
- Off-Network Primary
- The Agent sends the print job using the ONP service. If unsuccessful, the Agent sends the print job directly to the printer, which is direct IP printing.
Note the following:
- The Off-Network Priority options apply only to computers, not to mobile devices.
- ONCP does not support the Off-Network Primary option.
Configure ONP
Follow these steps to allow Off-Network Print:
- In the Admin Console, go to Tools
 Settings General, and scroll down to the Off-Network Printing section.
 - Select the checkbox for Allow Off-Network Printing.
- (Optional) Select Use customer-provided public / private key pair for print job encryption. For more details refer to Asymmetric Key Pair Configuration.
- Select Save in the upper-right corner.
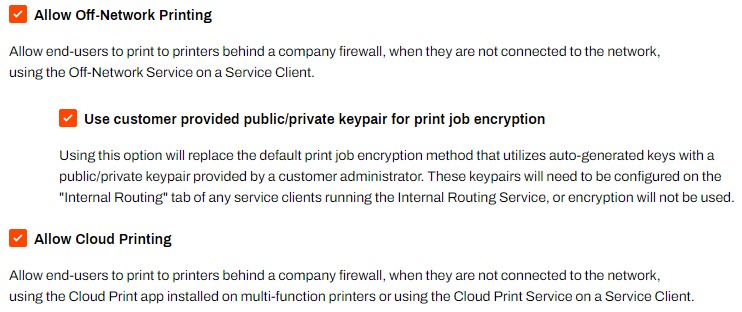
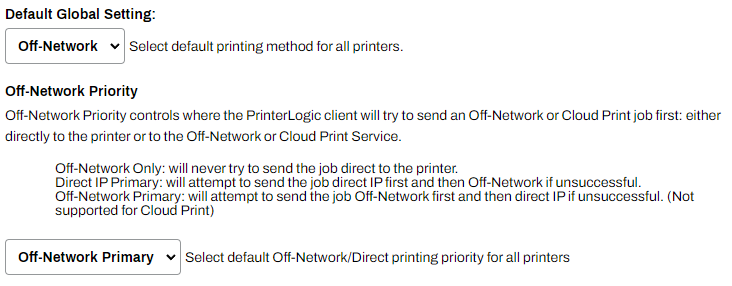
The following steps guide you through configuring ONP as the default for all printers or for specific printers. Turning on the global settings makes all printers off-network printers, which forces all print jobs to follow the flow of ONP, regardless of whether you are on the network. If you want to turn on ONP only for specific printers, follow the steps in the Turn on per-printer dropdown.
Turn on globally
Follow these steps:
- From the Default Global Setting menu, select Off-Network.
- In the Off-Network Priority section, select the default print priority:
- Off-Network Only.
- Direct IP Primary.
- Off-Network Primary.
- Select Save.
The Off-Network Priority section applies only to computers and not to mobile devices.
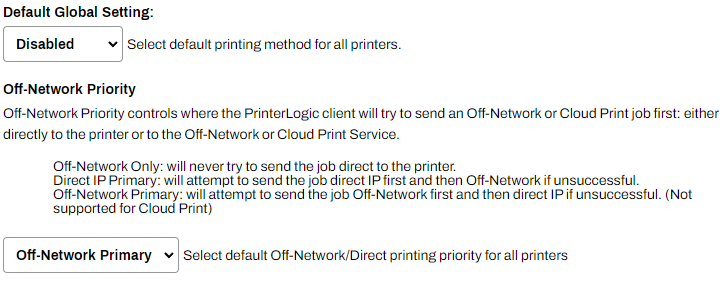
Turn on per-printer
Follow these steps:
- From the Default Global Setting menu, select Disabled.
- In the Off-Network Priority section, select the default print priority:
- Off-Network Only.
- Direct IP Primary.
- Off-Network Primary.
- Select Save.
The Off-Network Priority section applies only to computers and not to mobile devices.
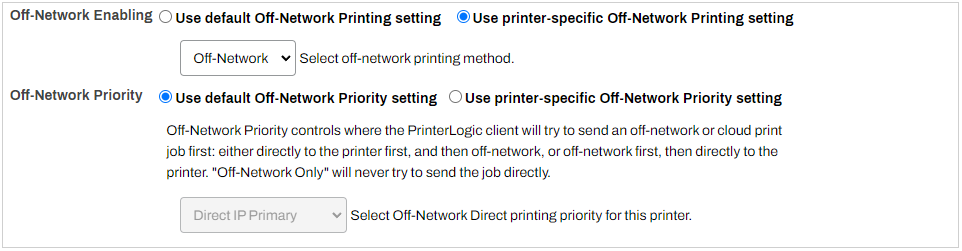
For the printer-specific configuration, complete the following steps on each printer object to turn on ONP:
- Go to the printer object's Off-Network tab.
- For the Off-Network Enabling setting, select Use printer-specific Off-Network Printing setting.
- From the Select off-network printing method dropdown menu, select Off-Network.
-
Use the default off-network priority option, or select the printer-specific option, and select from the following:
- Off-Network Only.
- Direct IP Primary.
- Off-Network Primary.
- Select Save.
- Repeat these steps for any other printer objects.
Configure the Service Agent
This section covers configuring a Service Agent which installs Vasion apps and features on a printer, like Direct Secure Release, Off-Network Print, Copy / Scan Tracking, and more.
If you already have a configured Service Agent,still review the requirements and steps below before continuing to the next sections.
Device Requirements
- Device:
- Windows 10 or 11 and Server 2016, 2019, 2022, or 2025.
- Visual C++ Redistributable for Visual Studio 2015-2022 package or later.
- You must install both the x86 and x64 redistributable packages. You can download these packages from the Windows Download Center.
- The Service Agent cannot be a Windows device using an ARM processor.
- Visual C++ Redistributable for Visual Studio 2015-2022 package or later.
- macOS with an Intel processor.
- Ubuntu Long Term Support (LTS) 22.04, 24.04, or 26.04.
- Windows 10 or 11 and Server 2016, 2019, 2022, or 2025.
- Dual-core processor.
- 20 GB of available hard drive space.
- 8 GB of RAM.
- PrinterLogic Agent installed and authorized.
- The device, such as server, virtual machine, or workstation, must have network access to target printers.
- The device must remain powered on because shutting it down stops all services.
Install and authorize the Agent on the device acting as your Service Agent before you define it in the Admin Console.
If the Agent is already installed and authorized on this machine, you can mark this step complete and move on.
Follow these steps to create a new Service Agent:
- Sign in to the Admin Console.
- Select the folder in which you want to place the Service Agent.
-
Select the New button at the top of the tree structure.
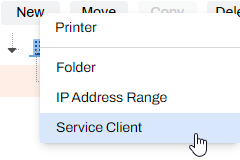
-
Alternatively, you can right-click the folder and select New
Service Agent.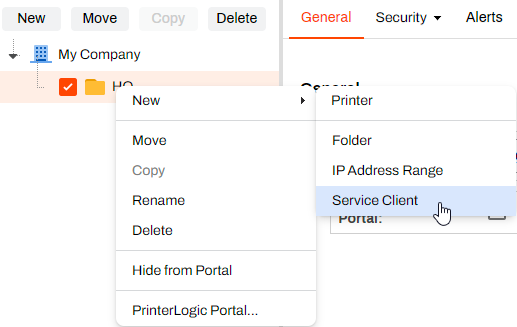
-
- In the Name field, give the Service Agent object an identifiable name.
- In the IP Address or Hostname field, enter the IP address or Fully Qualified Domain Name (FQDN) The complete domain name for a specific device or host on a network, consisting of the hostname, the domain name, and the top-level domain. of the device that hosts the Service Agent.
-
Select Add Service Client.
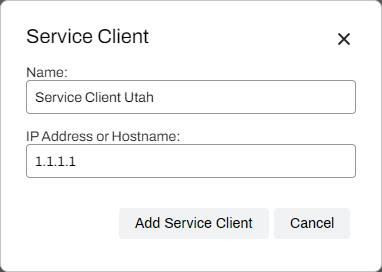
The name can be anything descriptive. If using a hostname, use the FQDN, for example printserver01.example.com.
The IRS Service Agent is a designated device on the printer network that monitors the external gateway, immediately retrieves print jobs, and routes them to the correct printer. Follow these steps to turn on the IRS:
- Go to the Service Agent object in the tree structure.
- Select the Internal Routing tab.
-
Select Enable Internal Routing Service.

- Select Save.
- On the device designated as the IRS Service Agent, use the Vasion icon in the system tray or the Start menu to refresh configurations.
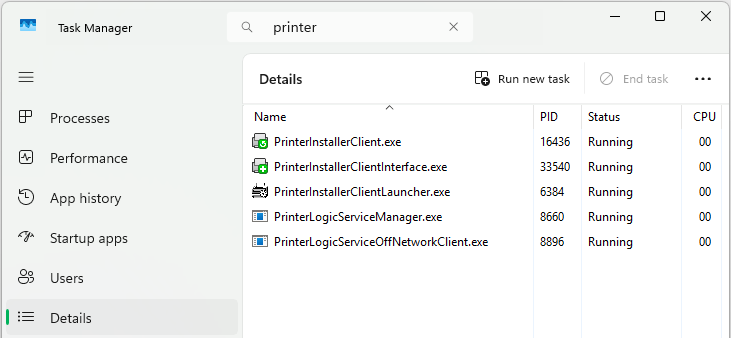
- Open the Task Manager, and select the Details tab.
- Search for "printer" to locate the Agent services.
- Confirm that the following services are running:
- Agent services, which include VasionClient.exe, PrinterInstallerClient.exe, PrinterInstallerClientInterface.exe, and PrinterInstallerClientLauncher.exe.
- PrinterLogicServiceManager.exe.
- PrinterLogicServiceInternalRouter.exe.
- PrinterLogicServiceOffNetworkClient.exe.
Other active services on the Service Agent also appear.
The folder structure creation for the new service takes a minute. Once complete, the service begins running and you can view it in Task Manager or similar management apps.
If the service does not start after a couple minutes, and doesn't create the folder structure, select on the General tab of the Service Agent object, then refresh the Agent on the Service Agent device.
Configure External Gateway (Customer-Hosted Only)
A customer-hosted external gateway requires an SSL certificate and key. You can store the certificate and key on the Service Agent and add the file path to the configuration page, or you can copy them and paste them in the fields in the Admin Console, which stores them in your instance's database. You need the following:
- An SSL certificate from a trusted CA in PEM and KEY formats for the external gateway.
- The certificate must be a Base64 PEM full chain unencrypted file.
- The key must be in unencrypted PKCS #8 format, and it must correspond to the PEM certificate.
- The certificate must match the external DNS or IP address of the external gateway.
With your certificate and key ready, select the desired store option below and follow the steps.
Store on Service Agent
Follow these steps:
- Place the SSL certificate and key on the device designated to host the Service Agent external gateway.
- Copy or note the path to the files.
- In the Admin Console, go to the Service Agent object, and select the External Gateway tab.
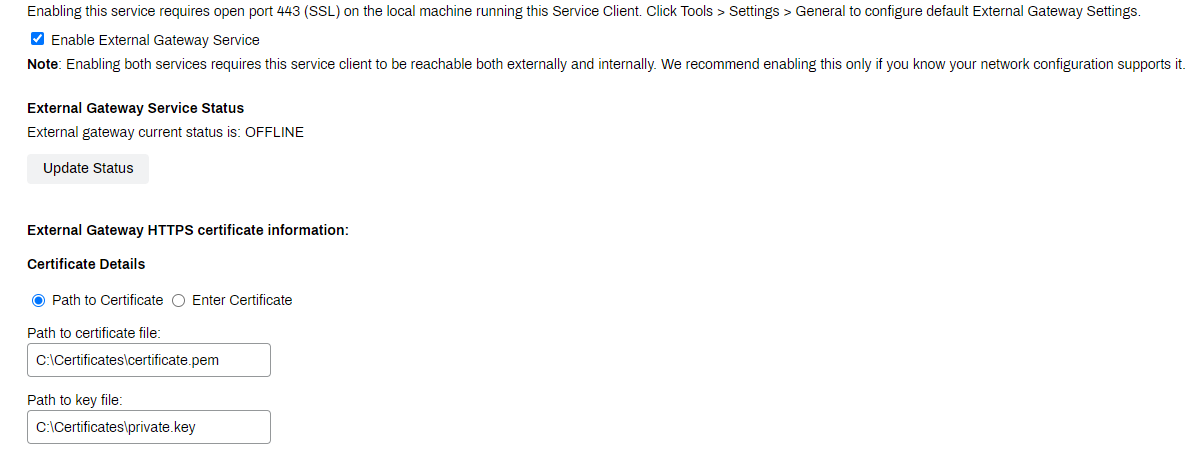
- Select the checkbox for Enable External Gateway Service.
- In the External Gateway HTTPS certificate information section, select Path to Certificate.
- Enter the path to the PEM certificate file in the Path to certificate file field. For example,
C:\Certificates\certificate.pem. - Enter the path to the key file in the Path to key file field.
-
Enter the external host address for the Service Agent in the External Host Address field.
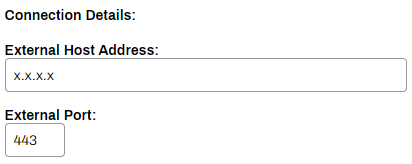
- Adjust the External Port field if needed.
- Select Save.
Store in Database
Follow these steps:
- Open the SSL certificate body and key files.
- In the Admin Console, go to the Service Agent object, and select the External Gateway tab.
- Select the checkbox for Enable External Gateway Service.
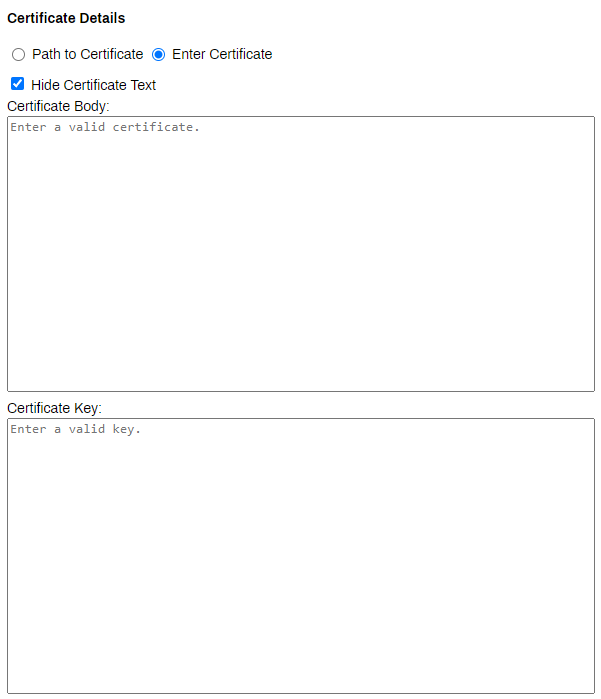
- In the External Gateway HTTPS certificate information section, select Enter Certificate.
- (Optional) Select Hide Certificate Text. After you save the certificate and key, the content no longer appears.
- Copy the certificate and key files, and paste them in their respective fields.
-
Enter the external host address for the Service Agent in the External Host Address field.
- Adjust the External Port field if needed.
- Select Save.
Assign External Gateway and IRS Service Agent
The IRS Service Agent provides high availability and built-in redundancy at the root, folder, and printer levels. Configuring all levels is optional. The IRS Service Agent must be on the same network and able to reach assigned printers. In environments with printers on multiple networks, an IRS Service Agent needs to reach printers in each network.
In most environments, configure the assignment at the folder or printer level first before configuring at a higher level. If all printers use the same assignment, add it to the root level. Folders and printers inherit higher-level assignments, but lower-level ones take priority.
If a printer or folder has a root assignment and a folder or printer assignment, the service prioritizes the folder or printer assignment and uses the root assignment as a backup. The priority order appears in the folder's Services tab and on the printer's Off-Network tab.
Configure the settings based on your organization's needs.
Customer-hosted gateways display as options once configured. See previous section for details.
Folder level
Do the following to add an external gateway and IRS assignment at the folder level:
- Select the folder in the tree structure.
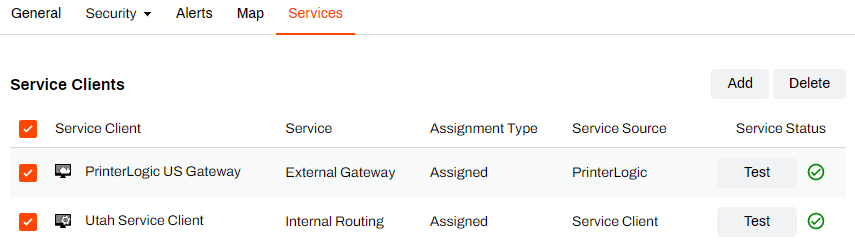
- Select the Services tab.
- Select the Add button.
-
In the Add Service modal:
- Select the regional, self-hosted external gateway, or both for hybrid configurations.
- Select the IRS Service Agent.
- Select OK.
- Use the Test button in the Service Status column to confirm connectivity.
Lower-level folders and printers inherit the external gateway and IRS assignment, including any set at the root level or a higher-level folder.
Printer level
Do the following to add an external gateway and IRS assignment at the printer level:
- Select the printer object in the tree structure.
- Select the Off-Network tab.
- Select the Add button.
-
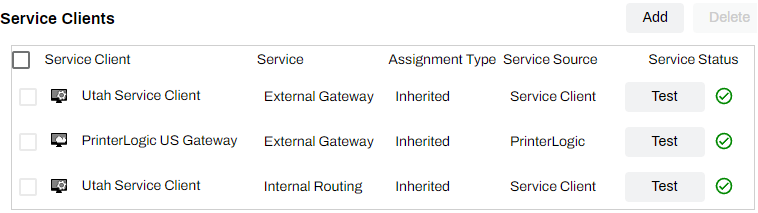
In the Add Service modal:
- Select the regional, self-hosted external gateway, or both for hybrid configurations.
- Select the IRS Service Agent.
- Select OK.
- Use the Test button in the Service Status column to confirm connectivity.
These steps set the external gateway and IRS assignment for the printer object, including any assignments set at the root level or a higher-level folder.
Root level
Do the following to add an external gateway and IRS assignment at the root level:
- Select the company icon
 at the top of the tree structure.
 - Select the Services tab.
- Select the Add button.
-
In the Add Service modal:
- Select the regional, self-hosted external gateway, or both for hybrid configurations.
- Select the IRS Service Agent.
- Select OK.
- Use the Test button in the Service Status column to confirm connectivity.
Lower-level folders and printers inherit the external gateway and IRS assignment.
Install and Test
To test this feature:
- Select a workstation on a different network than the destination printer.
- Install a printer configured for ONP.
- After installing, print a job and select the printer as the destination.
- Go to the printer and confirm the job printed.