Okta OIDC
Last Updated: April 07, 2026
An Okta OpenID Connect (OIDC) configuration is required if your organization uses an Okta SAML connection for identity management and Microsoft Microsoft Intune for mobile app deployment. Microsoft Intune's Mobile Application Management (MAM) policies require OIDC authentication for mobile apps to access protected documents.
Key Points
- This configuration is specifically for mobile Microsoft Intune environments.
- OIDC works alongside existing Okta SAML connections for desktop and web users (doesn't replace them).
- Ensure Microsoft Intune mobile settings are enabled. Contact your Vasion representative for assistance.
- This authentication method is specific to mobile sign-in to enable the PrinterLogic app to access documents protected by Intune's Mobile Application Management (MAM) policies.
Requirements
- Existing Okta SAML connection configured for Vasion Print.
- Multi-IdP and Microsoft Intune features enabled for your Vasion Print instance.
- Microsoft Microsoft Intune environment with Mobile Application Management (MAM) policies.
- Administrative access to both Okta and Vasion Print Admin Console.
These requirements assume an existing Okta SAML connection is configured for your Vasion Print instance. If your deployment only supports mobile devices through Microsoft Intune, the SAML configuration is not required.
Configure the Connection
To connect Vasion Print with Okta OIDC do the following:
- Create the Okta app.
- Add the IDP template.
- Configure OIDC authentication.
- Create the Okta SCIM app.
- Configure SCIM provisioning.
- Assign Users & Groups.
1. Create the Okta App
- Log in to your Okta Admin Portal.
-
In the left-side menu, expand Applications and select the Applications option.

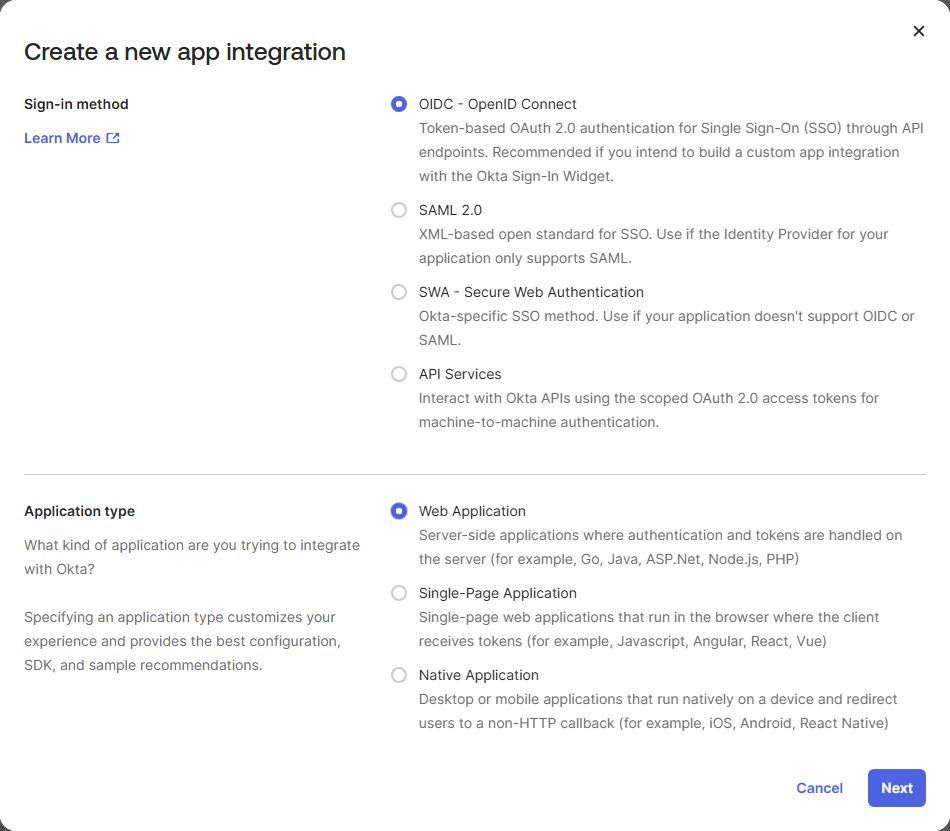
- Select the Create App Integration button.
- In the Sign-in method section select OIDC - OpenID Connect.
- In the Application type section select Web Application.
- Select Next.
- Leave the current browser open to the new app page.
To continue the app configuration, you need to open another browser and open the Vasion Automate / Vasion PrintAdmin Console and access the service provider information.
2. Add the IdP Template
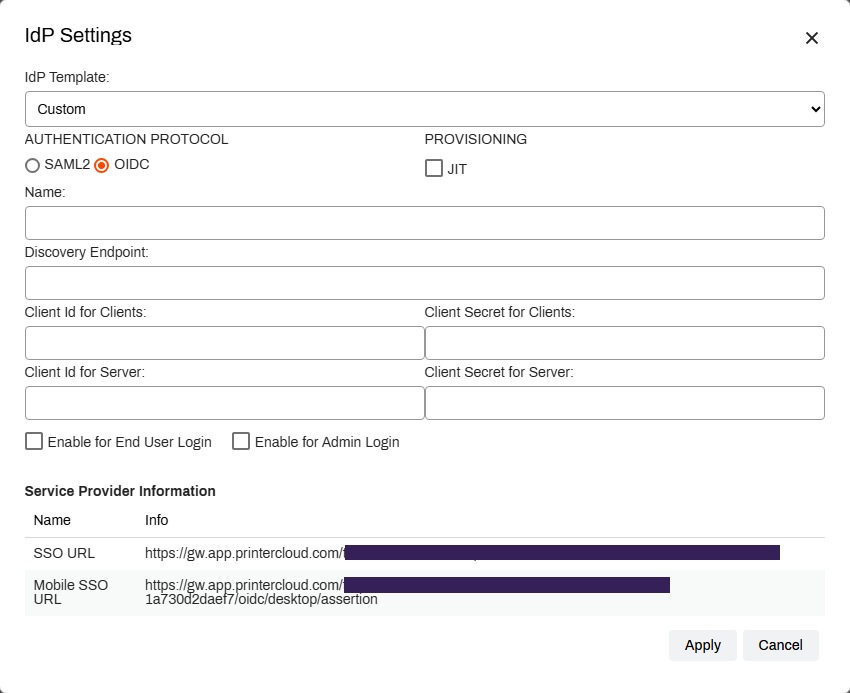
If the IdP Settings modal does not look like the image below, you may not be using the latest version and should contact Product Support to upgrade your IdP settings.
- In a separate browser tab, open your Vasion PrintAdmin Console and sign in.
- Select Tools
 Settings General, and scroll down to the Identity Provider Settings section.
 - Select IdP, and then select Add.
- Select Custom from the IdP Template dropdown.
- Select OIDC in the Authentication Protocol section.
-
In the Provisioning section, leave the JIT option unchecked.
- In the Name field, enter the name you want displayed on the sign in button for users. For example My Company, Login, Acme Corp, etc.
- Keep the IdP Settings modal open so that the Service Provider Information at the bottom is available for the following steps.
Do not select the Enable for End User Login or the Enable for Admin Login options. Microsoft Intune authentication is only supported by the mobile app.
3. Configure the OIDC Authentication
- In the New Web App Integration page enter a name to identify the integration in the Okta Admin Console into the App integration name field.
- From the IdP Settings modal, copy the SSO URL and paste it into the Okta app Sign-in redirect URIs section to replace the default localhost URL.
- Use the Add URI button to add a new URI field.
- Return to the IdP Settings modal and copy the Mobile SSO URL then paste it into the new URI field you added.
- In the Sign-out redirect URIs section, remove the localhost URL.
- In the Assignments section, select Skip group assignments for now.
- Select Save.
- Keep your new Okta web app open to complete the IdP settings configuration in Vasion Print.

Complete the IdP Settings Configuration
-
In the Discovery Endpoint field, enter the following URL, replacing
your-okta-domainwith your actual Okta domain:Copy Codehttps://your-okta-domain.okta.com/.well-known/openid-configuration -
Copy the Client ID from the new Okta web app.

- Return to the IdP Settings modal and paste the Client ID into the Client Id for Clients and the Client Id for Server fields.
-
Return to the Okta web app and use the Generate new secret button to add a new secret to the app.

- Copy the first secret and return to the IdP Settings modal to paste the secret into the Client Secret for Clients field.
- Return to the Okta app and copy the second secret and return to the IdP Settings modal to paste the second secret into the Client Secret for server fields.
- Select Apply.
- Under the CPA Specific Settings section select Enable PIN Authentication. This selection enables you to save the new IdP configuration.
- Scroll to the top of the General Settings screen and Select Save in the upper-right corner.

4. Create the Okta SCIM App.
-
Return to the Applications page your Okta Admin Portal.
-
Select Create App Integration.
-
In the Create a new app integration modal choose SAML 2.0, then select Next.
-
In the Create SAML Integration wizard, General Settings section, enter the name you want to identify the app in the Okta Admin Console and select Next.
-
In step 2 Configure SAML, A. SAML Settings section enter the following into the Single sign-on URL, Audience URI (SP Entity ID), and Default Relay State fields:
Copy Codehttps://www.okta.comThis will pass validation
-
Scroll to the bottom and select Next.
-
Select This is an internal app we have created.
-
Select Finish.


Enable SCIM Provisioning
-
Select the General tab of the new SAML app.
- In the App Settings section select the Edit button.
- In the Provisioning section select SCIM.
- Select Save.
- Select the Provisioning tab and leave the page open to complete the SCIM configuration in Vasion Print.

5. Configure SCIM Provisioning
- Go to your existing Okta SAML connection for desktop / web access.
-
In the Service Provider Information section, select the SCIM Tenant URL and copy it.

-
On the Okta app Provisioning tab, SCIM Connection section, select Edit.
-
Paste the SCIM Tenant URL into the SCIM Connection base URL field.
-
In the Unique identifier field for users enter email.
-
In the Supported provisioning actions section, select:
-
Import New Users and Profile Updates.
-
Push New Users.
-
Push Profile Updates.
-
Push Groups.
-
-
Use the Authentication Mode dropdown to select HTTP Header.
-
Leave the page open while you generate the SCIM token because you need to paste the token here.

Generate SCIM Token
- Return to the Vasion Print Admin Console Identity Provider Settings section and select SCIM.
- Use the dropdown to select the Okta OIDC connection you just created.
- Select Generate SCIM token.
- Copy the token then select Close.
- Paste the token into the HTTP Heater section of the Provisioning tab.
- Select Test Connector Configuration.
- When you get the message that the connector tested successfully, select Save.

Provision Users
- On the Provisioning tab, select To App under Settings on the left.
- In the Provisioning to App section, select the Edit.
-
Enable the following:
-
Create Users.
-
Update User Attributes.
-
Deactivate users.
-
-
Select Save.

6. Assign Users & Groups
All three Okta applications (SAML, OIDC, SCIM) should have the same groups assigned to ensure consistent user provisioning across all applications.
Assign to OIDC App
- In your Okta OIDC app, select the Assignments tab.
- Use the Assign dropdown to select:
- Assign to People: Use this option to assign app access to individual users.
- Assign to Groups: Use this option to assign app access to groups and all their members.
- Search for and select the desired people / groups.
- Select Assign and then Done.

Assign to SCIM App & Push Groups
- In your Okta OIDC app, select the Assignments tab.
- Use the Assign dropdown to select:
- Assign to People: Use this option to assign app access to individual users.
- Assign to Groups: Use this option to assign app access to groups and all their members.
- Search for and select the desired people / groups.
- Select Assign and then Done.
- Select the Push Groups tab.
- Use the Push Groups dropdown to select:
- Find groups by name: Use this option to search for the name of the group.
- Find groups by rule: Use this option to create a search rule that pushes any matching groups automatically.
- If you are adding more than one group or rule, select Save & Add Another.
- After you select the last group or rule, select Save.

7. Enable Microsoft Intune Login
- Go to Tools
 Settings Mobile in the Admin Console.
 -
In the Intune Settings section, select Enable Microsoft Intune Login.

-
Select the IdP you want to use for Microsoft Intune authentication from the dropdown.
- Select Save in the upper-right corner.