Epic API Tray Mappings
Last Updated: April 07, 2026
Tray mappings in Epic printing traditionally require manual configuration via the command line, where each print queue must be updated with specific tray values—for example, using a value like “262” to represent Tray 3 on an Canon printer. Applying this is a time-consuming process to repeat for every individual print record.
A more efficient method embeds the tray designation directly into the printer name (For example, Printer01/Tray01, Printer01/Tray02). The print server or application can parse the name to identify the tray, and automatically apply the appropriate tray value. This approach simplifies setup and enables centralized management of tray configurations across printers.
Printer manufacturers support different naming schemes for tray mappings. Ensure you're using supported values for your printer manufacturer.
To make changes to existing settings in bulk, see Quick Config Tool.
Configuration
Default Settings
- In your Admin Console go to Tools
 Settings Output.
 - Go to the Tray Settings section.
- Select Allow Epic/API Tray Mappings.
- In the Default Global Setting dropdown, select Enabled.
- Select the + Add button to generate a tray field.
- Enter the Tray Name and Value.
- Repeat as needed for additional tray mappings.
- Use the trash can icon to remove any uneeded mappings.
- Select Save in the upper-right corner.
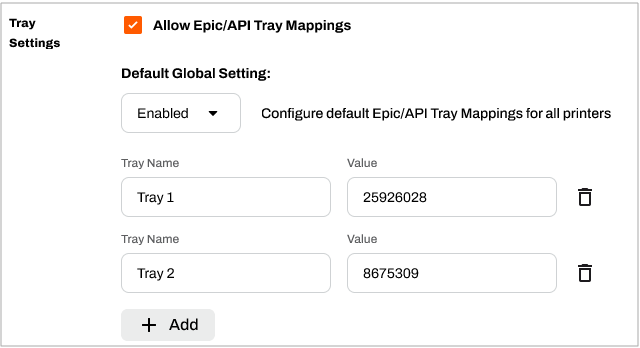
Printers, set to the default setting, use the tray mappings defined above.
Printer-Specific Settings
To adjust tray mappings for specific printers:
- In your Admin Console go to the desired printer object in your tree structure.
- Select the Port tab and locate the Tray Settings section.
- Select Use printer-specific Tray setting.
- Use the dropdown to enable / disable tray settings for the printer.
- If enabled, select the + Add button to generate a tray field.
- Enter the Tray Name and Value.
- Repeat as needed for additional tray mappings.
- Use the trash can icon to remove any uneeded mappings.
- Select Save in the upper-right corner.
- Repeat as needed for additional printers.
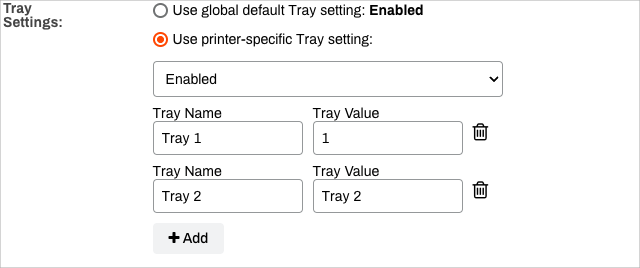
Tray mappings configured at the printer-specific level only apply to the selected printer object(s).
In this topic: