Configure High Availability
Last Updated: July 02, 2026
Here are the requirements and steps necessary to configure high availability for PrinterLogic Output. The instructions included here explain how to set up your Service Agents for redundancy and storage zones. To see full details about PrinterLogic Output high availability, see High Availability.
Requirements
-
You must have at least one additional PrinterLogic Output Service Agent that meets the minimum required specs. See Service Agents.
Running IPv6 on your Windows Service Agent may cause conflicts. You may need to disable IPv6 on the Service Agent' network adapter to resolve the conflict.
- Review the Output Service Recommendations for managing updates to the Output service on the Service Agent.
- A shared storage location from one of the following:
- Samba.
- AWS S3 bucket.
- For LPD Service, you must also meet the following prerequisites:
- Enable the LPD Service following these steps, if not already done.
- A load balancer that can distribute print jobs to all available Service Agents configured to use persistent or sticky connections for this LPD traffic, as LPD has acknowledgment messages that need to go to the same Service Agent as the job.
- To use a health check in addition to checking if port 515 is open for the load balancer, you'll need a certificate authority (CA) A trusted entity that issues and validates digital certificates. The primary purpose of a CA is to verify the authenticity and trustworthiness of a website, domain, and organization. trusted by the load balancer, in a .pem and .key format for the certificate and private key, respectively.
- For Epic, enable the Application Programming Interface (API) Print Service A PrinterLogic Output connector that lets source systems send print jobs through web requests rather than traditional print queues or drivers. Running on a Service Agent, the API Print Service accepts representational state transfer (RESTful) API calls so apps that do not natively support printing can still print. following these steps if not already done.
- For SAP integrations, enable the SAP Connector on two or more PrinterLogic Output Service Agents with the same service user account. Each service polls SAP for print jobs, and the first to detect a new job downloads and prints the file. You can also use different service user accounts by location for more granular management.
Redundancy
You must specify a configured shared storage location. This storage location stores the print job while determining which Service Agent will process the job. If one Service Agent is unavailable, the job is automatically routed to another available Service Agent.
Zones (Beta)
Setting Zones gives you the choice of which Service Agents are redundant to provide high availability. If you have multiple Service Agent machines in multiple regions, this feature offers you the option to ensure redundancy is happening in the same region.
Zone requirements
- Each Service Agent in the same zone must use the same shared storage location.
- Each zone must have its own shared storage. Different zones cannot use the same shared storage.
Configure High Availability
Perform the following steps on all Service Agents you want to use for high availability.
- In the Admin Console, select the Service Agent.
- Select the Output Automation tab.
-
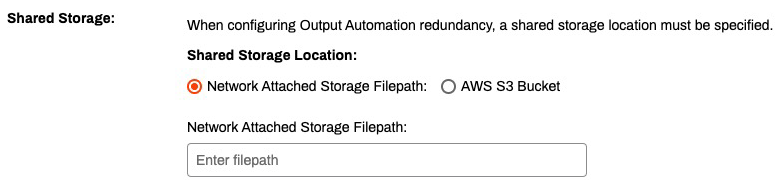
In the Shared Storage section, select the type of storage location.
-
Samba: Select Network Attached Storage Filepath field and complete the following:
-
Enter the full filepath to the storage location to store print jobs.
-
-
AWS S3 bucket: Select AWS S3 Bucket and complete the following:
- Access Key ID: Enter the access key ID for the S3 bucket.
- Secret Access Key: Enter the secret access key for the S3 bucket.
- Region: From the dropdown menu, select the S3 bucket region.
-
Bucket Name: Enter the S3 bucket name.

-
-
In the Zone section, use the dropdown menu to select the zone you want to assign to this Service Agent.

Configure a Load Balancer Health Check for Epic
Configure the load balancer's health check to use the following curl command replacing <ServiceClientDNSName> with the DNS name of your Service Agent and the port number to the port you are using for your services.
curl --request GET \
  --url https://<ServiceAgentDNSName>:31990/healthcheck
Configure a Load Balancer Health Check for LPD Service
The following section covers the necessary steps to configure a load balancer health check when you use LPD Service. Of course, you can just confirm that port 515 is open, but enabling some Epic-specific settings provide more detailed information on the load balancer's status.
- Scroll back up to the DNS Name section.
-
In the Domain Name field enter the domain name of the Service Agent machine.

-
In the API Print Service section, select Enable API Print Service.

-
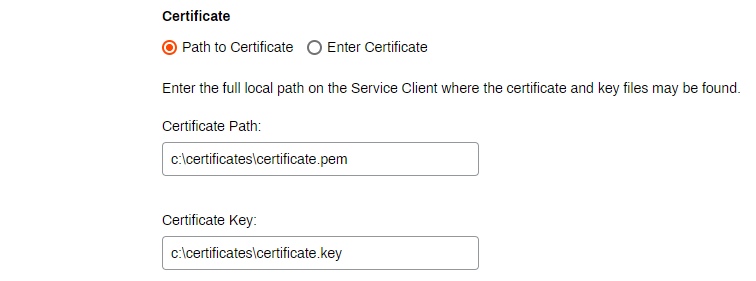
Enter the information for your certificate using one of the following options:
-
Path to Certificate: Enter the file path to where your .pem and .key files are stored on the Service Agent.
-
Enter Certificate: Paste the contents of the certificate and key files into the corresponding text boxes.

-
- Select Save.
-
Configure the load balancer's health check to use the following curl command replacing
<ServiceClientDNSName>with the DNS name of your Service Agent.Copy Codecurl --request GET \
--url https://<ServiceClientDNSName>:31990/healthcheck
In this topic: