Confirmed Delivery
Last Updated: June 12, 2026
Confirmed Delivery provides granular status monitoring of print jobs sent to a printer that supports the PJL USTATUS commands. Know what's happening when a job is printed, and help pinpoint precisely where printing stopped and identify potential issues.
How It Works
Your source application, whether an EMR, ERP, or another line-of-business application, sends print jobs to the PrinterLogic Output Service using a supported protocol, like HTTPS or LPR.
In addition to the standard trace logs you receive telling you when a print job was received, dispatched, converted into a print-ready format, and parsed, PJL USTATUS holds the connection and listens for confirmation updates from the printer. The printer tells you if the print job was successfully printed or not.
If a print job fails to print completely, for example, the printer runs out of paper mid-printing, an error message appears in the trace logs to notify you of the issue, and all notifications or failover rules will properly consider these responses when deciding if a print job failed or not.

The following steps show how to configure Confirmed Delivery in the PrinterLogic Admin Console. You may need additional settings within the EMR / ERP. Use the assistance of a Product Support Engineer or an assigned System Engineer for proper configuration.
Requirements
- Currently, the printer must support PJL USTATUS commands.
Configuration
Default Settings
In the following steps, changing the Default Global Setting to Enabled turns this feature on for all printers by default. If you want to enable this feature for only specific printers, set the Default Global Setting to Disabled, then follow the steps in the Printer-Specific Settings section.
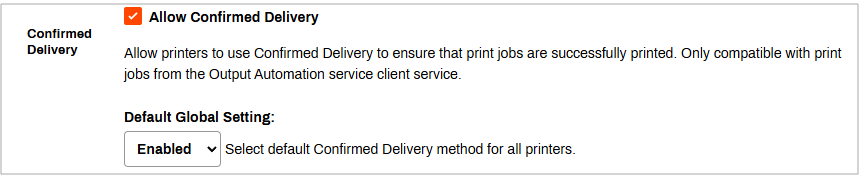
- In your Admin Console go to Tools
 Settings Output.
 - Go to the Confirmed Delivery section.
- Select Allow Confirmed Delivery to enable it.
- In the Default Global Setting dropdown, select Enabled.
- Select Save in the upper-right corner.
Confirmed Delivery functions for all Output Automation printers by default.
Printer-Specific Settings
If you set the Default Global Setting to Disabled in the step above, the following steps guide you through enabling Confirmed Delivery on specific printer objects. Alternatively, you can use these steps to turn off the feature for specific printers if you set the Default Global Setting to Enabled. To make changes to existing settings in bulk, see Quick Config Tool.
- In your Admin Console go to the desired printer object in your tree structure.
- Select the Port tab.
- Scroll down to the Confirmed Delivery section.
- Select Use printer-specific Confirmed Delivery setting.
- Use the dropdown to select Enabled.
- Select Save in the upper-right corner.
- Repeat as needed for additional printers.

Confirmed Delivery functions for the chosen Output Automation printers.
In this topic: