Last Updated: August 09, 2024
Connect Entra ID
Here we provide an overview of how to connect Entra ID (Azure AD) to Vasion Automate Pro SAML SSO.
Requirements
To connect SAML 2.0 you need the following:
- Vasion Admin rights.
- Admin console access to the Entra ID (Azure AD) portal.
- Full rights to create apps in Entra ID (Azure AD).
- A user account with the SAML login type.
Create a New App
- Navigate to https://entra.microsoft.com
- On the side navigation expand the Applications section and select Enterprise applications.
- Select New Application.
- On the Browse Microsoft Entra Gallery page select Create your own application.
- In the Create your own application panel, enter a name for your application.
- Select the Integrate any other application option.
- Select Create at the bottom of the panel.
For more information about creating an app, see their help section Add an Enterprise application.
Manage the App
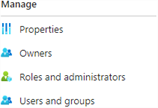
Complete the following in the Manage section:
- Add at least one owner to the app.
- Assign at least one user to the account so you can test the connection.
Setup Single Sign On
To set up single sign-on, open a new browser tab or window and access the Connect SAML modal by following the first 3 steps in the Connect SAML section below. Leave this web page open to complete the setup and connection processes.
Connect SAML
- Select the Admin app.
- Expand the Integrations option on the side menu and select Authentication.
-
Select Connect SSO.
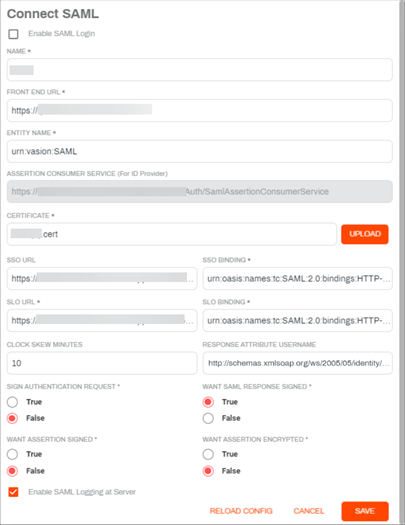
- In the Connect SAML modal complete the following:
- Name — enter a name that identifies the SAML connection.
Entity Name— enter the following:
Copyurn:vasion:SAMLServiceProvider
Continue Entra ID Setup
On the Entra ID (Azure AD) app's Overview page do the following:
- In the Getting Started section select the Get Started link under 2. Setup single sign on.
- On the Single sign-on page select SAML.
- Select Edit in the Basic SAML Configuration section on the Set up Single Sign-On with SAML pane.
- In the Identifier (Entity ID) field enter the Entity Name field value.
- In the Reply URL (Assertion Consumer Service URL), paste the value found in the Assertion Consumer Service field on the Connect SAML modal.
- Scroll down to the SAML Certificates section and select the Download link for the Certificate (Raw) option. You will need to upload the certificate file when you configure the connection.
Keep the web page open. You'll need to copy and paste the URLs found in section 4 Setup <app name> when you get to step 4 in the Connect SAML instructions below.
Select the Download Link for the Federation Metadata XML option in the SAML Certificates section. This file provides all the information related to your app and you can use it for reference, if necessary, while configuring the SAML Connection in Vasion Automate Pro.
Complete the Configuration
- Complete the rest of the options on the Connect SAML modal.
- Certificate — select the Upload button and upload the X509 certificate.
SSO URL — paste the URL from the Entra ID (Azure AD) app, Login URL field.
- SLO URL —paste the URL from the Entra ID (Azure AD) app, Logout URL field.
SSO Binding — enter the following code into this field. You can confirm the binding information by opening the XML file you previously downloaded and checking the service binding, typically found near the end of the file.
Copyurn:oasis:names:tc:SAML:2.0:bindings:HTTP-POSTSLO Binding — enter the same code into this field.

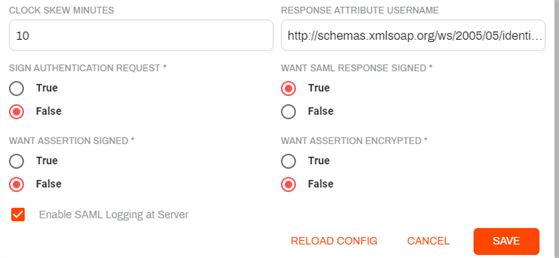
- Clock Skew Minutes — if the times are different between the client and the server, increase the number accordingly, otherwise leave the default.
- Response Attribute Username — to obtain this value do the following:
- Return to the Entra ID (Azure AD) app web page and scroll up to the Attributes & Claims section, then select Edit.
- On the Attributes & Claims page, under the Additional claims section, copy the URL listed for the user.principalname value.
- Return to the Connect SAML modal and paste the URL.
- Sign Authentication Request — set the option to False.
- Want SAML Response Signed — set the option to True.
- Want Assertion Signed — set the option to False.
- Want Assertion Encrypted — Set the option to False.
Enable SAML Logging at Server — select this option to turn on logging for SAML events to help with troubleshooting at the server level or when reaching out to Product Support.
-
Select Save.
Test the Connection
Before you test the connection make sure you have a user account created with the SAML login type. That account should have the same username as the user assigned to the new Entra ID app.
- Return to the SAML-based Sign-on web page.
- Scroll down to the bottom of the page and select Test.
- In the Test single sign-on panel select Test sign in.
- Enter or select the account username and complete the sign in process.
If the app is configured correctly you'll be signed in to Vasion Automate Pro. When you're ready, you can enable SAML SSO.
App Registration & Permissions
- Under the Security section select Permissions.
- On the Permissions panel, select the app registration link.
- On the API permissions page select Add a permission.
- Select Microsoft Graph.
- Select Delegated permissions.
- Scroll down to the User section and select User.Read.All.
- Select Add Permissions at the bottom of the panel.
- Select Grant admin consent for MSFT.
- Follow the prompts and select Accept in the Permissions Requested modal.
Enable SAML SSO
Once you're ready to enable SAML, access the Connect SAML modal and select Enable SAML Login.
Because once SAML is enabled and the identity provider's sign in flow is launched automatically, you can append the following code to the end of your Vasion Automate Pro URL on the web browser to bypass SAML login and access your instance using your admin credentials.
login?vasionLogin=trueEdit the SAML Connection
You can make any updates to the connection at any time by doing the following:
-
Select Edit SSO.
-
Update the information in the appropriate fields
- Select Save.