Scheduled Reports
Last Updated: September 08, 2026
The Scheduled Reports function exports data from the Print Job Records reports in PDF or CSV format to specified email addresses.
Key Points
- You can create Scheduled Reports for all the Print Job Records reports except Simplified Scanning.
- If you enter filters on the Print Job Records page, those filters are automatically copied to the Schedule a Report modal.
- Pop-up blockers can affect the Schedule a Report modal.
Intervals
The interval defined in the Repeats field uses the following logic:
- Daily
- Daily reports are processed and sent after 1 a.m. on the subsequent day.
- Weekly
- Weekly reports are processed and sent after 1 a.m. on Sunday of the subsequent week.
- Monthly
- Monthly reports are processed and sent after 1 a.m. on the first day of the subsequent month.
- Yearly
- Yearly reports are processed and sent after 1 a.m. on January 1 of the subsequent year.
Schedule a Report
- In the Admin Console, select Reports
 Print Job Records.
 - On the Run a Report tab, select the desired report from the Report Type field.
- Enter the start date and time and end date and time.
-
For the following reports, you can also enter filters, such as User Name, Computer Name, Printer Type, and so on.
-
Records.
-
User.
-
Job Title.
-
Manager.
-
Department.
-
Printer.
-
Folder.
Any filters you enter are automatically copied to the Schedule a Report modal.
-
- Select Schedule Report.
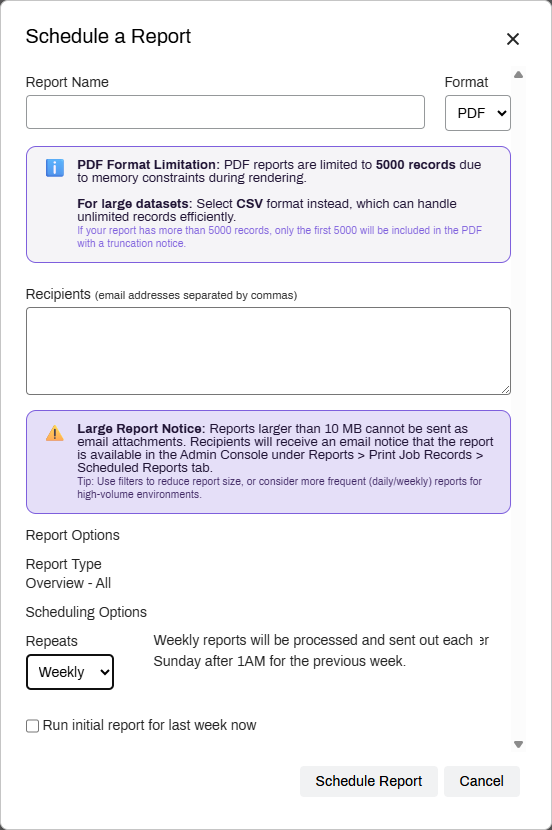
- Enter a name for the report.
-
Select the output format:
-
PDF.
-
CSV.
For Overview reports, you can select only the PDF format.
PDF reports can include up to 5,000 records. If your report has more than 5,000 records, only the first 5,000 are included.
For large datasets, select CSV. -
-
In the Recipients field, enter the destination email addresses. Use commas to separate multiple addresses.
Reports larger than 10MB cannot be sent as email attachments. Instead, recipients receive an email that the report is available in the Admin Console.
To access the attachments, select Reports Print Job Records, then go to the Scheduled Reports tab. - In the Repeats field, select the frequency:
- Daily.
- Weekly.
- Monthly.
- Yearly.
- Optional: To run the report immediately, select Run initial report for <selected frequency> now.
- Select Schedule Report.
The recipient email addresses receive a report at the specified interval. If you selected to run the initial report now, the report arrives after a few minutes.
Manage Scheduled Reports
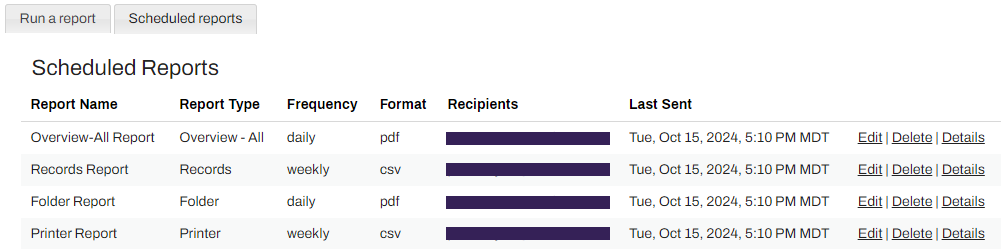
To view, edit, delete, or resend a scheduled report, select the Scheduled Reports tab on the Print Job Records screen. This brings up a list of scheduled reports and the manage options.
Edit
To edit an existing report:
- Select the Edit option on the right.
- Make any necessary changes in the Schedule a Report modal.
- Select Schedule Report when finished.
Details
Select the Details option on the right to expand the line item to show the report's history. From there you can view previous reports and select the Download report or Download CSV link to download a copy to your device. Select Run report and send to trigger another copy of the report sent to the destination email addresses.

Delete
To delete an existing report:
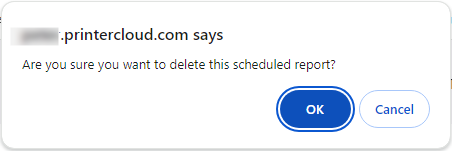
- Select the Delete option to the right of the report name.
- In the browser alert select OK.
In this topic: