Last Updated: June 18, 2024
Create Workflows
Workflow helps you customize and automate business processes using code-free workflow design that creates accountability with alerts and workflow notifications. In this section you can learn how to configure an end-to-end workflow process.
Preparation
Before you configure a workflow, here are some things you want to know in advance.
- What is required to initiate a workflow
- What are the tasks required to complete a workflow
- Who is responsible for each task
- How long it takes to complete each task
Requirements
If you would like to specify folder destinations where you would like store the document or form when it's completed, rejected or terminated, you must already have the appropriate folder created. For more details, see Create Folders.
To configure email options for completed and rejected workflows you must have already created the email templates. For more details, see Email Templates.
If you would like to include a tasklist in any of the steps you must already have tasks and tasklists configured.
Create a Workflow
- From the Vasion Home page click on Workflow or click the App button at the header and click on the Workflow app.
-
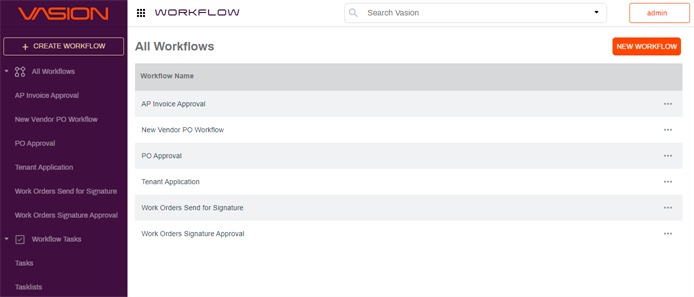
In Workflow, click the New Workflow button.
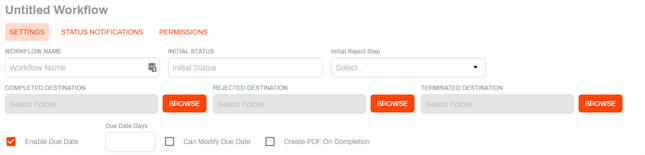
Settings Tab
Initial Workflow
- On the Settings tab, enter information about the new workflow.
- Workflow Name — enter a name for the new workflow.
- Initial Status — the status of the workflow when it starts.
- Initial Reject Step — the first step for a workflow task if it is rejected.
- Select the workflow task destinations:
- Completed Destination — click Browse to navigate to the folder where you want to store the completed workflow.
- Rejected Destination — click Browse to navigate to the folder where you want to store the rejected workflow.
- Terminated Destination — click Browse to navigate to the folder where you want to store the terminated, or ended, workflow.
- Set the priority and due dates, if applicable.
- Enable Due Date — check the box if you want a due date associated with the workflow.
- Due Date Days — use the up / down arrows to set the number of days before the task is due or enter the number.
- Can Modify Due Date — check this box to let the asignee modify the due date.
Create PDF on Completion — check this box to create a pdf of the workflow to be stored upon workflow completion.
- Workflow Initiation Type — use the drop-down to set the type for the workflow initiation and workflow view.
Upload / Browse / Scan — if you select this option, you also can associate an object to the workflow and check the boxes next to additional options.

Object — use the drop-down to associate an object to the workflow.\
Once you select an object, you can associate an object field as Primary Identifier. The new Primary Identifier option displays above the Workflow Initiation Type once the object is selected.
- Upload — check this box for the initiator to upload a file to start the workflow.
- Browse — check this box for the initiator to browse file storage and select a document to start a workflow
- Scan — check this box for the initiation to scan a document into Vasion to start a workflow.
- Allow File Attachments — check this box to allow users to attach files to this workflow.
- Open Document in Data View — check this box to allow users to use Data View in this workflow.
Form — if you select this option, associate an object to the workflow.

Object — use the drop-down to associate an object to the workflow.
Once you select an object, you can associate an object field as Primary Identifier. The new Primary Identifier option displays above the Workflow Initiation Type once the object is selected.
- Open Document in Data View — check this box to allow users to use Data View in this workflow.
Workflow Steps
- In the Workflow Steps section, click the + button to add the workflow steps.
- Step Name — enter name for this step.
- Step Type — use the drop-down to select whether the step applies to a user or a group.
- Recipient — use the drop-down to select the user to whom the workflow is routed.
- Description — enter a description for the step.
- Add Parallel Step — click this button if you would like a step that runs concurrently with the new step, and complete the fields.
- Click the + button to add the next step in the workflow.
- Continue adding steps as needed.
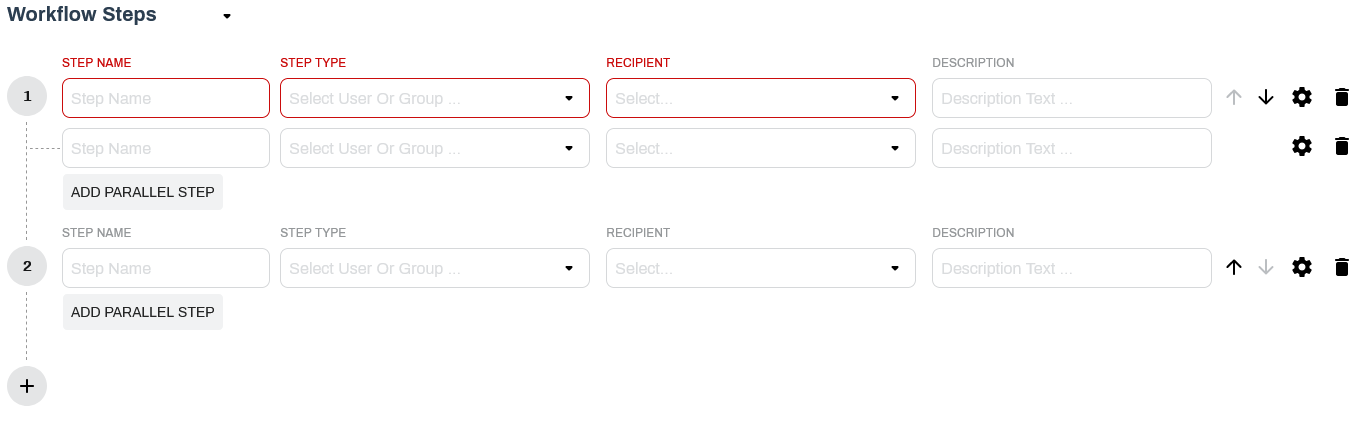
Click the up or down arrows  to reorder the steps. To delete a step, click on the Delete icon
  .
.
Step Settings
Once all the steps are added, click on the Settings icon  to configure each step.
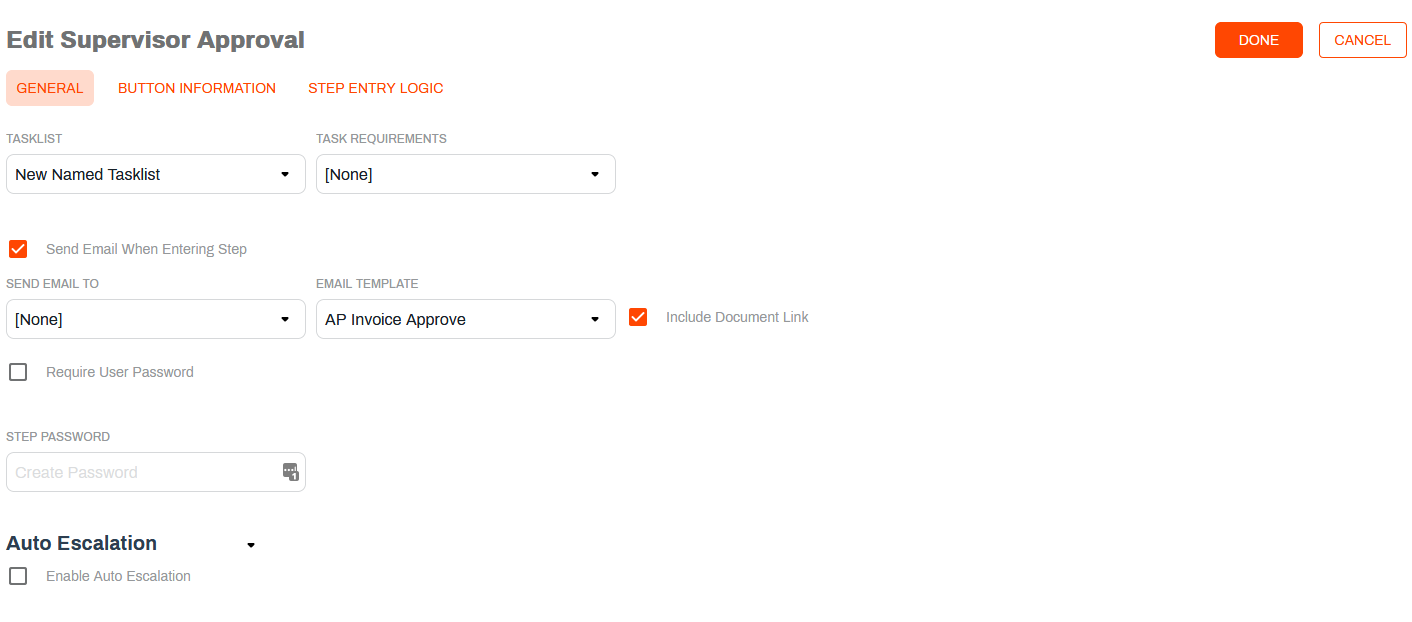
- In the step General Settings page complete the following:
- Task List — use the drop-down to associate a task list to the workflow step.
- Task Requirements — use the drop-down to select whether the task requirements are None, No Tasks Required, Workflow Note Required or All Tasks Complete.
- Send Email When Entering Step — check this box to send an email notification when the step is initiated. If this box if checked, complete the following:
- Send Email To — use the drop-down to select the email recipient.
- Email Template — use this drop-down to select the email template to use for the step. For details about email templates see Templates.
- Include Document Link — check this box to include a link to the document instead of an attachment.
- Require User Password — check this box if you would like the user to enter a password. If this box is checked, enter the password for the recipient to use in the Step Password field.
- Click on the right arrow to expand the Auto Escalation section and complete the following:
- Enable Auto Escalation — check this box to let Vasion automatically escalate the workflow.
Button Information Settings
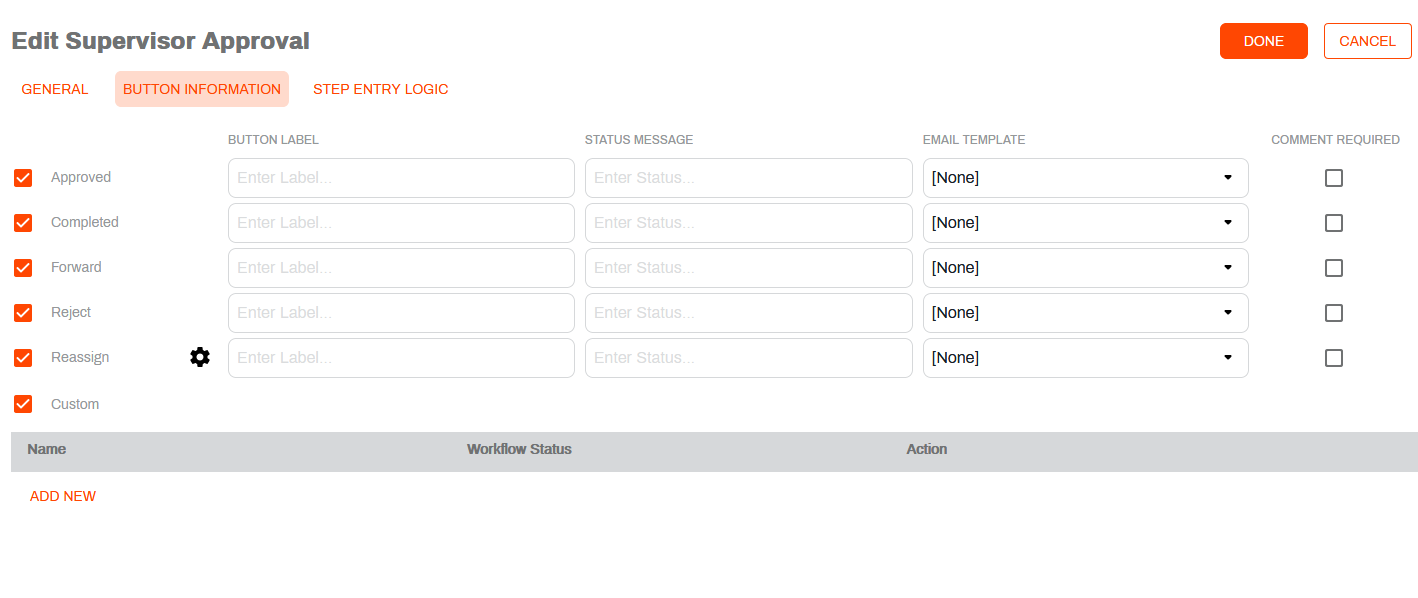
In the Button Information tab you can set buttons to display when the step your are configured start. To set the button settings:
- Click on the Button Information tab.
-
Check the box next to the button you want to include in this workflow step. When a box is checked, complete the following:
-
Button Label — enter the a label to display on the button.
-
Status message — enter the message associated with the button you want the end user to see. This message displays in the workflow status field after the user clicks the button.
-
Email Template — use the drop-down to associate a template for the email sent with this step. If you don't associate a template the default template is used.
-
Comment Required — check this box to require the end user to enter a comment on this step.
-
-
After the button(s) configuration is complete, click Done.
Step Entry Logic
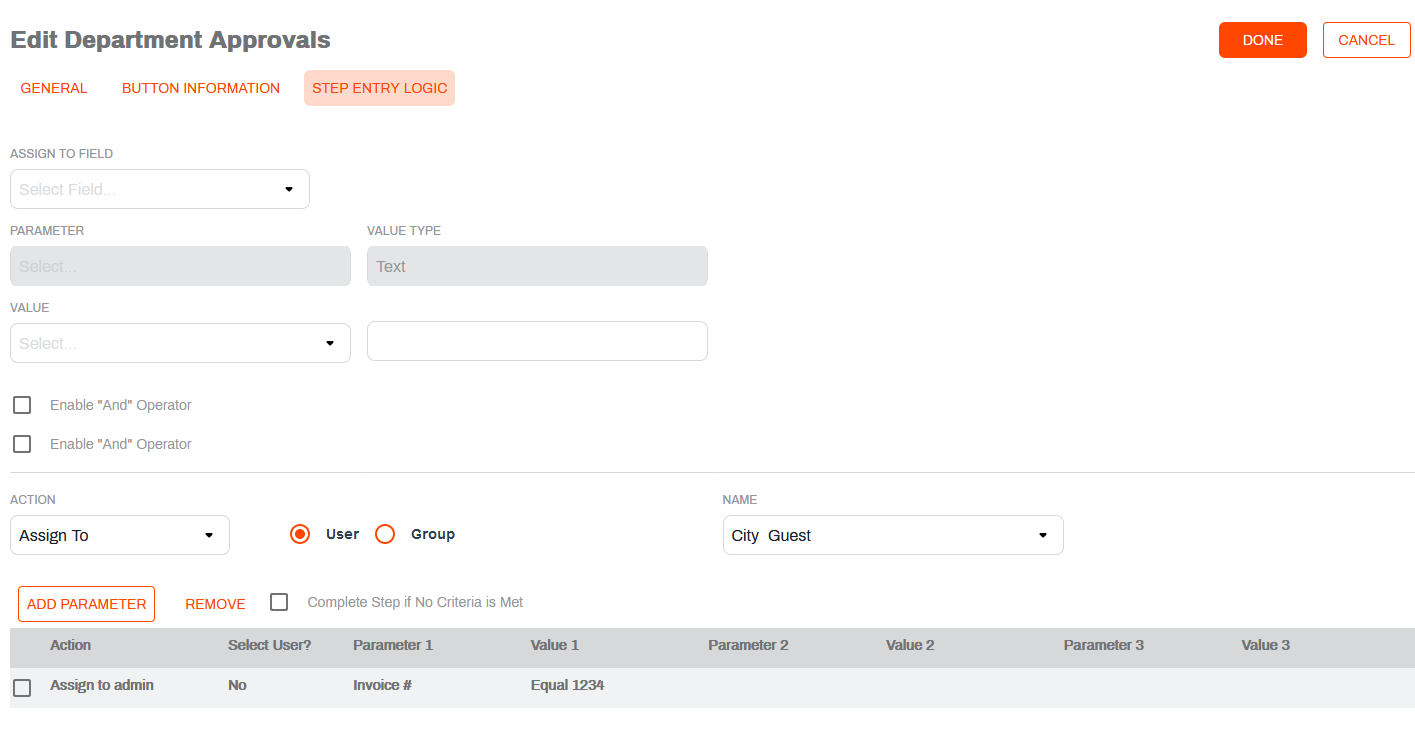
The Step Entry Logic tab is lets you configure logic for step entry and auto routing which is based on field values.
-
Click on the Step Entry Logic tab and complete the following:
-
Assign to Field — use the drop-down to select a field
-
Parameter — use the drop-down to select a field associated with the object for the workflow.
-
Value — use the drop-down to select text options and comparison options for number or date type fields.
-
Enable "And" Operator — check this box to assign a workflow route and user / roup assignment based on an additional field value. Vasion support up to 3 field values.
-
Action — use the drop-down to select one of the following actions:
-
Assign To — if selected, click on the radio button to assign to user or group. In the Name field use the drop-downt to select a user or a user group, depending on the assignment.
-
Skip Step — select to automatically skip this step
-
Complete Workflow —select to complete the workflow with this step.
-
-
-
Add a Parameter — click his button to add a new parameter to this workflow step.
-
Remove — select a parameter from the list and click this button to remove it from the workflow step.
-
Complete Step if No Criteria is Met — check this box to complete the workflow step if the criteria specified is not met based on the logic.
Complete the step settings for all the steps included in the workflow.
Workflow Advanced Options
- In the Advanced Options section select the following:
- Include Admin in All Steps — check this box to include Admin users in every step to oversee the workflow for management purposes.
- Auto Approve Documents — check this box to auto approve the documents in the workflow.
- Save Workflow Comments — check this box to save the comments added during the workflow.
User in Group Can Only Approve Once — check this box to have a document assigned to a group only be approved by a user in that group once.
Exit Workflow on Reject — check this box to have a user leave the workflow when a document is rejected.
Workflow Initiator Field — use the drop-down to select a field where the username of the workflow initiator is saved.
Workflow Action Field — use the drop-down to select the date field to update when a user takes action on a workflow item. This field is updated every time a user takes any action.

Email Options
-
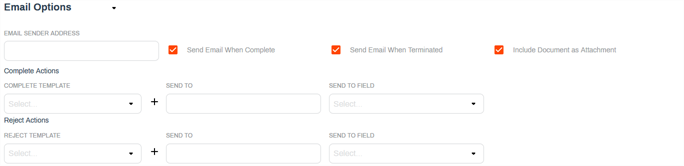
Click the arrow next to Email Options to expand the section.
- Select the email options for this workflow:
- Email Sender Address — enter the email address that displays in the “from” field on emails sent for this workflow.
- Send Email When Complete — check the box to have an email sent each time a document in the workflow is completed. When this box is checked, complete the following:
- Complete Template — use the drop-down to select an email template to use for the completed workflow email.
- Send To — enter the email address of the user to whom the completed email should be sent.
- Send to Field — use the drop-down to select a field where the sent to email is saved.
- Send Email When Rejected — check the box to have an email sent each time a document in the workflow is rejected. When this box is checked, complete the following:
- Reject Template — use the drop-down to select an email template to use for the rejected workflow email.
- Send To — enter the email address of the user to whom the rejected email should be sent.
- Send to Field — use the drop-down to select a field where the sent to email is saved.
- Include Document as Attachment — check the box to include the document as an attachment to each email sent.
In Workflow Permissions you can learn how to restrict access to a workflow.