webprint
Configure Web Print
Last Updated: August 27, 2026
Web Print uses Vasion's Off-Network Cloud Print (ONCP) app installed on the printer. To allow guests to print, you must turn on the Control Panel Application (CPA) Secure Release Print feature on the printer. The steps below guide you through the configuration process.
Requirements
Review the Requirements before configuring this feature.
Process Overview
You perform these high-level procedures:
- Configure SMTP Settings.
- Select Printers, Authentication, & Preferences.
- Turn On Web Print.
- (Optional) Install Web Print Code Authentication.
1. Configure SMTP Settings
Follow these steps:
- In the Admin Console, go to Tools
 Settings General.
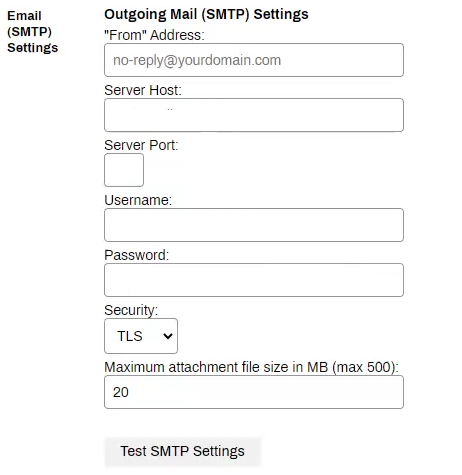
 - In the Email (SMTP) Settings section, leave the "From" Address field blank. Received emails show no-reply@vasion.com as the sender.
- Enter the server host of your email server.
- Enter the server port. The default is TCP port 25.
- Enter the username and password for the email server service account.
- From the Security dropdown menu, select either SSL, TLS, or None.
- Set the maximum attachment file size in the Maximum attachment file size in MB (max 500) field.
- Select the Test SMTP Settings button to confirm connectivity.
- Select Save.
2. Select Printers, Authentication, & Preferences
Consider these options when setting up Web Print:
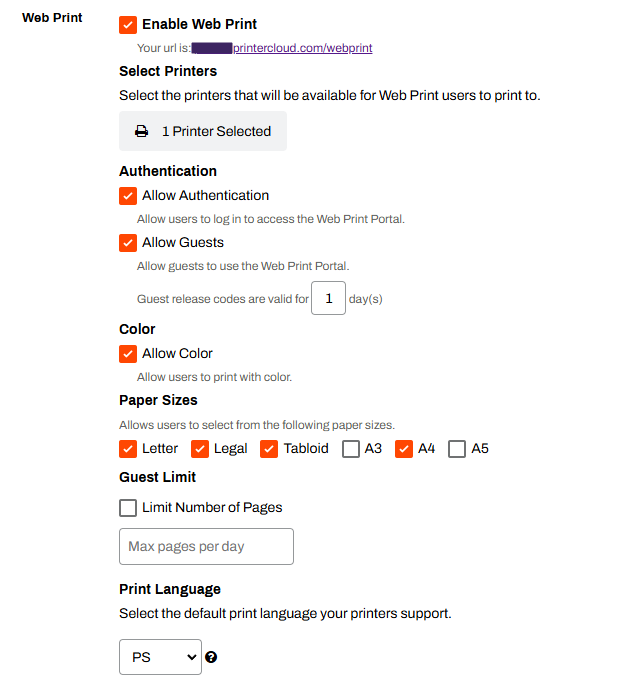
- Allow Authentication: This option uses existing identity provider (IdP) configurations in your environment to authenticate users. When you turn on only this option, all users must authenticate to use the Web Print Portal.
- Allow Guests: This option does not require authentication to use the Web Print Portal.
- If you turn on this feature without the Allow Authentication option, users enter their email addresses when using the Web Print Portal, which generates an email with steps and a code to release the job at the printer.
- If you turn on this feature with the Allow Authentication option, managed users authenticate to use the Web Print Portal, and guests use the Continue as Guest option.
Follow these steps:
- In the Admin Console, go to Tools
 Settings Printing.
 - Scroll down to the Web Print section. You configure the Web Print settings before turning on the Web Print Portal.
-
Use the Select Printer(s) button to select the Web Print printers.
Only printers configured for ONCP appear as options. For more details refer to Off-Network Cloud Print (ONCP).
- Select the authentication method:
- Allow Authentication: Requires users to sign in to access the Web Print Portal.
- Allow Guests: Allows guests to use the Web Print Portal via email address.
- Define the code validity length in the Guest release codes are valid for (x) days field.
- (Optional) Select Allow Color to let users print in color.
- In the Paper Sizes section, select the paper sizes that should appear in the Web Print Portal.
- Options include Letter, Legal, Tabloid, and A3 through A5.
- (Optional) Select Limit Number of Pages.
- In the Max pages per day field, set the daily printing limit per user.
- (Optional) Use the Print Language dropdown menu to define the default print language.
- Options include PS, PCL5, PCLXL, PDF, and XPS.
When you select a printer for Web Print, an additional option appears on its Port tab that allows printer-specific print-language definitions.

3. Turn On Web Print
Follow these steps to turn on the Web Print Portal:
- In the Web Print section, select the Enable Web Print option.
-
Select Save.

After you turn on Web Print, use the link in the Web Print section to visit your Web Print Portal. If you are not using the Allow Guests option or Secure Release Print, Web Print is ready to use.
4. (Optional) Install Web Print Code Authentication
The steps below are for installing Web Print code authentication on the CPA. Guest Web Print requires Secure Release Print and Web Print code authentication installed on the printer so that the user can release held jobs.
If you are using the printer object's Apps tab to install individually, install Secure Release Print and Web Print code authentication at the same time. If you are using the CPA Manager to bulk install, install Secure Release Print first, and then add Web Print code authentication using the Modify option.
Install Using the Apps Tab
For information on supported printers, prerequisites, and detailed steps for installing CPA Secure Release Print, refer to CPA 2.0.
Follow these steps:
- In the Admin Consoletree structure, select the printer on which you want to install the CPA.
- Select the Apps tab.
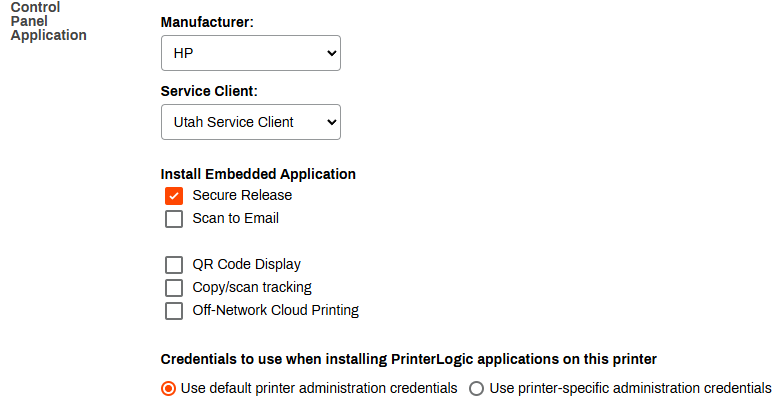
- From the Manufacturer menu, select the printer manufacturer.
- Select the Service Agent you want to use to install the CPA.
- In the Install Embedded Application section, select the Secure Release option.
- Ensure the credentials are correct.
-
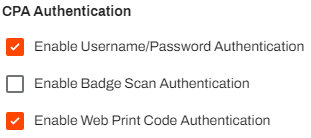
In the CPA Authentication section, select the checkbox for Enable Web Print Code Authentication.
- Select Save.
After the printer settings update, Web Print is ready for use.
Install Using the CPA Manager
For more information on the CPA Manager, refer to CPA Manager.
Follow these steps:
- In the Admin Consoletree structure, select the Service Agent that is running the Printer Apps service.
- Select the Printer Apps tab.
-
From the Printer(s) list, select the printers.
You can select only printers from the same manufacturer if you are modifying multiple printers.
- From the Actions dropdown menu, select Modify.
-
In the CPA Authentication section, select the checkbox for Enable Web Print Code Authentication.
- Select Save.
After the printer settings update, Web Print is ready for use.
Troubleshooting Help
If no printers appear in the printer selection list, verify that Off-Network Cloud Print is configured and active on each intended Web Print printer. Only ONCP-enabled printers appear as options. For more details refer to Off-Network Cloud Print (ONCP).
If guests receive a release code but cannot release the job at the printer, verify the following:
- CPA 2.0 with the Secure Release Print feature is installed on the printer. For more details refer to CPA 2.0.
- The Enable Web Print Code Authentication checkbox is selected on the printer's Apps tab or via the CPA Manager.
- The guest code has not expired. Verify the value in the Guest login codes are valid for (x) days field.
If uploaded jobs do not arrive at the printer or get stuck in a pending state, verify the following:
- print-api.app.<Instance_FQDN> is in your firewall allowlist.
- The Service Agent running the Internal Routing Service is online and communicating with the Admin Console.
- OR the Off-Network Cloud Print app on the printer is current. An outdated app version can prevent job delivery.
Some Fujifilm devices require a PostScript (PS) module to use Web Print. If a Fujifilm printer is not accepting Web Print jobs, confirm that the PS module is installed on the device before contacting support.
Contact your Fujifilm representative for assistance with PS module installation.
This is expected behavior for printers designated for Web Print. Printers assigned to Web Print do not display Secure Release Print prompts, even when Secure Release Print is configured. The print job either holds for code-based release or prints immediately, depending on your setting.
If you need a printer that supports both standard Secure Release Print prompts and Web Print jobs, you must assign separate printers for each workflow.
In this topic: