Toshiba CPA 2.0
Last Updated: August 26, 2026
Complete the requirements, and follow the steps below to install the second-generation Control Panel Application (CPA) on a Toshiba printer. For a list of supported devices, refer to Supported Printers for Printer Apps.
Installation Requirements
Complete all Universal Requirements, and ensure functionality prior to CPA setup. Toshiba also requires the following:
- Firmware version SY0W1700 or later is recommended. The installation process uses PrinterLogic Output service application programming interfaces (APIs) that might not be included in older firmware, which can cause the installation to fail on Toshiba devices.
- Turn on Secure Sockets Layer (SSL) or Transport Layer Security (TLS) in the printer's web interface by going to Administration
 Setup Network HTTP. For the Enable SSL/TLS option, select Enable.
 - Set the IP Address or Hostname field on the Service Agent's General tab to the Fully Qualified Domain Name (FQDN) of the Service Agent host. Using an IP address in this field causes CPA functionality issues.
- All devices, including the Service Agent, printers, etc., must be allowed to reach the Domain Name System (DNS) and resolve names.
Additional Port Information
CPA installation and uninstallation occur between the Service Agent and the printer over TCP ports 10443, 49629, and 49630.
CPA operation requires two main communication paths:
- From the printer to the Service Agent object over TCP 31988.
- From the printer to the PrinterLogic instance, cpp-ui.app.printercloudnow.com and cpa-api.app.printercloudnow.com, over TCP 443.
Everyday print communication occurs from the device to the printer over TCP 9100 or TCP 515 for Line Printer Remote (LPR) queues.
Communication for Simplified Scanning features occurs over TCP 50083 between the printer and the Service Agent.
By default Certificate Revocation List (CRL) checks occur over TCP 80 from the Service Agent. The installation might fail if the CRL check cannot complete over port 80.
USB Badge Reader Settings
If you use a USB badge reader, turn on the keyboard emulation.
Turn On the Keyboard Emulation
Follow these steps:
- Press and hold the reset and start buttons simultaneously to restart the device. Release the buttons when they light up.
- Enter "#1048#" as the password.
- Now that the device is in service mode, select 08 Settings Mode, and select the Next button.
- Select the Classic button at the top of the screen.
- Enter the value "3500." Then select the Start button.
- Set the value to "60001." Then select the OK button.
- Restart the device.
Simplified Scanning Settings
Scan To features require the following setting configurations.
To configure the Remote Scan / WS-Scan option:
- Go to User Management Role Management Guest Scan Function.
- Set the Remote Scan / WS-Scan option to Pull.
To enable SSL or TLS in the printer's web interface:
- Go to Administration Setup Network WSD.
- For the Enable SSL / TLS option, select Enable.
To check if the Guest User Profile is set to Available:
- Go to User Management User Accounts.
- Locate the Guest account in the list and check the Status column.
- If it is not set to Available:
- In TopAccess, go to Administration Security Authentication.
- Open the User Authentication Setting.
Set the User Authentication dropdown to Enable.
While User Authentication is set to Disable, the rest of the settings on this page, including the Enable Guest User checkbox, are greyed out and cannot be changed.
- Select the Enable Guest User checkbox, and save any changes.
- In TopAccess, go to Administration
- Return to User Management User Accounts and confirm the Guest User Profile now shows Available.
General Authentication Options
The authentication options on the TCP / IP printer determine what the CPA shows to the end user. If you use the same authentication options for all printers, you can use the default settings. If you want to set specific methods by printer, you can choose which printer-specific options you want available for setup on individual printers.
Default Settings
Note that default authentication settings vary depending on the identity provider (IdP). Lightweight Directory Access Protocol (LDAP) settings differ from settings available for a cloud IdP, such as Okta and Entra ID (Azure AD).
For provider-specific attribute mapping, refer to
Cloud IdPs like Entra ID and Okta support badge and PIN authentication. The username and password option is not available.
In the Admin Console, go to Tools  Settings General, and scroll down to the Identity Provider Settings. Follow the appropriate steps below for your provider.
- Username & Password
- User ID & PIN
- Badge Scan
Users sign in with their network credentials or the same credentials they use to sign in to the device. This method requires no additional setup beyond your Lightweight Directory Access Protocol (LDAP) Identity Sync configuration since it uses the credentials already defined there.
To verify this LDAP option:
-
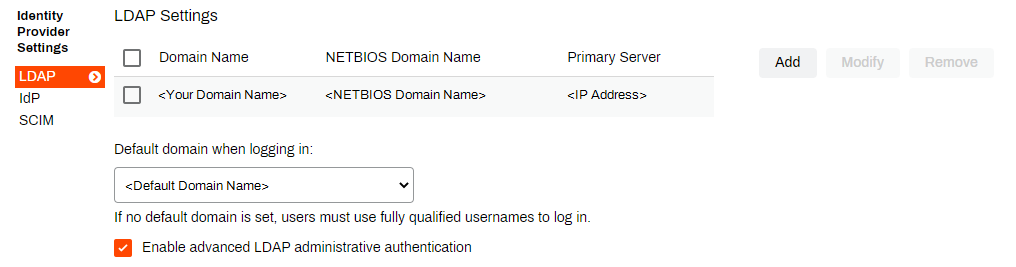
In the Identity Provider Settings section, select LDAP, and ensure that you correctly configured your LDAP credentials.
-
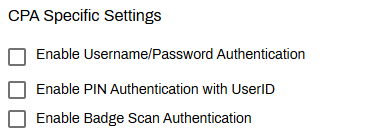
Scroll down to CPA Specific Settings section and verify / turn on Enable Username/Password Authentication.
- Select Save in the upper-right corner.
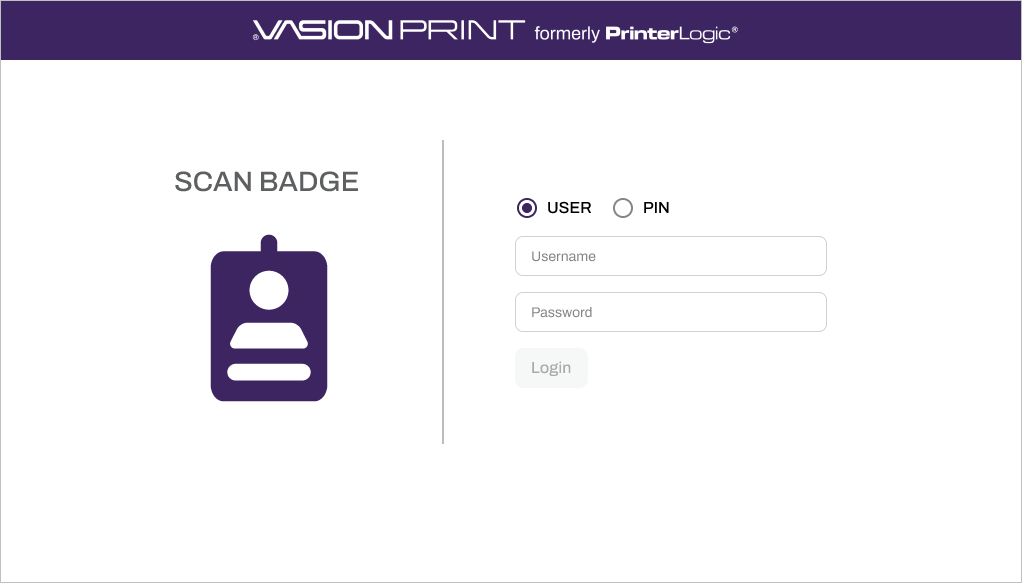
PIN authentication requires the end user to enter a user ID and PIN at the CPA.
 LDAP Settings
-
In the Identity Provider Settings section, select LDAP.
-
In the CPA Specific Settings section select Enable PIN Authentication with UserID.
- Select the PIN storage option:
- PrinterLogic Database: Enter the The field name containing UserID.
- Active Directory (AD): Enter The field name containing UserID and The field name containing PIN.
- Select Save in the upper-right corner.
If you select the Database option, users set their PIN in the Self-service Portal. For more details refer to PIN Self-Registration.
IdP Settings
-
In the Identity Provider Settings section, select IdP.

-
In the CPA Specific Settings section select Enable PIN Authentication.
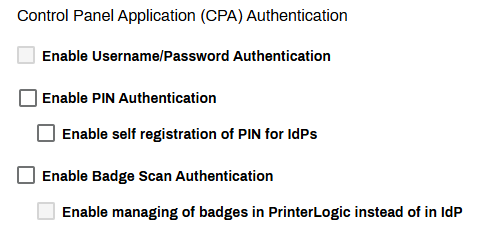
- If you do not use your IdP to map and manage PINs, select Enable self registration of PIN for IdPs.
- Select Save in the upper-right corner.
Do not select Enable self registration of PIN for IdPs for IdPs if you already have a PIN attribute mapped through your IdP.
If you select the Enable self registration of PIN for IdPs option, users set their PIN in the Self-service Portal. For more details refer to PIN Self-Registration.
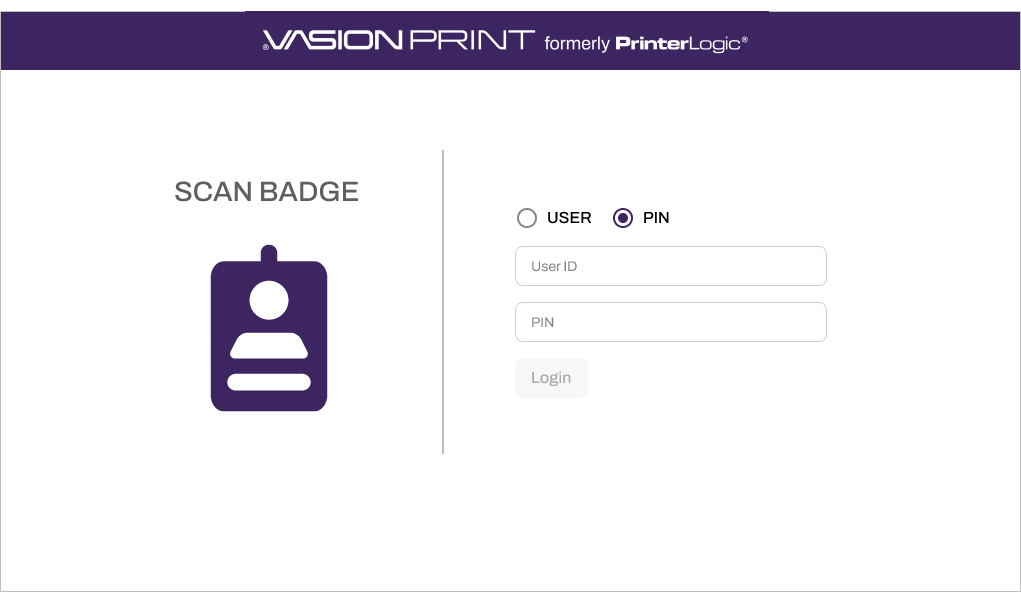
Badge scan authentication requires the end user to scan a badge, card, or dongle at the CPA. For LDAP, the first time users scan their badge, the CPA prompts them for their network credentials.
LDAP Settings
-
In the Identity Provider Settings section, select LDAP.
-
Scroll down to the CPA Specific Settings section and select Enable Badge Scan Authentication.
- Set badges to store in either the PrinterLogic Database or pull from Active Directory (AD). For AD, provide the field name that contains the badge ID attribute.
- Select Save in the upper-right corner.
If you select the Database option, badge registration becomes mandatory.
- Manage and import badges using the PrinterLogic Badge Management page.
- Or the user can set up their badge in the Self-service Portal. For more details refer to Badge Self-Registration.
IdP Settings
-
In the Identity Provider Settings section, select IdP.
-
In the CPA Specific Settings section select Enable Badge Scan Authentication.
- If you do not use your IdP to map and manage badges, select Enable managing of badges in PrinterLogic instead of in IdP.
- Select Save in the upper-right corner.
Do not select Enable managing of badges in PrinterLogic instead of in IdP for IdPs if you already have a badge attribute mapped through your IdP.
If you select the Enable managing of badges in PrinterLogic instead of in IdP option, users set their badge in the Self-service Portal. For more details refer to Badge Self-Registration.
Global Install Credentials, Security, & Single Sign-On (SSO)
In the Control Panel Application section on Tools Settings General set global installation credentials if the username and password to access the printer's UI are the same. Installation credentials can be adjusted per printer on the Apps tab or through the CPA Manager.
This section also includes the global Enabled or Disabled settings for SSO
- In Provider mode you can lock the printer so that a user must authenticate before they can access the printer's control panel.
- In Listener mode PrinterLogic listens for when another app acting as the SSO provider authenticates a user and passes that user information to the CPA. The user can then select PrinterLogic on the control panel.
- To review and understand the Enable higher security options and impact, refer to Transport Layer Security (TLS) Settings
To set global installation credentials or turn on SSO
- Go to the Control Panel Application section.
-
Use the Username and Password fields to set the global installation credentials.
The credentials must have admin rights to the printer.
-
Turn SSO on or off using the Enabled and Disabled options.
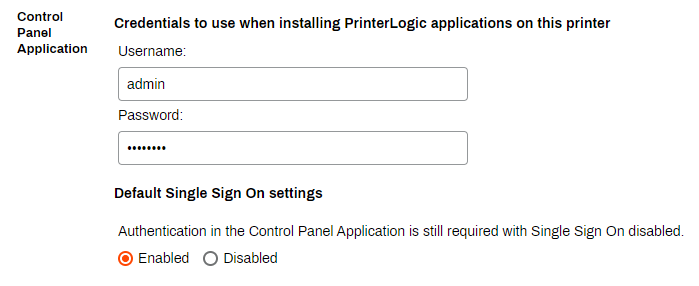
- Turn on higher security using the Enable higher security checkbox.
- Select Save in the upper-right corner.
Install the CPA
These steps are for installing the CPA on a single printer using the printer's Apps tab. To install the CPA on multiple printers at once, refer to CPA Manager.
Follow these steps:
- In the Admin Console tree structure, select the Service Agent that you want to run the app service.
-
On the General tab, enter the FQDN in the IP Address or Hostname field, and then select Save.
Using an IP address in this field causes CPA functionality and installation issues. Use only an FQDN for the Service Agent. - Return to the tree structure, and select the printer on which you want to install the CPA.
- Select the Apps tab.
-
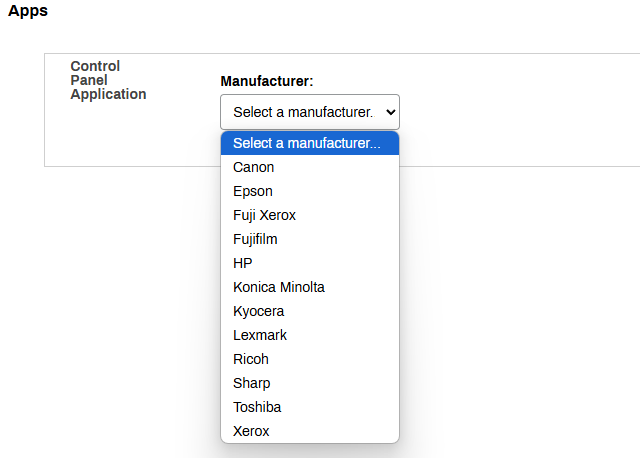
From the Manufacturer menu, select the printer manufacturer.
- Select the Service Agent that you want to use to install the CPA.
-
In the Install Embedded Application section, select the Secure Release option.
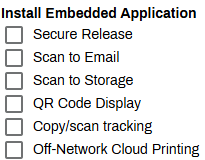
- Select the checkboxes for any additional apps that you want to install:
After installation the device goes to sleep as part of the deployment process. The device restarts after installation completes. The MDS settings configuration can take 5 or more minutes prior to start-up. Until the app is completely installed, error messages might appear on the screen.
Installation Credentials
If your printers do not share the default username and password, defined on Tools Settings General in the Control Panel Application section, to access the printer's UI:
- Go to the Apps tab, Credentials to use when installing... section.
- Select Use printer-specific administration credentials.
- Enter in the printer's username and password.
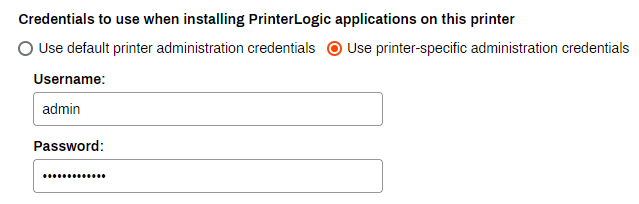
The credentials must have admin rights to the printer.
CPA Authentication Options
The options below appear depending on what you select in the CPA Authentication settings. Note that authentication features vary depending on the printer manufacturer.
If you use an IdP, the Control Panel Application (CPA) supports only badge and PIN authentication.
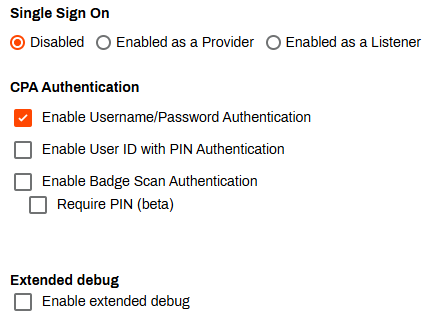
For SSO, select from:
- Disabled: Normal CPA authentication without SSO.
- Enabled as a Provider: Users authenticate through the CPA screen before accessing apps.
- Enabled as a Listener: Users authenticate through another SSO provider and the CPA listens in the background and accepts the authorization.
For CPA Authentication, select from the option(s) you enabled in the General Authentication Options section above.
The Extended debug section is more for troubleshooting and contains:
- Certificates to download the PrinterLogic CA.
- PrinterLogic Control Panel Application manual install URL.
Start the Installation
With your settings in place:
- Select Save to start the installation.
Do the following if installation fails:
- Note the error message, and check the Printer Apps logs. For more details refer to PrinterLogic Log File Locations.
- Review and adjust your configuration to ensure that it meets all requirements.
- Select the Try Again button to restart the installation.

The installation process may trigger a device restart once complete.
Uninstall the CPA
Follow these steps:
- In the Admin Console, select the Apps tab for the printer from which you want to remove the CPA.
-
Deselect the options in the Install Embedded Application section.
- Select Save.
After an uninstall the device is put to sleep as part of the process. The device will reboot after the uninstall is completed.
Troubleshooting Help
Is an Identity Provider Configured?
The CPA requires the use of an IdP. This can be LDAP or another IdP such as Entra ID (Azure AD), Okta, etc.
Check the Default Printer Admin Credentials
Are the default printer admin credentials correct?CPA installations can fail if the admin username and password are incorrect. You can resolve this issue by modifying the credentials used for CPA installation. With the Modify option in the CPA Manager, update the credentials for multiple printers as long as they are the same brand. Often, the default admin name and password are the same multiple manufacturers.
Is There a Self-signed Certificate?
At a minimum, the printer requires a self-signed certificate. If an Amazon Root CA 1 certificate is not installed, refer to Amazon Root CA 1 Cert for the steps to obtain the certificate so you can manually install it on the printer.
Is There a Time Difference Between the Service Agent and the Printer?
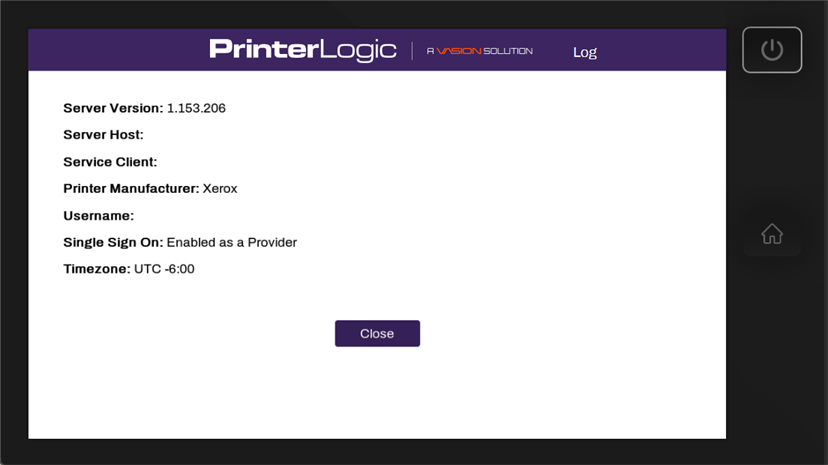
If a certificate did not authorize, it could be because a printer is in a different time zone than the Service Agent hosting the Printer Apps. When the Service Agent pushes out the CPA application with the certificate, due to the time difference, the certificate may be expired.
You can reach the info page to check the timezone in two ways:
- Log in to the CPA, then select the PrinterLogic logo at the top.
- Install the CPA with Extended Debug mode enabled, then select the PrinterLogic logo at the top (without the need to log in first).
Check the Network Settings
- Verify that the IP address assigned to the printer is accurate within the Admin Console.
- Ensure that you can successfully ping the printer from the Service Agent machine.
Are You Using a Universal Print Driver?
Sometimes printer-specific drivers can cause installation issues for the CPA. Use a universal print driver to ensure a smooth and successful installation.
This is a generic communication error. A few things to check are:
- The Service Agent is not listening over port 31988. Update the configuration to allow listening over port 31988.
- The printer does not trust the PrinterLogic certificate. Register or upload a new certificate.
Fuji Xerox Specific
In the printer settings, configure the Domain Name within the DNS Configuration settings to see if it resolves.
The CPA requires a Service Agent to install apps to the printer. Check that the Service Agent machine is not shut down or in an error state.
On the machine, open the Task Manager and select the Details tab. In the Search field, type "printer" to locate the Agent processes.
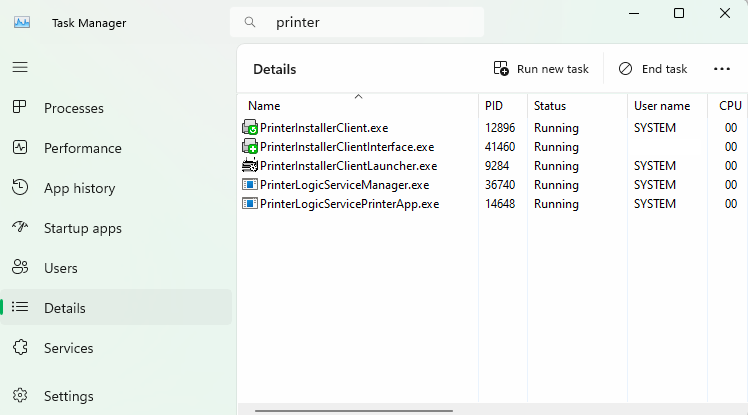
If neither the PrinterLogicServiceManager.exe nor PrinterLogicServicePrinterApp.exe process is running on the Service Agent device, verify the Agent installation and / or Service Agent installation.
Verify the Client Installation
Verify the Agent is installed, authorized, and pointing to the correct instance. A quick test is to click the system tray icon to open the Self-service Portal. If it opens to the correct URL, and you can sign in and view / install printers from the portal, then the Agent is authorized.
If you are prompted for an authorization code in the Self-service Portal, refer to Device Authorization for steps on how to create one.
If the Self-service Portal opens to an incorrect URL, you need to set the home URL. Refer to Update the Home URL.
Verify the Service Agent Configuration
Navigate to C:\Program Files (x86)\Printer Properties Pro\Printer Installer Client\ServiceHost, and check the following:
If the Service Host folder is not created, check the machine's hostname or IP address and compare with what you entered for the Service Agent in the Admin Console.
If the folder is created, check the config folder in it. A token.json file is saved here when the Service Agent is authorized.
If the folder is created, but the token.json file is not there, you need to reauthorize the Service Agent, refer to Reauthorization Steps. Please note that the Service Agent authorization is different from the Agent authorization.
By default, the Visual C++ Redistributable for Visual Studio 2015 (32-bit/64-bit) or newer is typically already installed. However, both the x86 and x64 redistributable packages must be installed on the Service Agent to generate the items required for a successful installation. Without the packages, the Service Agent cannot initiate the app service. You can find these packages in the Microsoft Download Center.
The CPA requires an email address associated with each IdP user, which it uses as the username when logging in. This scenario occurs when an email address has not been associated with the user within the IdP.
You can find the log file on the Service Agent machine at the following path:
Windows:
C:\Program Files (x86)\Printer Properties Pro\Printer Installer Client\ServiceClientLogs\PrinterLogicServicePrinterApp.log
Mac/Linux:
/opt/printerinstallerclient/log/printerlogicserviceprinterapp.log
If the installation fails with an InvalidSolutionsKeyError, update the printer's region in the firmware settings.
In this topic:
The CPA can show text in the following languages. For more details refer to Supported Languages.
- Dutch: 0413.
- English: 0409.
- French: 040C.
- German: 0407.
- Italian: 0410.
- Japanese: 0411.
- Polish: 0415.
- Portuguese: 0416.
- Simplified Chinese: 0404.
- Spanish: 040A.
- Swedish: 0409.
- Thai: 041E.
- Turkish: 041F.