Imprivata

Last Updated: May 21, 2026

Use this topic to configure Vasion Print to work with Imprivata Enterprise Access Management (EAM) for badge-based secure print release. Configuration involves steps in both the Vasion and Imprivata Admin Consoles.

Requirements

Review the Requirements before configuring this feature.

Configure the Imprivata Integration

1. Enable API Access in Imprivata

Enable API access for Vasion in the Imprivata portal so that the CPA can authenticate badge credentials against Imprivata. You must also configure a procedure code so Imprivata notifies the Vasion Client when a user logs in.

Enable API Access

To enable API access:

  1. Sign in to the Imprivata portal.
  2. Select the Settings icon, then API Access.

    Imprivata console showing the settings menu exapnded and API Access selected.

  3. Select Allow Full API Access via Confirm ID.

    API Access dropdown showing Allow full API access via Confirm ID selected.

  4. Select Save.

Configure a Procedure Code

To configure the procedure code:

  1. In the Imprivata portal, select the Settings icon, then Extensions.

  2. Select View / Edit next to Procedure Code, then select Add.

    Procedure code section showing the View and Edit option near the bottom of the section.

  3. Enter a name for the procedure code.
  4. Select the event trigger: when User Login or Desktop Unlocked.

    Imprivata UI showing the expanded procedure code with the User Login and Desktop Unlocked logic.

  5. Set the file extension to BAT and enter the following script:

    Copy Code

    Procedure Code

    "C:\Program Files (x86)\Imprivata\OneSign Agent\ISXRunAs.exe" "C:\Program Files (x86)\Printer Properties Pro\Printer Installer Client\PrinterInstallerClient.exe" "silentrefresh"
  6. Select Save.
  7. Go to Computers, then Computer Policies and open the applicable computer policy.
  8. On the Extensions tab, select Enable Procedure Code Extension Object.

    Computer policies Extension tab showing the enabled procedure for the selected computer policy.

  9. Select Save.

2. Create a Custom SAML Application in Vasion

Create a SAML application in Vasion to connect to Imprivata.

  1. In the Vasion Admin Console, go to Tools then Settings then General.
  2. Scroll down to the Identity Provider Settings section.
  3. Select IdP, and then select Add.
  4. Select Imprivata from the IdP Template dropdown menu.
  5. Select SAML2 in the Authentication Protocol section.
  6. In the Provisioning section, if you are using Systems for Cross-domain Identity Management (SCIM), leave the JIT option deselected.

    By default, the Admin Console assumes that you are using SCIM for provisioning. Only select JIT if you are not using SCIM.

  7. In the Name field, enter the name that you want to appear on the login button for users. For example, My Company, Login, or Acme Corp.
  8. Scroll down, and select the desired settings:
    • Enable for End User Login: Allows end users to log in using this IdP. (Self-service Portal)
    • Enable for Admin Login: Allows admins to log in using this IdP. (Admin Console)
    • You can select both checkboxes when you are using a single IdP or the admin and end users use the same IdP to log in.

IdP Settings showing multiple fields and Service Provider Information section.

Keep the IdP Settings modal open so that the Service Provider Information section at the bottom is available for the following steps.

3. Create Imprivata App

To create the Imprivata app:

  1. In the Imprivata EAM portal, go to Applications Single sign-on application profiles.

    Imprivata showing the expanded Applications menu and the Single sign-on application profiles option selected.

  2. Use the Add App Profile dropdown to select Application using SAML.

    Add App Profile dropdown expanded to show the Application using SAML option selected.

  3. Give the application a profile and user-friendly name.
  4. In the Identity Provider (IdP) metadata section:

    1. Select View and copy Imprivata (IdP) metadata.

      Identity Provider metadata section showing the link to open the metadata for the IdP configuration.

    2. Copy the SSO URL (redirect) and paste it into the Vasion SSO URL field.
    3. Press tab to autopopulate the Issuer ID and Issuer URL fields.
    4. In the Imprivata IdP SAML Metadata modal, download the Imprivata IdP certificate.
    5. Open in the text editor of your choice and copy the value, including the Being and End Certificate headers.

      SAML Certificate opened in Notepad, showing the body of the content highlighted, excluding the being and end certificate lines.

    6. Paste the value in the Vasion X-509 Certificate field.
    7. Close the Imprivata IdP SAML Metadata modal.
  5. Copy the Vasion Identifier (Entity ID).
  6. Select Apply in the Vasion modal.
  7. Select Save in the upper-right corner.

Imprivata IdP SAML Metadata modal showing the different URLs for the configuration.

If you do not apply and save the IdP Settings modal, the metadata collection via URL in the next section will not work.

4. Add SAML Metadata

To add the SAML metadata:

  1. In the Imprivata Service Provider (SP) metadata section:
  2. Select the Get SAML metadata button.
  3. Select From URL and paste the Identifier (Entity ID) into the field.

    Get SAML metadata modal showing the options for From URL and From XML.

  4. Select OK.
  5. In the same section verify or adjust the following:
  6. Adjust the NameID format preference to Unspecified.
  7. Adjust the Returned attribute to User logon name - Pre W2k (sAMAccountName).
  8. Select Save at the bottom of the Imprivata screen.

Imprivata Service Provider metadata section showing the user mapping fields and Get SAML Metadata button.

5. Confirm CPA Settings

To confirm the badge authentication method:

  1. Back in Vasion, in the Identity Provider Settings section, confirm IdP is selected.
  2. In the CPA Specific Settings section, select Enable Badge Scan Authentication.
  3. Select Save in the upper-right corner.

CPA Specific Settings section showing the Enable Badge Scan Authentication option selected.

Do not select Enable managing of badges in PrinterLogic instead of in IdP. Imprivata owns the badge database. Enabling this setting creates a conflict between the two systems.

6. Enable Imprivata Badge Authentication

With this setting enabled, only Imprivata badge authentication will work on devices with the CPAs installed from this Service Client, other user authentication methods will not.

To enable Imprivata badge authentication:

  1. In Vasion, go to the Service Client running the Printer Apps service.
  2. Select the Printer Apps tab.
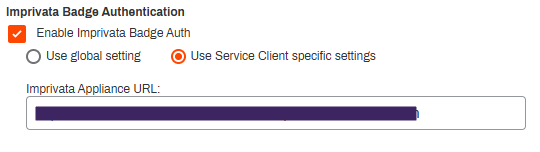
  3. In the Imprivata Badge Authentication section, select Enable Imprivata Badge Auth.
  4. Enter the Imprivata Appliance URL in the field provided.

  5. Select Save in the upper-right corner.

Imprivata Badge Authentication showing the Enable option and the field for the URL.

The Imprivata Appliance URL is the full address of your Imprivata admin console login page. Enter the complete URL, including the path. For example, https://example.com/sso/administrator.htm. Do not enter only the base domain.

7. Enable Identity Sync

Identity Sync provisions users into the Vasion instance where they are associated with the Imprivata IdP connection.

On the same Service Client:

  1. Select the Identity Sync tab.
  2. Select Enable LDAP Identity Sync.
  3. Use the dropdown next to Associate Groups and Users with to select your Imprivata configuration.
  4. Confirm the identity linking attribute is set to sAMAccountName.
  5. Select Save in the upper-right corner.

Identity Sync tab showing the Imprivata configuration selected and the option enabled.

8. Deploy Imprivata

To finish and deploy the Imprivata connection:

  1. Back on the Imprivata Single Sign-On application profiles page, select your app.
  2. Select the Deploy option from the menu.

    App menu showing the app selected and the Deploy option available in the top menu.

  3. On the Deploy application page, select Deploy This Application?
  4. Select Deploy to All Users and Groups?, or deselect and choose specific users and groups.
  5. Select Save when finished.

After you configure the connection, clinicians can badge in at the MFP using their Imprivata proximity badge to view and release their print jobs. If badge authentication fails, a manual login option is available at the MFP.

Next Steps