SNMP with a Service Agent
Last Updated: September 08, 2026
Below are the steps to set up Simple Network Management Protocol (SNMP) status monitoring using a Service Agent.
Requirements
Review the following requirement:
- A Service Agent already configured in your print environment.
- The Service Agent reports on printers in its folder and subfolders.
- Placing a Service Agent at the root of the tree structure reports on all printers.
- The SNMP settings on Tools
 Settings General legacy settings. New configurations should be created using the Service Agent's SNMP tab.
If you do not have a device set up as a Service Agent, refer to Service Agents for complete details.
1. Turn On the SNMP Service
- In the Admin Console, select the Service Agent's SNMP tab.
- Select the checkbox for Enable SNMP Service.
- Select Save.
- Access the physical device that you designated as the Service Agent.
- Use the system tray icon or Start menu to refresh configurations.
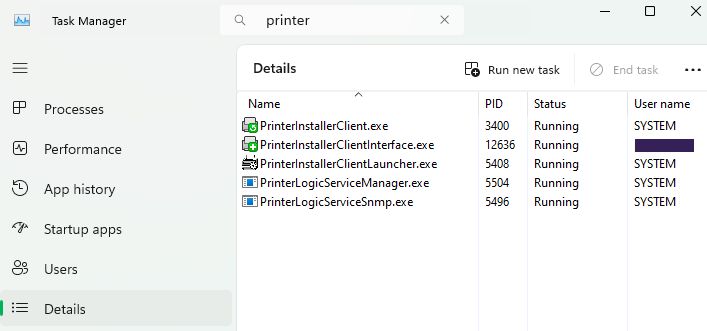
- Open the Task Manager, and select the Details tab.
- In the Search field, enter "printer" to locate the Agent processes.
- Confirm that the following services are running:
- Agent services, which include VasionClient.exe, PrinterInstallerClient.exe, PrinterInstallerClientInterface.exe, and PrinterInstallerClientLauncher.exe.
- PrinterLogicServiceManager.exe.
- PrinterLogicServiceSnmp.exe.
- Other services running on the Service Agent also appear.
2. Configure SNMP Settings
Back on the Service Agent's SNMP tab:
-
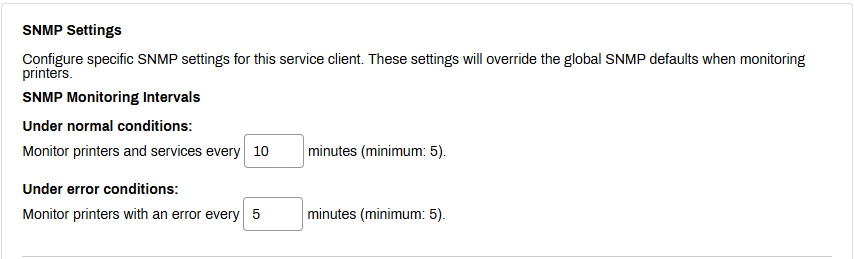
Scroll down to the SNMP Settings section, and adjust the SNMP Monitoring Intervals as needed:
- Under normal conditions: Enter the time interval, in minutes, for data queries under normal conditions.
- Under error conditions: Enter the time interval, in minutes, for data queries under error conditions.
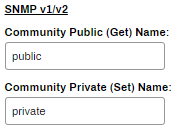
- If the printer uses SNMP v1/v2, complete the following:
- Community Public (Get) Name: Public is the default.
Community Private (Set) Name: Private is the default.
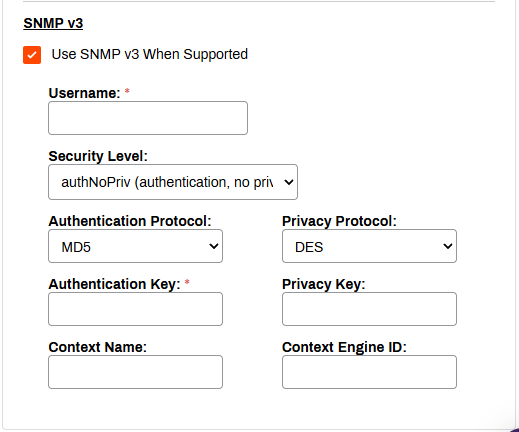
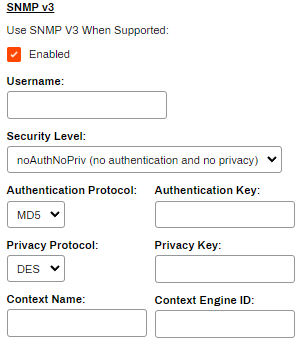
- If the printer uses SNMP v3, you can complete the following:
- Use SNMP V3 When Supported:: Select the checkbox to turn on SNMP v3.
- Username: Enter a username to turn on authentication.
- Security Level: From the dropdown menu, select one of the following:
- noAuthNoPriv: No authentication or privacy settings apply.
- authNoPriv: Authentication settings apply, but privacy settings do not.
- authPriv: Both authentication and privacy settings apply.
- Authentication Protocol Select the hashing algorithm for your authentication key: MD5 or SHA.
- Authentication Key: Enter the key for the authentication protocol, which is similar to a password.
- Context Name: Enter a context name, an octet string containing management information.
- Privacy Protocol: Select the encryption algorithm that secures communication with PrinterLogic: DES and AES.
- Privacy Key: Enter the key for the privacy protocol, which is similar to a password.
Context Engine ID: Enter the context ID that uniquely identifies the SNMP entity, typically the same as the SNMP engine ID.
- Select Save in the upper-right corner.
Printer-Specific SNMP Settings
The printer object's Status tab contains basic reporting data about the device and the option to configure printer-specific SNMP settings. In the Settings section, a printer using the default SNMP configuration has the Use Global option selected by default.
The steps below guide you through configuring printer-specific SNMP settings for devices that do not use the default settings configured above.
- In the Admin Console, select the printer object's Status tab.
-
In the Settings section, select Use Printer-Specific.

-
Select Enable SNMP Status Monitoring.
To turn off SNMP status monitoring on a printer object, deselect Enable SNMP Status Monitoring, and select Save.
- If the printer uses SNMP v1/v2, complete the following:
- Community Public (Get) Name: Public is the default.
Community Private (Set) Name: Private is the default.
- If the printer uses SNMP v3, you can complete the following:
- Enabled: Select the checkbox to turn on SNMP v3.
- Username: If you want to turn on authentication, enter the username that you want to use for authentication.
Security Level: From the dropdown menu, select one of the following:
- noAuthNoPriv: Select this option if you do not want to apply authentication or privacy settings.
- authNoPriv: Select this option if you want to apply authentication settings but not privacy settings.
- authPriv: Select this option if you want to apply authentication and privacy settings.
- Authentication Protocol From the dropdown menu, select the hashing algorithm that you want to use to store your authentication key. Options include MD5 and SHA.
- Authentication Key: Enter the key for the authentication protocol, which is similar to a password.
- Privacy Protocol: From the dropdown menu, select the encryption algorithm that you want to use to secure communication between the device and PrinterLogic. Options include DES and AES.
- Privacy Key: Enter the key for the privacy protocol, which is similar to a password.
- Context Name: Enter a context name. The context name is an octet string, which has at least one management information.
Context Engine ID: Enter the context ID to uniquely identify the SNMP entity. Most SNMP v3 entities use their SNMP engine ID as their context ID.
- Select Save in the upper-right corner.
In this topic: