CPA Manager
Last Updated: August 19, 2026
The Control Panel Application (CPA) Manager is a tool in the Admin Console that lets you install, manage, and monitor printer apps across multiple printer objects at the same time. Rather than configuring each printer individually, you use the CPA Manager to apply settings to groups of printers, view installation status across your network, and perform common actions such as installing, uninstalling, modifying, and deleting apps.
Key Points
The following are key points about the CPA Manager:
- Requires a Service Agent to communicate with printers and push app installations. The Service Agent runs several background processes that must be active for installations to succeed.
- All printers you select for simultaneous operations must be from the same manufacturer. This requirement applies when adding printers, installing apps, modifying configurations, and uninstalling apps.
-
Printers appear in the CPA Manager Printer(s) list if they are associated with the Service Agent, either through the CPA Manager itself or through the Apps tab on the printer object.
A printer appearing in the list does not mean it is configured correctly or ready for installation.
- The CPA Manager supports the following authentication types: username and password, PIN, badge scan, and single sign-on (SSO). If you use an identity provider (IdP), the CPA supports only badge and PIN authentication.
How It Works
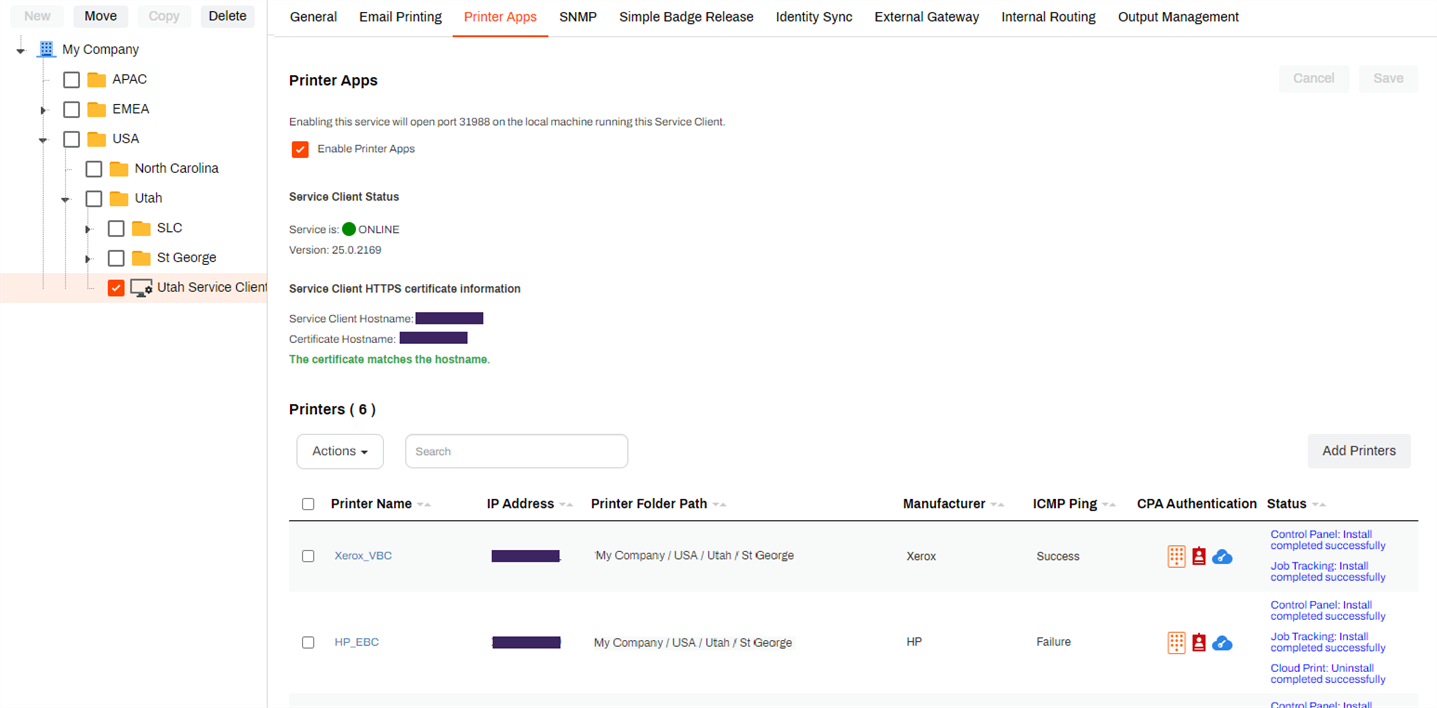
You access the CPA Manager from the Printer Apps tab on the Service Agent in the Admin Console. From there, you can add printers to the list, view status information for each printer, and use the Actions menu to manage apps.
The top of the Printer Apps tab shows the service toggle, the Service Agent status and version, and the HTTPS certificate information. The bottom of the tab shows the Printer(s) list, which displays the name, IP address, folder path, manufacturer, Internet Control Message Protocol (ICMP) ping status, authentication type, and current status for each printer.
Actions become available after you add one or more printers in the list. Available actions depend on the printer configuration and whether the selected printers share the same manufacturer.
Turn On the Printer Apps Service
Follow these steps:
- Go to the Service Agent's Printer Apps tab.
-
Select Enable Printer Apps.

- Select Save.
- Access the device designated as the Service Agent.
- Use the system tray icon or Start menu to refresh configurations.
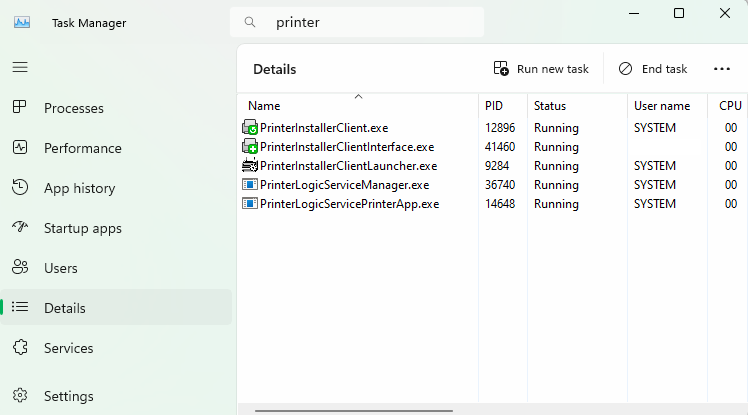
- Open the Task Manager, and select the Details tab.
- In the Search field, enter "printer" to locate the Agent processes.
- Confirm that the following services are running:
- Agent services, which include VasionClient.exe, PrinterInstallerClient.exe, PrinterInstallerClientInterface.exe, and PrinterInstallerClientLauncher.exe.
- PrinterLogicServiceManager.exe.
- PrinterLogicServicePrinterApp.exe.
- Other services running on the Service Agent also appear.
Service Log Level
The Service Log Level setting on the controls which information the printer apps logs record. For more details refer to Service Log Level.
Printers List
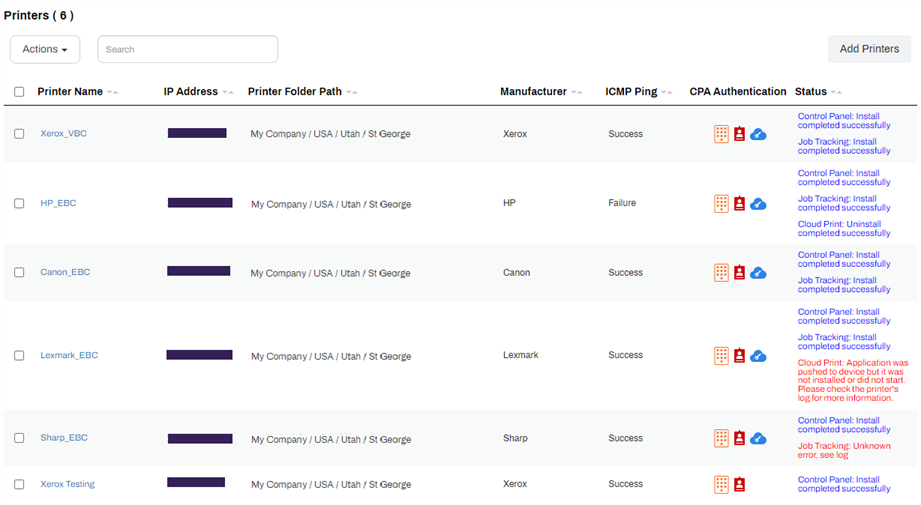
The bottom part of the Printer Apps tab shows the list of printers that have apps installed and are managed by the Service Agent. You can select any column heading to sort in ascending or descending order. The number of printers added to the CPA Manager appears above the Actions dropdown menu.
There are several columns:
- Printer Name: The name of the printer object as defined in the tree structure. Select the name to open the printer object.
- IP Address: The printer object's IP address.
- Printer Folder Path: Shows the folder path to the printer object.
- Manufacturer: The printer object's device manufacturer.
- ICMP Ping The printer object's current Internet Control Message Protocol (ICMP) Abbreviation for "Internet Control Message Protocol." A network protocol used for diagnostics and network management. ICMP pings are echo requests and echo replies. status, which indicates connectivity between devices. The ping intervals match those set for your Simple Network Management Protocol (SNMP) status monitoring.
- CPA Authentication: Lists icons that depict the authentication types configured for the object. Hover over the icons to view descriptions:
 : username and password authentication.
 : PIN authentication.
 : badge scan authentication.
 : Single Sign-On (SSO) authentication.
- Status: Lists messages about the printer object's current status and, in some cases, past status. These messages can help you determine which errors are blocking installation, the current progress of an installation, and whether you previously had the app installed.
Requirements
The following are required to use the CPA Manager:
- Default printer admin credentials must be correct. Incorrect credentials cause installation failures.
- Each printer must have, at a minimum, a self-signed certificate. If an Amazon Root CA 1 certificate is not installed, you must obtain and install it manually before proceeding.
- The Service Agent machine and the printer must be in the same time zone. A time zone difference can cause certificate authorization failures during installation.
- The printer IP address assigned in the Admin Console must be accurate, and the printer must be reachable by ping from the Service Agent machine.
Next Steps
Troubleshooting Help
Is an Identity Provider Configured?
The CPA requires the use of an IdP. This can be LDAP or another IdP such as Entra ID (Azure AD), Okta, etc.
Check the Default Printer Admin Credentials
Are the default printer admin credentials correct?CPA installations can fail if the admin username and password are incorrect. You can resolve this issue by modifying the credentials used for CPA installation. With the Modify option in the CPA Manager, update the credentials for multiple printers as long as they are the same brand. Often, the default admin name and password are the same multiple manufacturers.
Is There a Self-signed Certificate?
At a minimum, the printer requires a self-signed certificate. If an Amazon Root CA 1 certificate is not installed, refer to Amazon Root CA 1 Cert for the steps to obtain the certificate so you can manually install it on the printer.
Is There a Time Difference Between the Service Agent and the Printer?
If a certificate did not authorize, it could be because a printer is in a different time zone than the Service Agent hosting the Printer Apps. When the Service Agent pushes out the CPA application with the certificate, due to the time difference, the certificate may be expired.
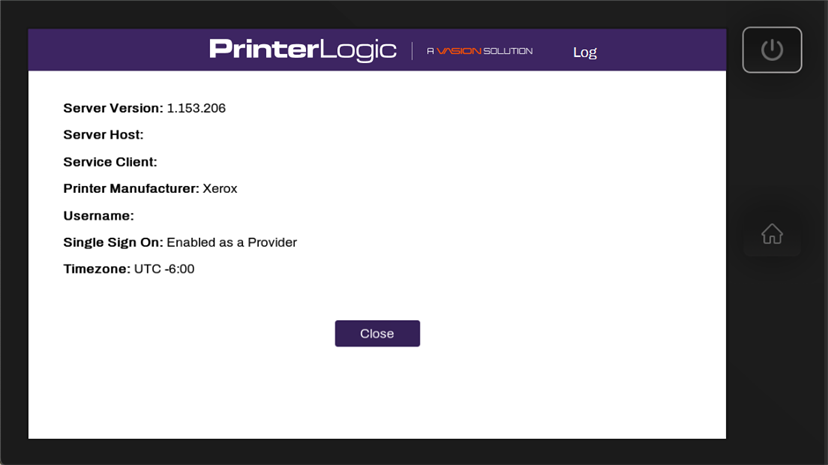
You can reach the info page to check the timezone in two ways:
- Log in to the CPA, then tap on the PrinterLogic logo at the top.
- Install the CPA with Extended Debug mode enabled, then tap on the PrinterLogic logo at the top (without the need to log in first).
Check the Network Settings
- Verify that the IP address assigned to the printer is accurate within the Admin Console.
- Ensure that you can successfully ping the printer from the Service Agent machine.
Are You Using a Universal Print Driver?
Sometimes printer-specific drivers can cause installation issues for the CPA. Use a universal print driver to ensure a smooth and successful installation.
This is a generic communication error. A few things to check are:
- The Service Agent is not listening over port 31988. Update the configuration to allow listening over port 31988.
- The printer does not trust the PrinterLogic certificate. Register or upload a new certificate.
Fuji Xerox Specific
In the printer settings, configure the Domain Name within the DNS Configuration settings to see if it resolves.
The CPA requires a Service Agent to install apps to the printer. Check that the Service Agent machine is not shut down or in an error state.
On the machine, open the Task Manager and select the Details tab. In the Search field, type "printer" to locate the Agent processes.
If neither the PrinterLogicServiceManager.exe nor PrinterLogicServicePrinterApp.exe process is running on the Service Agent device, verify the Agent installation and / or Service Agent installation.
Verify the Client Installation
Verify the Agent is installed, authorized, and pointing to the correct instance. A quick test is to click the system tray icon to open the Self-service Portal. If it opens to the correct URL, and you can sign in and view / install printers from the portal, then the Agent is authorized.
If you are prompted for an authorization code in the Self-service Portal, refer to Device Authorization for steps on how to create one.
If the Self-service Portal opens to an incorrect URL, you need to set the home URL. Refer to Update the Home URL.
Verify the Service Agent Configuration
Navigate to C:\Program Files (x86)\Printer Properties Pro\Printer Installer Client\ServiceHost, and check the following:
If the Service Host folder is not created, check the machine's hostname or IP address and compare with what you entered for the Service Agent in the Admin Console.
If the folder is created, check the config folder in it. A token.json file is saved here when the Service Agent is authorized.
If the folder is created, but the token.json file is not there, you need to reauthorize the Service Agent, refer to Reauthorization Steps. Please note that the Service Agent authorization is different from the Agent authorization.
You can find the log file on the Service Agent machine at the following path:
Windows:
C:\Program Files (x86)\Printer Properties Pro\Printer Installer Client\ServiceClientLogs\PrinterLogicServicePrinterApp.log
Mac/Linux:
/opt/printerinstallerclient/log/printerlogicserviceprinterapp.log
If the installation fails with an InvalidSolutionsKeyError, update the printer's region in the firmware settings.
In this topic:
The CPA can show text in the following languages. For more details refer to PrinterLogic Supported Languages.
- Dutch: 0413.
- English: 0409.
- French: 040C.
- German: 0407.
- Italian: 0410.
- Japanese: 0411.
- Polish: 0415.
- Portuguese: 0416.
- Simplified Chinese: 0404.
- Spanish: 040A.
- Swedish: 0409.
- Thai: 041E.
- Turkish: 041F.
To display a printer in the CPA Manager list, it only needs to be associated with a Service Agent. A Service Agent can also be assigned to a printer through the printer’s Apps tab. If it is assigned in the printer's Apps tab, it also displays in the CPA Manager.
However, keep in mind that just because a printer is displayed in the CPA Manager does not necessarily mean it is configured correctly. If the configuration on the printer’s Apps tab is incorrect, such as an incorrect username and password, the installation will fail whether it is initiated from the printer’s Apps tab or the CPA Manager.