Admin Console Users
Last Updated: September 08, 2026
The Users section is only for user accounts that need access to the Admin Console.
This section covers the basic ways you can add Admin Console user types:
- PrinterLogic (local) users.
- Identity Provider (IdP) A system that creates, maintains, and manages identity information for an organization. An IdP provides authentication services to apps in a federation or distributed network. users.
Users
The Root Account is the first account created in the instance and can be updated or disabled. There are two types of administrator accounts that you can add users to: Administrator and Non-Administrator. After you create accounts, you can also update the passwords for the Root Account and local user accounts and assign and modify role assignments. IdP user information only changes if it is updated in the IdP, but you still assign roles to these users in the Users section.
Users Section
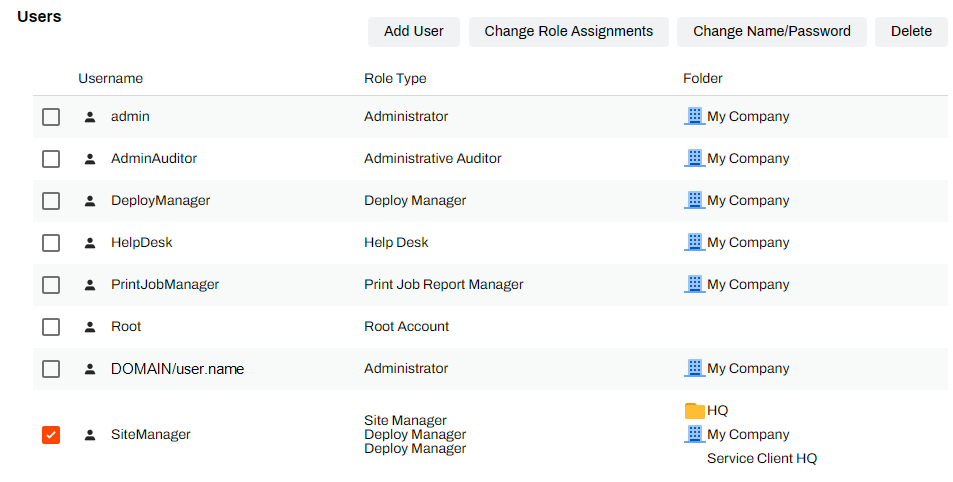
The Users section shows the following information:
- Username: For local accounts, this column shows the username you entered. For identity provider accounts, this column shows the source (IdP) username.
- Role Type: This column shows the role that is assigned to the user. For details about user roles and permissions, refer to Role-Based Access Control (RBAC).
-
Folder: This column shows the folders or printer objects that are assigned to the user.
Non-Administrator users can have different role assignments for different objects in the tree structure. For example, a user can be a Site Manager for one folder and a Deploy Manager for a different folder.
Roles Section
The Roles section shows the name and description of each role. For more details refer to Role-Based Access Control (RBAC).
Add a New User
If you migrated to the Vasion Automate Fed Unified Login, you have slightly different options after selecting Add. These options are LDAP Group / User (LDAP users) and User or Group (IdP users).
Follow the IdP instructions to add a user that already exists in Vasion Automate Fed, but who does not have the permission to access PrinterLogic.
- In the Admin Console, navigate to Tools
 Users.
 - In the Users section, select Add.
- Select User or Group.
- In the Add IdP Users modal, do the following:
- Enter the Users to search for: Enter the name of the user or group that you want to add.
Select Search.
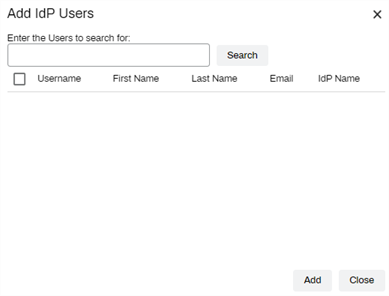
Select the user or group from the results, and select Add.
- In the Configure User's Role Assignments modal, do the following:
- Role Assignment Type: Select the role type that you want to assign to the user.
- If you select Non-Administrator, do the following:
- Select Add to assign folders, printers, IP address ranges, and Service Agent objects.
Use the Role dropdown menu to designate the role assignment for the selected folder or printer object.
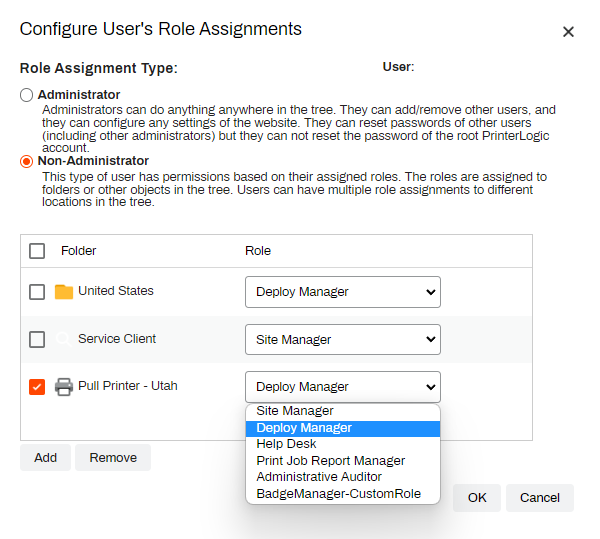
- Select OK.
All the users listed here can access the Admin Console.
User Search
The Users page includes a Search bar in the upper-left which shows the total amount of admin and non-admin accounts with access to the PrinterLogic Admin Console, and simplifies finding them in large environments.
- Enter the users name.
-
Select Search or Enter on your keyboard.

The users list filters based on the value in the Search bar. Delete the value or select the X in the Search bar to clear the value and return to the full users list.
Change User Roles
- In the Users section of the Admin Console, select the checkbox next to the desired user or group.
- Select Change Role Assignments.
- In the Configure User's Role Assignments modal, do the following:
- To make the user an Admin Console admin, select Administrator.
- For Non-Administrator roles, do the following:
- Select Add to assign folders, printers, IP address range, and Service Agent objects.
- After you add the object, use the dropdown menu next to the folder to designate the role assignment.
- To change a role assignment, use the dropdown menu to change the role for the folder, printer, IP address range, or Service Agent object.
- To remove a role for a specific object, select the object and select Remove.
- Select OK.
(Optional) Assign Vasion Automate Fed Roles
These roles apply to users within the Print tab of the Vasion Platform. To apply Vasion Automate Fed roles, refer to Manage Users.
In this topic: