Independent Service Manager (ISM)
Last Updated: August 27, 2026
The Service Agent and the ISM are devices, servers, or virtual machines that are always running in your environment, and you promoted them to provide additional service functions in the PrinterLogic app, such as the Control Panel Application (CPA) An app installed on a compatible multifunction device (MFD) that aids in the release of held print jobs, supports authentication for secure printing, and provides simple scanning functionality., Simple Network Management Protocol (SNMP), and Offline Printing.
The ISM has the same functionality as the Service Agent but with a few differences:
- The ISM does not require installing the Vasion Agent on the device.
- Updates for running services download before the services shut down, which improves the update process.
- You must manually update the VasionPrintServiceManager service. For more details refer to Update the ISM.
- Other services on the ISM Service Agent object can update automatically. For more details refer to Automatic Updates.
Requirements
- Review the Service Agent types, Device Requirements, and update options before setting up your Service Agents.
- The ISM is intended for PrinterLogic Output customers with specific deployment requirements. For all other use cases, use the Service Agent Setup. If you are uncertain whether the ISM applies to your environment, contact your Vasion representative.
- Each printer manufacturer might have different requirements specific to their models. Review general requirements for CPA 2.0 and the manufacturer specific requirements on the related pages in that section.
- The CPA installation process is the same except for the Service Agent assignments outlined below.
Download the ISM
Follow these steps to download the ISM:
- Select a device that meets the minimum requirements listed above to set up as the ISM.
- In the device's directory, create a folder in a location in which you have admin rights.
- In the Admin Console, go to Tools
 Settings Client, and scroll down to the Independent Service Manager section.
 -
Select the download button for the OS on the ISM device.

- Place the file in the folder you created.
- Extract the files.
Install the ISM
The scripts folder in the ISM file structure is the location you navigate to when running the commands below. Running the command file with --help offers additional information about the command. Here is an example: install.exe --help.
- Open your preferred terminal window (Command Prompt, Powershell, Terminal, etc.) as an admin.
- Change the directory to the scripts folder in the ISM folder.
-
Run the following command:
Copy Codeinstall -u <HOME_URL_HERE> -c <AUTH_CODE_HERE>Replace
<HOME_URL_HERE>with your instance's URL, and replace<AUTH_CODE_HERE>with your authorization code. -
If the service does not start automatically after installation, run the following command:
Copy Codestart - Confirm that the Enable Automatic Updates service is running.
Create a Service Agent Object
Create a New Service Agent
- Log in to the Admin Console.
- Select the folder in which you want to place the Service Agent.
-
Select the New button at the top of the tree structure.
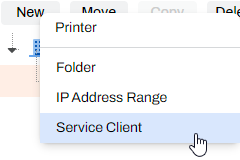
-
Alternatively, you can right-click the folder and select New
 Service Agent.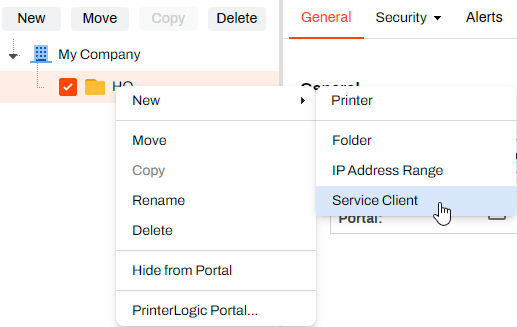
-
- In the Name field, give the Service Agent object an identifiable name.
- In the IP Address or Hostname field, enter the IP address or Fully Qualified Domain Name (FQDN) The complete domain name for a specific device or host on a network, consisting of the hostname, the domain name, and the top-level domain. of the Service Agent object host device.
-
Select Add Service Client.
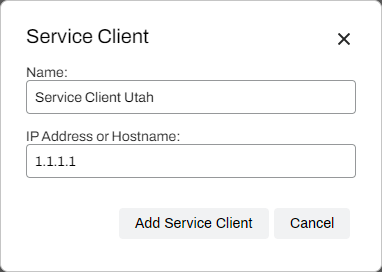
If you use HTTPS, use the FQDN to reduce potential communication issues. This action is especially important for CPA manufacturers, such as Ricoh, Toshiba, and Kyocera.
In the Admin Console, turn on the services that you want to run on the ISM.
Update the ISM
Follow these steps to manually update the ISM service (VasionPrintServiceManager). Feature service updates happen using the automatic update option. For more details refer to Automatic Updates.
- On the ISM device, access the PrinterLogic Admin Console.
- In the Admin Console, go to Tools Settings Client, and scroll down to the Independent Service Manager section.
-
Select the download button for the OS on the ISM device.
- Move the file from its download location to the folder you created for the ISM.
- Extract the files, and select the Replace option when prompted.
- Open your preferred terminal window (Command Prompt, Powershell, Terminal, etc.) as an admin.
- Change the directory to the scripts folder in the ISM folder.
-
Run the following command related to your OS:
Copy Codeupdate -u <HOME_URL_HERE> -c <AUTH_CODE_HERE> -
Replace
<HOME_URL_HERE>with your instance's URL, and replace<AUTH_CODE_HERE>with your authorization code. - Confirm that the VasionPrintServiceManager service is running.
Uninstall the ISM
The following steps guide you through uninstalling the ISM from a device:
- Open your preferred terminal window (Command Prompt, Powershell, Terminal, etc.) as an admin.
- Change the directory to the scripts folder in the ISM file.
-
Run the following command related to your OS:
Copy Codeuninstall - Delete the folder and contents as needed.
In this topic: