Pull Print
Last Updated: August 27, 2026
Pull Print is a one-to-many option for secure print. When the user sends a job to a pull printer, it remains in a virtual queue on the device until the user authenticates and releases the job to a pull print-enabled printer.
Options for releasing print jobs include the following:
- The Control Panel Application (CPA).
- The PrinterLogic mobile app.
- The Release Portal.
- Release stations.
- Simple Badge Release.
Key Points
Review the following key points:
-
The number of printers with Pull Print turned on must be equal to or less than the number of Pull Print licenses purchased. Keep this requirement in mind when turning on Pull Print by default for all printers.
An error appears during the next Admin Console sign-on if you turn on this option but have more printers than Pull Print licenses.
- You can view license details by selecting your username in the upper-right corner of the Admin Console and selecting My Account.
- You can manage Pull Print for individual printers on the printer object's Printing tab in the Pull Printing section.
- Note that due to caching, adjusting the following Pull Print settings might prevent new pull print jobs from appearing on the CPA for up to 8 hours:
- Allow Pull Print jobs to be released to all printers by default.
- Allow Pull Print jobs to be released to this printer.
Process Overview
You perform these high-level procedures:
- Turn On Queue Management.
- Turn On Pull Print.
- Create a Pull Printer.
1. Turn On Queue Management
This setting makes the Queue tab appear on printer objects. You use the Queue tab to view the printer queues on end user devices, and it makes pull print jobs and direct secure release jobs visible to the local spooler for release.
Follow these steps:
- In the Admin Console, go to Tools
 Settings Printing.
 -
In the Print Jobs section, select Enable queue management.

- Select Save.
2. Turn On Pull Print
There are two configuration options: Default and printer specific. If you select the Allow Pull Print jobs to be released to all printers by default option in the Pull Printing section, you can release jobs sent to the pull printer to any printer objects in your environment. If you leave this option deselected, you must turn on Pull Print for each printer object that you want to receive pull print jobs.
Turn On as Default
Follow these steps:
- In the Admin Console, go to Tools Settings Printing.
-
In the Pull Printing section, select Enable Workstation Pull Printing / Secure Printing.
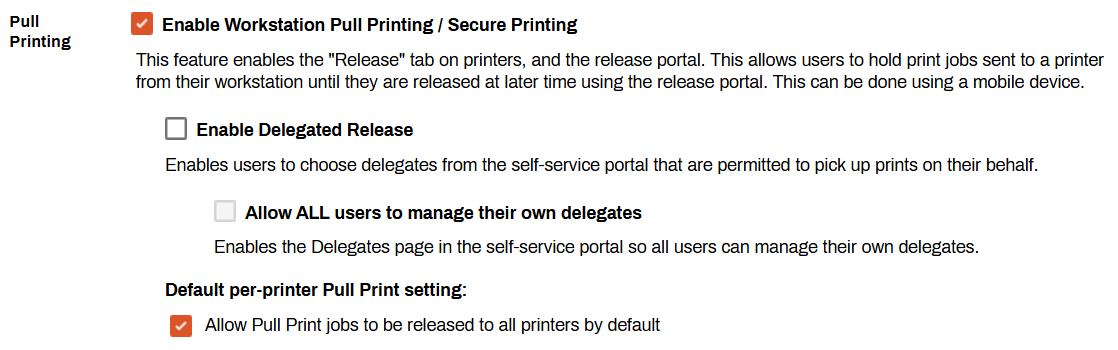
- Select the checkbox for Allow Pull Print jobs to be released to all printers by default.
- Select Save.
All printer objects can release pull print jobs by default.
Turn On for Specific Printers
Follow these steps:
- In the Admin Console, go to Tools Settings Printing.
-
In the Pull Printing section, select Enable Workstation Pull Printing / Secure Printing.
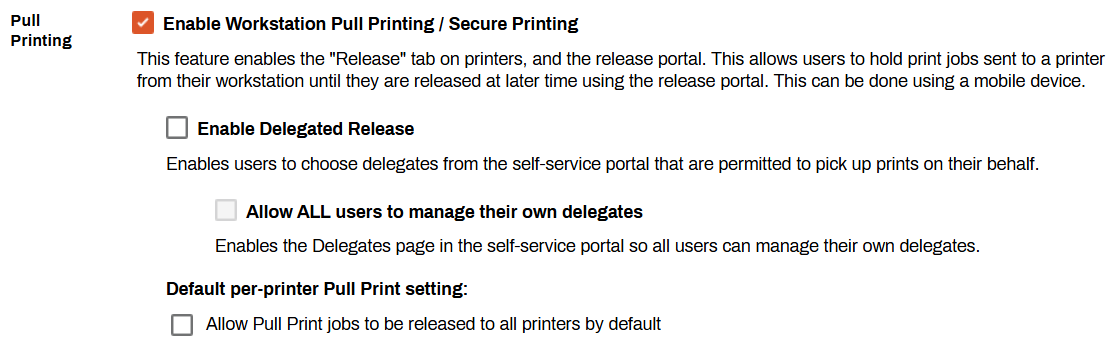
- Select Save.
For the printer-specific configuration, you must complete the following steps on each printer object to turn on Pull Print:
- Select the printer object in the tree structure.
- Select the Printing tab.
-
In the Pull Printing section, select Use printer-specific Pull Print setting.
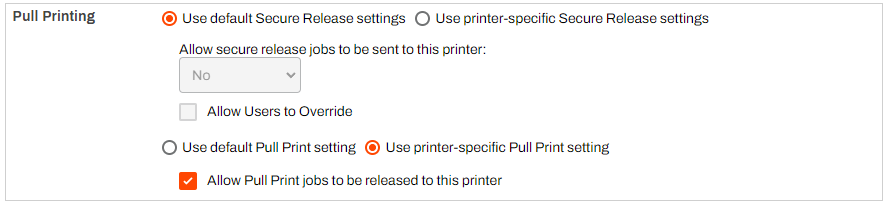
- Select Allow Pull Print jobs to be released to this printer.
- Select Save.
- Repeat these steps for any additional printer objects.
Printers with this setting turned on can release pull print jobs.
3. Create a Pull Printer
Follow these steps:
- Select the folder in the tree structure.
-
Select New
Printer.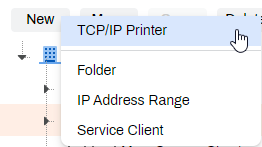
Alternatively you may right-click on the desired folder and select New
Printer from the context menu. - In the Add Printer modal, name the pull printer.
- (Optional) Complete the Location and Comment fields.
-
Select the checkbox for Make Pull Printer.
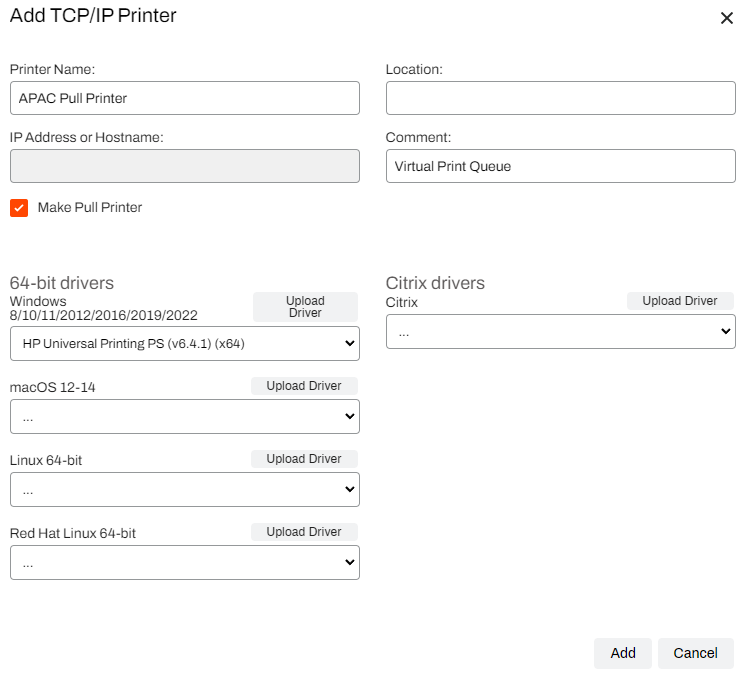
- Upload a new driver or assign an existing driver to the pull printer.
- Select Add.
The Pull Print object appears in the folder.
Print jobs sent to the pull printer are ready for release to any printer with the Allow Pull Print jobs to be released to this printer option turned on by default or for specific printers.
Type 4 drivers do not work with TCP / IP printer objects with PrinterLogic because they turn off port monitoring, which the app needs. If a TCP / IP printer uses a Type 4 driver, it might cause printing issues. However, USB and software printers, such as Adobe and Microsoft XPS, can still use Type 4 drivers without problems.
Next Steps
In this topic:
PrinterLogic Output provides robust security features that protect sensitive documents during transmission and storage, ensuring that only authorized users can access critical information. It includes:
- Detailed Audit Trails: Track document access and delivery for compliance and security audits.
- Zero Trust Remote Printing: Enable secure print jobs from remote facilities without costly VPNs.
- Information Security: Document and print jobs are stored locally and encrypted when at rest on our services.
Vasion’s Secure Release Print capabilities ensure that print jobs are accessible to only authorized users. Users must authenticate at the printer before releasing their documents, whether by badge swipe, entering credentials at the CPA, or scanning a QR code, preventing sensitive documents from falling into the wrong hands.
Additionally, Vasion’s SaaS platform is ISO27001:2022 and SOC 2 Type 2-certified to mitigate risks to customer data and help manufacturing organizations better meet their business, legal, and regulatory requirements.